 网硕互联帮助中心
PyQt+QML 实现飞控仪表盘:姿态、高度、速度,飞行数据等 实时显示(二)
- 一、说明
- 二、效果展示
- 三、源码分享
-
- 1、工程结构
- 2、库安装
- 3、main.py
- 4、main.qml
- 5、Hsi.qml
- 6、Nav.qml
- 7、Tc.qml
- 8、图片资源下载
- 四、实现原理
-
- 1、Python 侧:轻量启动与数据入口
- 2、QML 侧:属性系统驱动仪表
- 3、数据模拟:Timer 生成正弦波形
- 4、仪表绘制:层叠图片 + 旋转变换
- 5、自适应缩放:保持仪表比例
- 6、小结
一、说明
由于篇幅限制此篇只显示3个仪表,剩余见下一篇
二、效果展示
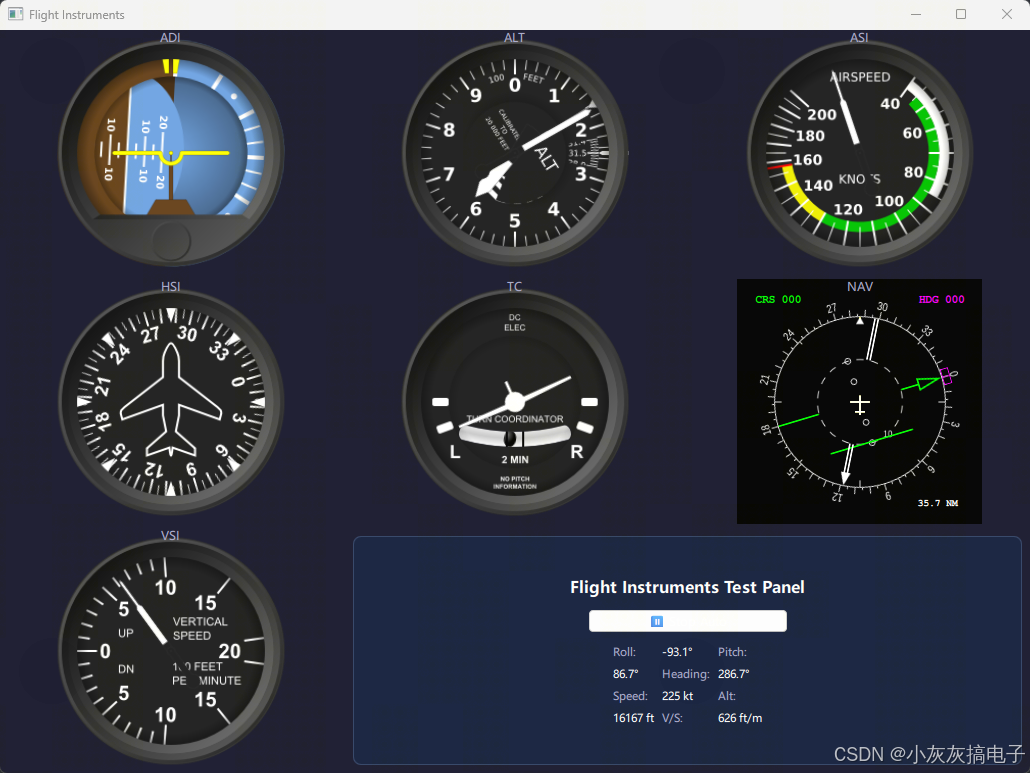
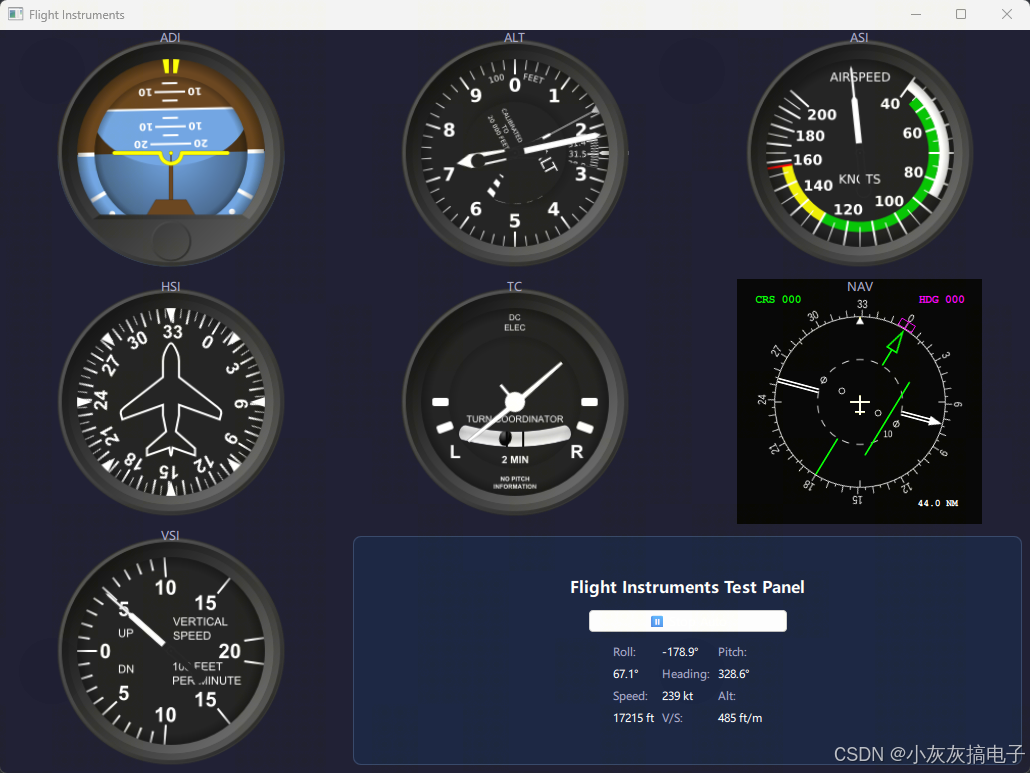
三、源码分享
1、工程结构
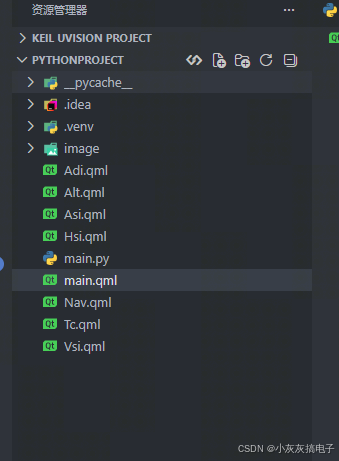
2、库安装
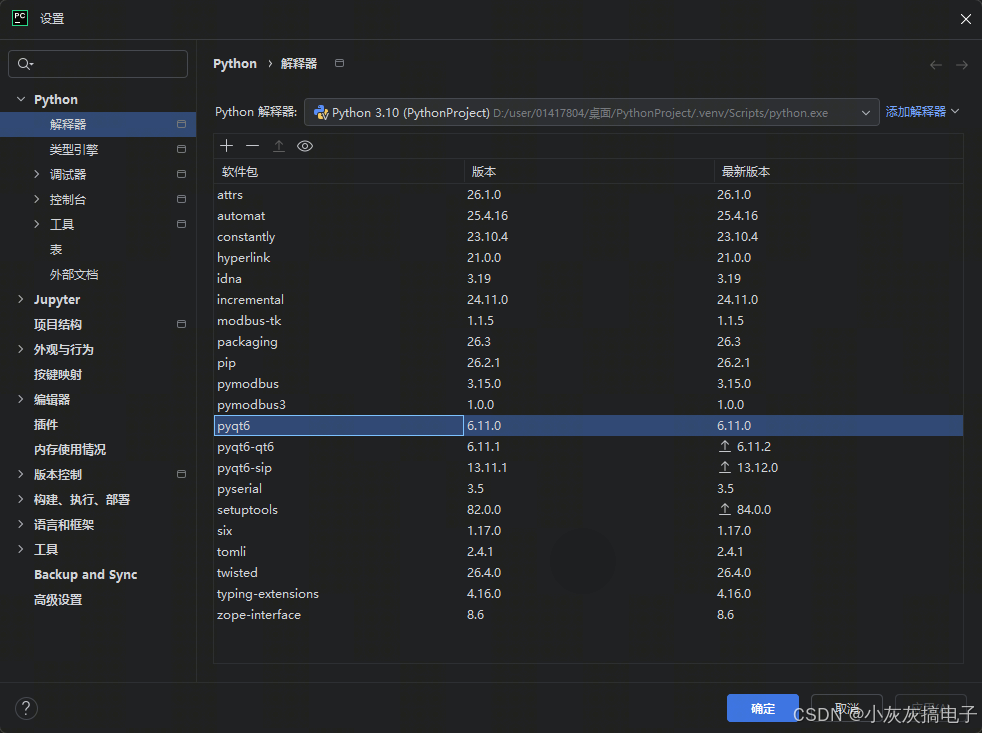
3、main.py
import sys
import os
from PyQt6.QtCore import QUrl
from PyQt6.QtGui import QGuiApplication
from PyQt6.QtQml import QQmlApplicationEngine
def main():
app = QGuiApplication(sys.argv)
engine = QQmlApplicationEngine()
qml_path = os.path.join(os.path.dirname(os.path.abspath(__file__)), "main.qml")
engine.load(QUrl.fromLocalFile(qml_path))
if not engine.rootObjects():
print("错误:无法加载 QML 文件", file=sys.stderr)
sys.exit(–1)
sys.exit(app.exec())
if __name__ == "__main__":
main()
4、main.qml
import QtQuick
import QtQuick.Window
import QtQuick.Controls
import QtQuick.Layouts
ApplicationWindow {
id: root
visible: true
width: 1200
height: 900
title: "Flight Instruments"
color: "#1a1a2e"
// Flight parameters (driven by test timer or manual control)
property real alpha: 0
property real beta: 0
property real roll: 0
property real pitch: 0
property real heading: 0
property real slipSkid: 0
property real turnRate: 0
property real devH: 0
property real devV: 0
property real airspeed: 0
property real altitude: 0
property real pressure: 30.0
property real climbRate: 0
property real machNo: 0
property real adf: 0
property real dme: 0
// Simulation state
property bool autoMode: true
property real realTime: 0
// 3×3 Grid layout
GridLayout {
anchors.fill: parent
columns: 3
rows: 3
rowSpacing: 4
columnSpacing: 4
// Row 1: ADI, ALT, ASI
Item {
Layout.fillWidth: true
Layout.fillHeight: true
Label {
anchors.top: parent.top
anchors.horizontalCenter: parent.horizontalCenter
text: "ADI"
color: "#aaaacc"
font.pixelSize: 12
z: 10
}
Adi {
anchors.fill: parent
roll: root.roll
pitch: root.pitch
}
}
Item {
Layout.fillWidth: true
Layout.fillHeight: true
Label {
anchors.top: parent.top
anchors.horizontalCenter: parent.horizontalCenter
text: "ALT"
color: "#aaaacc"
font.pixelSize: 12
z: 10
}
Alt {
anchors.fill: parent
altitude: root.altitude
pressure: root.pressure
}
}
Item {
Layout.fillWidth: true
Layout.fillHeight: true
Label {
anchors.top: parent.top
anchors.horizontalCenter: parent.horizontalCenter
text: "ASI"
color: "#aaaacc"
font.pixelSize: 12
z: 10
}
Asi {
anchors.fill: parent
airspeed: root.airspeed
}
}
// Row 2: HSI, TC, NAV
Item {
Layout.fillWidth: true
Layout.fillHeight: true
Label {
anchors.top: parent.top
anchors.horizontalCenter: parent.horizontalCenter
text: "HSI"
color: "#aaaacc"
font.pixelSize: 12
z: 10
}
Hsi {
anchors.fill: parent
heading: root.heading
}
}
Item {
Layout.fillWidth: true
Layout.fillHeight: true
Label {
anchors.top: parent.top
anchors.horizontalCenter: parent.horizontalCenter
text: "TC"
color: "#aaaacc"
font.pixelSize: 12
z: 10
}
Tc {
anchors.fill: parent
turnRate: root.turnRate
slipSkid: root.slipSkid * 15.0
}
}
Item {
Layout.fillWidth: true
Layout.fillHeight: true
Label {
anchors.top: parent.top
anchors.horizontalCenter: parent.horizontalCenter
text: "NAV"
color: "#aaaacc"
font.pixelSize: 12
z: 10
}
Nav {
anchors.fill: parent
heading: root.heading
headingBug: 0
course: 0
bearing: root.adf
bearingVisible: true
deviation: root.devH
deviationVisible: true
distance: root.dme
distanceVisible: true
}
}
// Row 3: VSI, Controls
Item {
Layout.fillWidth: true
Layout.fillHeight: true
Label {
anchors.top: parent.top
anchors.horizontalCenter: parent.horizontalCenter
text: "VSI"
color: "#aaaacc"
font.pixelSize: 12
z: 10
}
Vsi {
anchors.fill: parent
climbRate: root.climbRate
}
}
// Control Panel – spans 2 columns
Item {
Layout.columnSpan: 2
Layout.fillWidth: true
Layout.fillHeight: true
Rectangle {
anchors.fill: parent
anchors.margins: 8
color: "#16213e"
radius: 8
border.color: "#334466"
border.width: 1
Column {
anchors.centerIn: parent
spacing: 12
width: parent.width * 0.8
Label {
text: "Flight Instruments Test Panel"
color: "#ffffff"
font.pixelSize: 16
font.bold: true
anchors.horizontalCenter: parent.horizontalCenter
}
Button {
text: root.autoMode ? "⏸ Stop Auto" : "▶ Start Auto"
anchors.horizontalCenter: parent.horizontalCenter
width: 200
palette.button: root.autoMode ? "#e94560" : "#0f3460"
palette.buttonText: "#ffffff"
onClicked: root.autoMode = !root.autoMode
}
Grid {
columns: 3
spacing: 8
anchors.horizontalCenter: parent.horizontalCenter
Label { text: "Roll:"; color: "#aaaacc"; font.pixelSize: 11 }
Label { text: roll.toFixed(1) + "°"; color: "#ffffff"; font.pixelSize: 11 }
Label { text: ""; color: "#aaaacc"; font.pixelSize: 11 }
Label { text: "Pitch:"; color: "#aaaacc"; font.pixelSize: 11 }
Label { text: pitch.toFixed(1) + "°"; color: "#ffffff"; font.pixelSize: 11 }
Label { text: ""; color: "#aaaacc"; font.pixelSize: 11 }
Label { text: "Heading:"; color: "#aaaacc"; font.pixelSize: 11 }
Label { text: heading.toFixed(1) + "°"; color: "#ffffff"; font.pixelSize: 11 }
Label { text: ""; color: "#aaaacc"; font.pixelSize: 11 }
Label { text: "Speed:"; color: "#aaaacc"; font.pixelSize: 11 }
Label { text: airspeed.toFixed(0) + " kt"; color: "#ffffff"; font.pixelSize: 11 }
Label { text: "Alt:"; color: "#aaaacc"; font.pixelSize: 11 }
Label { text: altitude.toFixed(0) + " ft"; color: "#ffffff"; font.pixelSize: 11 }
Label { text: "V/S:"; color: "#aaaacc"; font.pixelSize: 11 }
Label { text: climbRate.toFixed(0) + " ft/m"; color: "#ffffff"; font.pixelSize: 11 }
}
}
}
}
}
// Test Timer – generates sinusoidal flight data (ported from MainWindow.cpp)
Timer {
id: testTimer
interval: 50
repeat: true
running: true
triggeredOnStart: false
onTriggered: {
if (!root.autoMode) return
const dt = interval / 1000.0
root.realTime += dt
const t = root.realTime
root.alpha = 20.0 * Math.sin(t / 10.0)
root.beta = 15.0 * Math.sin(t / 10.0)
root.roll = 180.0 * Math.sin(t / 10.0)
root.pitch = 90.0 * Math.sin(t / 20.0)
root.heading = 360.0 * Math.sin(t / 40.0)
root.slipSkid = 1.0 * Math.sin(t / 10.0)
root.turnRate = 7.0 * Math.sin(t / 10.0)
root.devH = 1.0 * Math.sin(t / 20.0)
root.devV = 1.0 * Math.sin(t / 20.0)
root.airspeed = 125.0 * Math.sin(t / 40.0) + 125.0
root.altitude = 9000.0 * Math.sin(t / 40.0) + 9000.0
root.pressure = 2.0 * Math.sin(t / 20.0) + 30.0
root.climbRate = 650.0 * Math.sin(t / 20.0)
root.machNo = root.airspeed / 650.0
root.adf = –360.0 * Math.sin(t / 50.0)
root.dme = 99.0 * Math.sin(t / 100.0)
}
}
}
5、Hsi.qml
import QtQuick
Item {
id: root
// Horizontal Situation Indicator
// Original size: 240×240
property real heading: 0 // degrees, 0–360
readonly property real origW: 240
readonly property real origH: 240
property real s: Math.min(width / origW, height / origH)
Item {
width: root.origW
height: root.origH
scale: root.s
anchors.centerIn: parent
// Face (z: –20) – rotates by –heading
Image {
width: 240
height: 240
source: "image/hsi/hsi_face.svg"
fillMode: Image.PreserveAspectFit
transformOrigin: Item.Center
rotation: –root.heading
}
// Case (z: 10)
Image {
width: 240
height: 240
source: "image/hsi/hsi_case.svg"
fillMode: Image.PreserveAspectFit
}
}
}
6、Nav.qml
import QtQuick
Item {
id: root
// Navigation Display
// Original size: 300×300
property real heading: 0 // degrees, 0–360
property real headingBug: 0 // degrees, 0–360
property real course: 0 // degrees, 0–360
property real bearing: 0 // degrees, 0–360
property bool bearingVisible: true
property real deviation: 0 // range: –1 to 1
property bool deviationVisible: true
property real distance: 0 // NM
property bool distanceVisible: true
readonly property real origW: 300
readonly property real origH: 300
readonly property real pixPerDev: 52.5
property real s: Math.min(width / origW, height / origH)
// Normalize heading values
property real normHeading: {
var h = heading
while (h < 0) h += 360
while (h > 360) h -= 360
return h
}
property real normHeadingBug: {
var h = headingBug
while (h < 0) h += 360
while (h > 360) h -= 360
return h
}
property real normCourse: {
var c = course
while (c < 0) c += 360
while (c > 360) c -= 360
return c
}
property real normBearing: {
var b = bearing
while (b < 0) b += 360
while (b > 360) b -= 360
return b
}
property real clampedDeviation: Math.max(–1.0, Math.min(1.0, deviation))
// Deviation bar angle and translation
property real devAngleDeg: –normHeading + normCourse
property real devAngleRad: devAngleDeg * Math.PI / 180.0
property real devDelta: pixPerDev * clampedDeviation
property real devBarDeltaX: deviationVisible ? devDelta * Math.cos(devAngleRad) : 0
property real devBarDeltaY: deviationVisible ? devDelta * Math.sin(devAngleRad) : 0
Item {
width: root.origW
height: root.origH
scale: root.s
anchors.centerIn: parent
// Back (z: 0)
Image {
z: 0
width: 300
height: 300
source: "image/nav/nav_back.svg"
fillMode: Image.PreserveAspectFit
}
// Deviation Scale (z: 10)
Image {
z: 10
width: 300
height: 300
source: "image/nav/nav_dev_scale.svg"
fillMode: Image.PreserveAspectFit
transformOrigin: Item.Center
rotation: root.devAngleDeg
visible: root.deviationVisible
}
// Deviation Bar (z: 50) – rotates and translates
Item {
z: 50
x: root.devBarDeltaX
y: root.devBarDeltaY
width: 300
height: 300
visible: root.deviationVisible
Image {
width: 300
height: 300
source: "image/nav/nav_dev_bar.svg"
fillMode: Image.PreserveAspectFit
transformOrigin: Item.Center
rotation: root.devAngleDeg
}
}
// Bearing Arrow (z: 60)
Image {
z: 60
width: 300
height: 300
source: "image/nav/nav_brg_arrow.svg"
fillMode: Image.PreserveAspectFit
transformOrigin: Item.Center
rotation: –root.normHeading + root.normBearing
visible: root.bearingVisible
}
// Course Arrow (z: 70)
Image {
z: 70
width: 300
height: 300
source: "image/nav/nav_crs_arrow.svg"
fillMode: Image.PreserveAspectFit
transformOrigin: Item.Center
rotation: –root.normHeading + root.normCourse
}
// Mask (z: 100)
Image {
z: 100
width: 300
height: 300
source: "image/nav/nav_mask.svg"
fillMode: Image.PreserveAspectFit
}
// Heading Scale (z: 110)
Image {
z: 110
width: 300
height: 300
source: "image/nav/nav_hdg_scale.svg"
fillMode: Image.PreserveAspectFit
transformOrigin: Item.Center
rotation: –root.normHeading
}
// Heading Bug (z: 120)
Image {
z: 120
width: 300
height: 300
source: "image/nav/nav_hdg_bug.svg"
fillMode: Image.PreserveAspectFit
transformOrigin: Item.Center
rotation: –root.normHeading + root.normHeadingBug
}
// Mark (z: 200)
Image {
z: 200
width: 300
height: 300
source: "image/nav/nav_mark.svg"
fillMode: Image.PreserveAspectFit
}
// CRS Text (z: 130) – positioned at (50, 25) in original coordinates
Text {
z: 130
x: 10
y: 12
width: 80
height: 25
text: "CRS " + root.normCourse.toFixed(0).padStart(3, '0')
color: "#00ff00"
font.family: "Courier"
font.pixelSize: 14
font.weight: Font.Bold
horizontalAlignment: Text.AlignHCenter
verticalAlignment: Text.AlignVCenter
}
// HDG Text (z: 130) – positioned at (250, 25)
Text {
z: 131
x: 210
y: 12
width: 80
height: 25
text: "HDG " + root.normHeadingBug.toFixed(0).padStart(3, '0')
color: "#ff00ff"
font.family: "Courier"
font.pixelSize: 14
font.weight: Font.Bold
horizontalAlignment: Text.AlignHCenter
verticalAlignment: Text.AlignVCenter
}
// DME Text (z: 130) – positioned at (250, 275)
Text {
z: 132
x: 200
y: 262
width: 90
height: 25
text: Math.abs(root.distance).toFixed(1) + " NM"
color: "#ffffff"
font.family: "Courier"
font.pixelSize: 12
font.weight: Font.Bold
horizontalAlignment: Text.AlignHCenter
verticalAlignment: Text.AlignVCenter
visible: root.distanceVisible
}
}
}
7、Tc.qml
import QtQuick
Item {
id: root
// Turn Coordinator
// Original size: 240×240
property real turnRate: 0 // deg/s, range: –6 to 6
property real slipSkid: 0 // deg, range: –15 to 15
readonly property real origW: 240
readonly property real origH: 240
property real s: Math.min(width / origW, height / origH)
// Clamp values
property real clampedTurnRate: Math.max(–6, Math.min(6, turnRate))
property real clampedSlipSkid: Math.max(–15, Math.min(15, slipSkid))
Item {
width: root.origW
height: root.origH
scale: root.s
anchors.centerIn: parent
// Back (z: –70)
Image {
width: 240
height: 240
source: "image/tc/tc_back.svg"
fillMode: Image.PreserveAspectFit
}
// Ball (z: –60) – rotates by –slipSkid
// Ball center in original: (120, –36) – this is above the visible area
// The ball rotates around the instrument center (120, 120) effectively
Image {
width: 240
height: 240
source: "image/tc/tc_ball.svg"
fillMode: Image.PreserveAspectFit
transformOrigin: Item.Center
rotation: –root.clampedSlipSkid
}
// Face 1 (z: –50)
Image {
width: 240
height: 240
source: "image/tc/tc_face_1.svg"
fillMode: Image.PreserveAspectFit
}
// Face 2 (z: –40)
Image {
width: 240
height: 240
source: "image/tc/tc_face_2.svg"
fillMode: Image.PreserveAspectFit
}
// Mark (z: –30) – rotates by (turnRate/3)*20
// Mark center: (120, 120)
Image {
width: 240
height: 240
source: "image/tc/tc_mark.svg"
fillMode: Image.PreserveAspectFit
transformOrigin: Item.Center
rotation: (root.clampedTurnRate / 3.0) * 20.0
}
// Case (z: 10)
Image {
width: 240
height: 240
source: "image/tc/tc_case.svg"
fillMode: Image.PreserveAspectFit
}
}
}
8、图片资源下载
https://download.csdn.net/download/qq_15181569/93089298
四、实现原理
本项目采用 PyQt6 + QML(Qt Quick) 的混合架构:Python 负责应用生命周期与数据驱动,QML 负责仪表盘的绘制与动画。整体流程如下:
#mermaid-svg-JnhWKQS6H4amNNzx{font-family:\”trebuchet ms\”,verdana,arial,sans-serif;font-size:16px;fill:#333;}@keyframes edge-animation-frame{from{stroke-dashoffset:0;}}@keyframes dash{to{stroke-dashoffset:0;}}#mermaid-svg-JnhWKQS6H4amNNzx .edge-animation-slow{stroke-dasharray:9,5!important;stroke-dashoffset:900;animation:dash 50s linear infinite;stroke-linecap:round;}#mermaid-svg-JnhWKQS6H4amNNzx .edge-animation-fast{stroke-dasharray:9,5!important;stroke-dashoffset:900;animation:dash 20s linear infinite;stroke-linecap:round;}#mermaid-svg-JnhWKQS6H4amNNzx .error-icon{fill:#552222;}#mermaid-svg-JnhWKQS6H4amNNzx .error-text{fill:#552222;stroke:#552222;}#mermaid-svg-JnhWKQS6H4amNNzx .edge-thickness-normal{stroke-width:1px;}#mermaid-svg-JnhWKQS6H4amNNzx .edge-thickness-thick{stroke-width:3.5px;}#mermaid-svg-JnhWKQS6H4amNNzx .edge-pattern-solid{stroke-dasharray:0;}#mermaid-svg-JnhWKQS6H4amNNzx .edge-thickness-invisible{stroke-width:0;fill:none;}#mermaid-svg-JnhWKQS6H4amNNzx .edge-pattern-dashed{stroke-dasharray:3;}#mermaid-svg-JnhWKQS6H4amNNzx .edge-pattern-dotted{stroke-dasharray:2;}#mermaid-svg-JnhWKQS6H4amNNzx .marker{fill:#333333;stroke:#333333;}#mermaid-svg-JnhWKQS6H4amNNzx .marker.cross{stroke:#333333;}#mermaid-svg-JnhWKQS6H4amNNzx svg{font-family:\”trebuchet ms\”,verdana,arial,sans-serif;font-size:16px;}#mermaid-svg-JnhWKQS6H4amNNzx p{margin:0;}#mermaid-svg-JnhWKQS6H4amNNzx .label{font-family:\”trebuchet ms\”,verdana,arial,sans-serif;color:#333;}#mermaid-svg-JnhWKQS6H4amNNzx .cluster-label text{fill:#333;}#mermaid-svg-JnhWKQS6H4amNNzx .cluster-label span{color:#333;}#mermaid-svg-JnhWKQS6H4amNNzx .cluster-label span p{background-color:transparent;}#mermaid-svg-JnhWKQS6H4amNNzx .label text,#mermaid-svg-JnhWKQS6H4amNNzx span{fill:#333;color:#333;}#mermaid-svg-JnhWKQS6H4amNNzx .node rect,#mermaid-svg-JnhWKQS6H4amNNzx .node circle,#mermaid-svg-JnhWKQS6H4amNNzx .node ellipse,#mermaid-svg-JnhWKQS6H4amNNzx .node polygon,#mermaid-svg-JnhWKQS6H4amNNzx .node path{fill:#ECECFF;stroke:#9370DB;stroke-width:1px;}#mermaid-svg-JnhWKQS6H4amNNzx .rough-node .label text,#mermaid-svg-JnhWKQS6H4amNNzx .node .label text,#mermaid-svg-JnhWKQS6H4amNNzx .image-shape .label,#mermaid-svg-JnhWKQS6H4amNNzx .icon-shape .label{text-anchor:middle;}#mermaid-svg-JnhWKQS6H4amNNzx .node .katex path{fill:#000;stroke:#000;stroke-width:1px;}#mermaid-svg-JnhWKQS6H4amNNzx .rough-node .label,#mermaid-svg-JnhWKQS6H4amNNzx .node .label,#mermaid-svg-JnhWKQS6H4amNNzx .image-shape .label,#mermaid-svg-JnhWKQS6H4amNNzx .icon-shape .label{text-align:center;}#mermaid-svg-JnhWKQS6H4amNNzx .node.clickable{cursor:pointer;}#mermaid-svg-JnhWKQS6H4amNNzx .root .anchor path{fill:#333333!important;stroke-width:0;stroke:#333333;}#mermaid-svg-JnhWKQS6H4amNNzx .arrowheadPath{fill:#333333;}#mermaid-svg-JnhWKQS6H4amNNzx .edgePath .path{stroke:#333333;stroke-width:2.0px;}#mermaid-svg-JnhWKQS6H4amNNzx .flowchart-link{stroke:#333333;fill:none;}#mermaid-svg-JnhWKQS6H4amNNzx .edgeLabel{background-color:rgba(232,232,232, 0.8);text-align:center;}#mermaid-svg-JnhWKQS6H4amNNzx .edgeLabel p{background-color:rgba(232,232,232, 0.8);}#mermaid-svg-JnhWKQS6H4amNNzx .edgeLabel rect{opacity:0.5;background-color:rgba(232,232,232, 0.8);fill:rgba(232,232,232, 0.8);}#mermaid-svg-JnhWKQS6H4amNNzx .labelBkg{background-color:rgba(232, 232, 232, 0.5);}#mermaid-svg-JnhWKQS6H4amNNzx .cluster rect{fill:#ffffde;stroke:#aaaa33;stroke-width:1px;}#mermaid-svg-JnhWKQS6H4amNNzx .cluster text{fill:#333;}#mermaid-svg-JnhWKQS6H4amNNzx .cluster span{color:#333;}#mermaid-svg-JnhWKQS6H4amNNzx div.mermaidTooltip{position:absolute;text-align:center;max-width:200px;padding:2px;font-family:\”trebuchet ms\”,verdana,arial,sans-serif;font-size:12px;background:hsl(80, 100%, 96.2745098039%);border:1px solid #aaaa33;border-radius:2px;pointer-events:none;z-index:100;}#mermaid-svg-JnhWKQS6H4amNNzx .flowchartTitleText{text-anchor:middle;font-size:18px;fill:#333;}#mermaid-svg-JnhWKQS6H4amNNzx rect.text{fill:none;stroke-width:0;}#mermaid-svg-JnhWKQS6H4amNNzx .icon-shape,#mermaid-svg-JnhWKQS6H4amNNzx .image-shape{background-color:rgba(232,232,232, 0.8);text-align:center;}#mermaid-svg-JnhWKQS6H4amNNzx .icon-shape p,#mermaid-svg-JnhWKQS6H4amNNzx .image-shape p{background-color:rgba(232,232,232, 0.8);padding:2px;}#mermaid-svg-JnhWKQS6H4amNNzx .icon-shape .label rect,#mermaid-svg-JnhWKQS6H4amNNzx .image-shape .label rect{opacity:0.5;background-color:rgba(232,232,232, 0.8);fill:rgba(232,232,232, 0.8);}#mermaid-svg-JnhWKQS6H4amNNzx .label-icon{display:inline-block;height:1em;overflow:visible;vertical-align:-0.125em;}#mermaid-svg-JnhWKQS6H4amNNzx .node .label-icon path{fill:currentColor;stroke:revert;stroke-width:revert;}#mermaid-svg-JnhWKQS6H4amNNzx :root{–mermaid-font-family:\”trebuchet ms\”,verdana,arial,sans-serif;}
main.py 启动 QGuiApplication
加载 main.qml
ApplicationWindow 创建 3×3 仪表网格
Timer 每 50ms 生成正弦飞行数据
属性绑定驱动各仪表旋转/平移
QML 层叠图片 + 变换实现指针与刻度
1、Python 侧:轻量启动与数据入口
main.py 只做三件事:
- 创建 QGuiApplication(注意是 GUI 应用,不需要 QWidgets);
- 通过 QQmlApplicationEngine 加载同目录下的 main.qml;
- 进入 Qt 事件循环 app.exec()。
engine = QQmlApplicationEngine()
qml_path = os.path.join(os.path.dirname(os.path.abspath(__file__)), "main.qml")
engine.load(QUrl.fromLocalFile(qml_path))
这里的关键点是:Python 不直接操作任何仪表控件,所有界面元素都在 QML 中声明。Python 只负责把 QML 文件加载进来,剩下的绘制、动画、数据绑定全部交给 Qt Quick 场景图(Scene Graph)渲染。
2、QML 侧:属性系统驱动仪表
main.qml 中定义了 16 个 property real 飞行参数(roll、pitch、heading、airspeed、altitude 等),这些属性就是整个仪表盘的“数据总线”:
property real roll: 0
property real pitch: 0
property real heading: 0
property real airspeed: 0
property real altitude: 0
每个仪表组件(Adi、Alt、Asi、Hsi、Nav、Tc、Vsi)通过属性绑定接收数据:
Hsi {
anchors.fill: parent
heading: root.heading
}
当 root.heading 变化时,QML 的属性绑定机制会自动把新值推送到 Hsi 组件的 heading 属性,无需手动刷新界面。这是 Qt Quick 相比传统 Widget 的一大优势:数据与视图自动同步。
3、数据模拟:Timer 生成正弦波形
由于没有真实飞控硬件,项目用 Timer 模拟飞行数据。每 50ms 触发一次,用正弦函数生成平滑变化的曲线:
Timer {
interval: 50
repeat: true
running: true
onTriggered: {
root.roll = 180.0 * Math.sin(t / 10.0)
root.pitch = 90.0 * Math.sin(t / 20.0)
root.heading = 360.0 * Math.sin(t / 40.0)
root.airspeed = 125.0 * Math.sin(t / 40.0) + 125.0
}
}
正弦波的好处是:数据连续、无跳变,指针转动平滑自然,非常适合演示仪表动画效果。实际接入真实数据时,只需把 onTriggered 里的赋值替换为串口/网络读取即可。
4、仪表绘制:层叠图片 + 旋转变换
每个仪表(如 Hsi.qml)的核心思路是多层 SVG 图片叠加 + 旋转变换:
// 表盘面(随航向旋转)
Image {
source: "image/hsi/hsi_face.svg"
transformOrigin: Item.Center
rotation: -root.heading
}
// 固定外壳(不旋转)
Image {
source: "image/hsi/hsi_case.svg"
}
原理拆解:
- 表盘面(hsi_face.svg)以中心为原点,旋转 -heading 度,模拟罗盘随航向转动;
- 外壳(hsi_case.svg)固定不动,作为边框遮挡;
- 通过 transformOrigin: Item.Center 保证旋转围绕仪表中心进行。
Nav.qml 更进一步,用三角函数计算偏航杆的平移量:
property real devAngleRad: devAngleDeg * Math.PI / 180.0
property real devDelta: pixPerDev * clampedDeviation
property real devBarDeltaX: devDelta * Math.cos(devAngleRad)
property real devBarDeltaY: devDelta * Math.sin(devAngleRad)
这里把“偏航角 + 偏航量”换算成屏幕上的 x/y 偏移,再叠加旋转,实现偏航杆沿航道方向平移的效果。
5、自适应缩放:保持仪表比例
每个仪表都定义了原始尺寸(如 HSI 为 240×240),并通过 scale 属性自适应容器大小:
readonly property real origW: 240
readonly property real origH: 240
property real s: Math.min(width / origW, height / origH)
Item {
width: root.origW
height: root.origH
scale: root.s
anchors.centerIn: parent
}
Math.min 保证仪表在宽高比不一致时也不会变形,始终按较小比例缩放,居中显示。
6、小结
整个项目的实现原理可以概括为一条链路:
Timer 生成数据 → 属性绑定推送 → QML 图片层叠 → 旋转变换渲染
Python 只做应用壳,QML 负责全部界面逻辑,两者通过 Qt 属性系统无缝衔接。这种架构让仪表盘的开发变得非常模块化:新增一个仪表,只需写一个 QML 组件并绑定属性即可。




评论前必须登录!
注册