 网硕互联帮助中心
一、引言
在当今计算机硬件飞速发展的背景下,多核处理器已经成为标准配置。如何充分利用多核CPU的计算能力,提高应用程序的性能和响应速度,成为每个Java开发者必须掌握的核心技能。并发编程作为提升程序性能的重要手段,在Java生态系统中占据着重要地位。
Java从诞生之初就将多线程支持作为核心特性之一,提供了丰富的并发编程API和工具类。从基础的Thread类到高级的并发集合,从简单的同步机制到复杂的并发框架,Java为开发者构建高性能并发应用提供了完整的技术栈。掌握Java并发编程不仅是技术深度的体现,更是解决实际性能问题的关键能力。
二、核心概念
2.1 进程与线程
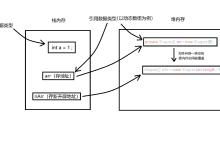
进程是操作系统资源分配的基本单位,每个进程都有独立的内存空间和系统资源。一个应用程序可以包含多个进程。
线程是CPU调度的基本单位,也被称为轻量级进程。同一进程内的线程共享进程的内存空间和资源,但拥有独立的程序计数器、栈和局部变量。
// 进程与线程的区别示例
public class ProcessThreadDemo {
public static void main(String[] args) {
// main方法本身就是一个线程
System.out.println("主线程名称: " + Thread.currentThread().getName());
// 创建并启动新线程
Thread newThread = new Thread(() -> {
System.out.println("新线程名称: " + Thread.currentThread().getName());
});
newThread.start();
}
}
2.2 并发与并行
并发是指多个任务在同一个时间段内交替执行,宏观上看起来是同时进行,但微观上是交替使用CPU资源。
并行是指多个任务真正在同一时刻执行,需要多核CPU支持。
并发模式(单核CPU):
时间片1: 任务A
时间片2: 任务B
时间片3: 任务A
时间片4: 任务B
并行模式(多核CPU):
核心1: 任务A (持续执行)
核心2: 任务B (持续执行)
三、Java并发基础
3.1 Thread类与Runnable接口
Java提供了两种主要的线程创建方式:继承Thread类和实现Runnable接口。
// 方式一:继承Thread类
class MyThread extends Thread {
@Override
public void run() {
for (int i = 0; i < 5; i++) {
System.out.println(Thread.currentThread().getName() + ": " + i);
try {
Thread.sleep(500); // 线程休眠500毫秒
} catch (InterruptedException e) {
e.printStackTrace();
}
}
}
}
// 方式二:实现Runnable接口
class MyRunnable implements Runnable {
@Override
public void run() {
for (int i = 0; i < 5; i++) {
System.out.println(Thread.currentThread().getName() + ": " + i);
try {
Thread.sleep(500);
} catch (InterruptedException e) {
e.printStackTrace();
}
}
}
}
public class ThreadCreationDemo {
public static void main(String[] args) {
// 使用Thread类创建线程
MyThread thread1 = new MyThread();
thread1.setName("Thread-方式一");
thread1.start(); // 启动线程,不要直接调用run()方法
// 使用Runnable接口创建线程
MyRunnable runnable = new MyRunnable();
Thread thread2 = new Thread(runnable);
thread2.setName("Thread-方式二");
thread2.start();
// 使用Lambda表达式简化Runnable实现(推荐)
Thread thread3 = new Thread(() -> {
for (int i = 0; i < 5; i++) {
System.out.println("Lambda线程: " + i);
try {
Thread.sleep(500);
} catch (InterruptedException e) {
e.printStackTrace();
}
}
});
thread3.start();
}
}
3.2 线程生命周期及状态转换
Java线程有6种状态,通过Thread.State枚举定义:
public class ThreadStateDemo {
public static void main(String[] args) throws InterruptedException {
Thread thread = new Thread(() -> {
try {
// TIMED_WAITING状态
Thread.sleep(1000);
synchronized (ThreadStateDemo.class) {
// BLOCKED状态(等待锁)
Thread.sleep(100);
}
} catch (InterruptedException e) {
e.printStackTrace();
}
});
System.out.println("线程状态: " + thread.getState()); // NEW
thread.start();
System.out.println("线程状态: " + thread.getState()); // RUNNABLE
Thread.sleep(100);
System.out.println("线程状态: " + thread.getState()); // TIMED_WAITING
thread.join();
System.out.println("线程状态: " + thread.getState()); // TERMINATED
}
}
3.3 线程创建方式对比
| 单继承限制 | ✗ 只能继承一个类 | ✓ 可实现多个接口 |
| 代码耦合度 | 高(业务逻辑与线程耦合) | 低(业务逻辑独立) |
| 资源共享 | 困难 | 容易(适合共享资源场景) |
| 推荐使用 | 不推荐 | 推荐 |
四、线程同步机制
4.1 synchronized关键字详解
synchronized是Java中最基本的同步机制,用于解决多线程访问共享资源的线程安全问题。
4.1.1 同步方法
public class SynchronizedMethodDemo {
private int counter = 0;
// 同步实例方法
public synchronized void increment() {
counter++;
}
// 同步静态方法
public static synchronized void staticMethod() {
System.out.println("同步静态方法");
}
public static void main(String[] args) throws InterruptedException {
SynchronizedMethodDemo demo = new SynchronizedMethodDemo();
// 创建多个线程并发修改counter
Thread[] threads = new Thread[10];
for (int i = 0; i < threads.length; i++) {
threads[i] = new Thread(() -> {
for (int j = 0; j < 1000; j++) {
demo.increment();
}
});
threads[i].start();
}
// 等待所有线程执行完成
for (Thread thread : threads) {
thread.join();
}
System.out.println("最终counter值: " + demo.counter); // 应该输出10000
}
}
4.1.2 同步代码块
public class SynchronizedBlockDemo {
private int counter = 0;
private final Object lock = new Object(); // 专用锁对象
// 使用synchronized代码块
public void increment() {
synchronized (lock) { // 使用专用锁对象
counter++;
}
}
// 同步this对象
public void incrementThis() {
synchronized (this) {
counter++;
}
}
// 同步Class对象
public static void staticBlockMethod() {
synchronized (SynchronizedBlockDemo.class) {
System.out.println("同步代码块 – Class对象锁");
}
}
public static void main(String[] args) throws InterruptedException {
SynchronizedBlockDemo demo = new SynchronizedBlockDemo();
Runnable task = () -> {
for (int i = 0; i < 1000; i++) {
demo.increment();
}
};
Thread thread1 = new Thread(task);
Thread thread2 = new Thread(task);
thread1.start();
thread2.start();
thread1.join();
thread2.join();
System.out.println("Counter值: " + demo.counter); // 应该输出2000
}
}
4.2 volatile关键字
volatile关键字用于确保变量的可见性和有序性,但不能保证原子性。
public class VolatileDemo {
// 使用volatile保证可见性
private volatile boolean running = true;
private volatile int counter = 0;
public void stop() {
running = false;
}
public void startThread() {
Thread worker = new Thread(() -> {
while (running) {
counter++;
try {
Thread.sleep(100);
} catch (InterruptedException e) {
e.printStackTrace();
}
}
System.out.println("线程已停止,counter值: " + counter);
});
worker.start();
// 主线程休眠2秒后停止工作线程
try {
Thread.sleep(2000);
} catch (InterruptedException e) {
e.printStackTrace();
}
stop();
}
public static void main(String[] args) {
VolatileDemo demo = new VolatileDemo();
demo.startThread();
}
}
4.3 线程安全问题及解决方案
4.3.1 线程安全问题产生原因
4.3.2 线程安全示例与解决方案
public class ThreadSafetyDemo {
// 问题示例:非线程安全的计数器
private int unsafeCounter = 0;
public void unsafeIncrement() {
unsafeCounter++; // 非原子操作,存在线程安全问题
}
// 解决方案1:使用synchronized
private int syncCounter = 0;
public synchronized void syncIncrement() {
syncCounter++;
}
// 解决方案2:使用Atomic类(推荐)
private AtomicInteger atomicCounter = new AtomicInteger(0);
public void atomicIncrement() {
atomicCounter.incrementAndGet();
}
// 解决方案3:使用ReentrantLock
private int lockCounter = 0;
private ReentrantLock lock = new ReentrantLock();
public void lockIncrement() {
lock.lock();
try {
lockCounter++;
} finally {
lock.unlock(); // 必须在finally中释放锁
}
}
public static void main(String[] args) throws InterruptedException {
ThreadSafetyDemo demo = new ThreadSafetyDemo();
int threadCount = 100;
int incrementPerThread = 1000;
// 测试非线程安全版本
testUnsafe(demo, threadCount, incrementPerThread);
// 测试Atomic版本
testAtomic(demo, threadCount, incrementPerThread);
}
private static void testUnsafe(ThreadSafetyDemo demo, int threadCount, int incrementPerThread)
throws InterruptedException {
demo.unsafeCounter = 0;
Thread[] threads = new Thread[threadCount];
long startTime = System.currentTimeMillis();
for (int i = 0; i < threadCount; i++) {
threads[i] = new Thread(() -> {
for (int j = 0; j < incrementPerThread; j++) {
demo.unsafeIncrement();
}
});
threads[i].start();
}
for (Thread thread : threads) {
thread.join();
}
long endTime = System.currentTimeMillis();
System.out.println("非线程安全 – 结果: " + demo.unsafeCounter +
", 预期: " + (threadCount * incrementPerThread) +
", 耗时: " + (endTime – startTime) + "ms");
}
private static void testAtomic(ThreadSafetyDemo demo, int threadCount, int incrementPerThread)
throws InterruptedException {
demo.atomicCounter.set(0);
Thread[] threads = new Thread[threadCount];
long startTime = System.currentTimeMillis();
for (int i = 0; i < threadCount; i++) {
threads[i] = new Thread(() -> {
for (int j = 0; j < incrementPerThread; j++) {
demo.atomicIncrement();
}
});
threads[i].start();
}
for (Thread thread : threads) {
thread.join();
}
long endTime = System.currentTimeMillis();
System.out.println("Atomic类 – 结果: " + demo.atomicCounter.get() +
", 预期: " + (threadCount * incrementPerThread) +
", 耗时: " + (endTime – startTime) + "ms");
}
}
五、并发工具类
5.1 ThreadPoolExecutor线程池
线程池能够有效管理线程资源,提高程序性能。
import java.util.concurrent.*;
import java.util.concurrent.atomic.AtomicInteger;
public class ThreadPoolDemo {
private static final AtomicInteger taskNumber = new AtomicInteger(1);
public static void main(String[] args) {
// 创建线程池
ThreadPoolExecutor executor = new ThreadPoolExecutor(
2, // 核心线程数
4, // 最大线程数
60L, // 空闲线程存活时间
TimeUnit.SECONDS, // 时间单位
new ArrayBlockingQueue<>(10), // 任务队列
Executors.defaultThreadFactory(), // 线程工厂
new ThreadPoolExecutor.CallerRunsPolicy() // 拒绝策略
);
// 提交任务
for (int i = 0; i < 15; i++) {
final int taskId = taskNumber.getAndIncrement();
executor.submit(() -> {
System.out.println("任务" + taskId + "开始执行 – " +
Thread.currentThread().getName());
try {
Thread.sleep(1000); // 模拟任务执行
} catch (InterruptedException e) {
e.printStackTrace();
}
System.out.println("任务" + taskId + "执行完成");
return "任务" + taskId + "的结果";
});
}
// 关闭线程池
executor.shutdown();
try {
// 等待所有任务完成
if (!executor.awaitTermination(60, TimeUnit.SECONDS)) {
executor.shutdownNow();
}
} catch (InterruptedException e) {
executor.shutdownNow();
}
}
}
5.2 CountDownLatch倒计时门栓
CountDownLatch用于协调多个线程之间的执行顺序。
import java.util.concurrent.*;
import java.util.concurrent.atomic.AtomicInteger;
public class CountDownLatchDemo {
public static void main(String[] args) throws InterruptedException {
final int THREAD_COUNT = 5;
CountDownLatch startLatch = new CountDownLatch(1); // 开始信号
CountDownLatch endLatch = new CountDownLatch(THREAD_COUNT); // 结束信号
AtomicInteger resultSum = new AtomicInteger(0);
// 创建并启动工作线程
for (int i = 1; i <= THREAD_COUNT; i++) {
final int threadId = i;
new Thread(() -> {
try {
System.out.println("线程" + threadId + "准备就绪,等待开始信号…");
startLatch.await(); // 等待开始信号
System.out.println("线程" + threadId + "开始执行任务");
int result = threadId * threadId; // 模拟计算任务
Thread.sleep(1000); // 模拟耗时操作
resultSum.addAndGet(result);
System.out.println("线程" + threadId + "执行完成,结果: " + result);
} catch (InterruptedException e) {
e.printStackTrace();
} finally {
endLatch.countDown(); // 完成后倒计时
}
}).start();
}
// 主线程等待所有线程准备就绪
Thread.sleep(100);
System.out.println("主线程:所有工作线程准备就绪,发送开始信号!");
startLatch.countDown(); // 发送开始信号
// 等待所有工作线程完成
endLatch.await();
System.out.println("主线程:所有任务执行完成,总和: " + resultSum.get());
}
}
5.3 其他常用工具类简介
- Semaphore(信号量) :控制同时访问特定资源的线程数量
- CyclicBarrier(循环栅栏) :让一组线程到达一个屏障时被阻塞,直到最后一个线程到达屏障时,所有被屏障拦截的线程才会继续执行
- ConcurrentHashMap:线程安全的HashMap实现
- BlockingQueue:阻塞队列,支持线程安全的生产-消费模式
六、实践建议
6.1 并发编程常见问题及避坑指南
6.1.1 死锁问题
public class DeadlockDemo {
private static final Object lock1 = new Object();
private static final Object lock2 = new Object();
public static void main(String[] args) {
Thread thread1 = new Thread(() -> {
synchronized (lock1) {
System.out.println("线程1获取lock1");
try { Thread.sleep(100); } catch (InterruptedException e) {}
System.out.println("线程1等待lock2");
synchronized (lock2) {
System.out.println("线程1获取lock2");
}
}
});
Thread thread2 = new Thread(() -> {
synchronized (lock2) {
System.out.println("线程2获取lock2");
try { Thread.sleep(100); } catch (InterruptedException e) {}
System.out.println("线程2等待lock1");
synchronized (lock1) {
System.out.println("线程2获取lock1");
}
}
});
thread1.start();
thread2.start();
// 可能产生死锁
}
}
避坑建议:
- 避免嵌套锁
- 按照固定顺序获取锁
- 设置锁超时时间
- 使用tryLock()替代lock()
6.1.2 资源泄漏
// 错误示例:线程池未正确关闭
public class ResourceLeakDemo {
public static void wrongExample() {
ThreadPoolExecutor executor = (ThreadPoolExecutor) Executors.newFixedThreadPool(10);
executor.submit(() -> System.out.println("任务执行"));
// 忘记调用shutdown(),导致线程池无法关闭
}
// 正确示例
public static void correctExample() {
ThreadPoolExecutor executor = (ThreadPoolExecutor) Executors.newFixedThreadPool(10);
try {
executor.submit(() -> System.out.println("任务执行"));
} finally {
executor.shutdown(); // 确保线程池被关闭
}
}
}
6.2 性能优化方向
import java.util.concurrent.*;
import java.util.concurrent.atomic.AtomicLong;
public class PerformanceOptimizationDemo {
// 性能对比:同步方式 vs 无锁方式
private long syncCounter = 0;
private AtomicLong atomicCounter = new AtomicLong(0);
// 同步方式
public synchronized void syncIncrement() {
syncCounter++;
}
// 无锁方式
public void atomicIncrement() {
atomicCounter.incrementAndGet();
}
public static void main(String[] args) throws InterruptedException {
PerformanceOptimizationDemo demo = new PerformanceOptimizationDemo();
int threadCount = 10;
int operations = 1000000;
// 测试synchronized性能
long syncStart = System.currentTimeMillis();
testSyncMethod(demo, threadCount, operations);
long syncEnd = System.currentTimeMillis();
// 测试Atomic性能
long atomicStart = System.currentTimeMillis();
testAtomicMethod(demo, threadCount, operations);
long atomicEnd = System.currentTimeMillis();
System.out.println("synchronized耗时: " + (syncEnd – syncStart) + "ms");
System.out.println("Atomic耗时: " + (atomicEnd – atomicStart) + "ms");
}
private static void testSyncMethod(PerformanceOptimizationDemo demo,
int threadCount, int operations)
throws InterruptedException {
demo.syncCounter = 0;
CountDownLatch latch = new CountDownLatch(threadCount);
for (int i = 0; i < threadCount; i++) {
new Thread(() -> {
for (int j = 0; j < operations; j++) {
demo.syncIncrement();
}
latch.countDown();
}).start();
}
latch.await();
}
private static void testAtomicMethod(PerformanceOptimizationDemo demo,
int threadCount, int operations)
throws InterruptedException {
demo.atomicCounter.set(0);
CountDownLatch latch = new CountDownLatch(threadCount);
for (int i = 0; i < threadCount; i++) {
new Thread(() -> {
for (int j = 0; j < operations; j++) {
demo.atomicIncrement();
}
latch.countDown();
}).start();
}
latch.await();
}
}
七、总结
Java并发编程是构建高性能应用的重要技术,掌握其核心概念和实践技巧对开发者至关重要。本文从并发编程的基础概念入手,详细介绍了Java中的线程创建、同步机制、并发工具类等核心内容,并提供了丰富的代码示例和实践建议。
核心知识点回顾:
Java并发编程的发展展望:
随着Java版本的不断更新,并发编程API也在持续优化。Java 8引入的CompletableFuture大大简化了异步编程,Java 9的响应式编程支持为并发编程带来了新的可能性。未来,Java并发编程将更加注重性能优化、易用性和可维护性,开发者需要持续学习和掌握新的并发编程技术。


评论前必须登录!
注册