 网硕互联帮助中心
前言
今年的电赛(2025),很多题都与云台相关,因此为备战电赛,博主这边也是准备了一个由两个42步进电机驱动的云台并提前进行调试,避免赛题出来之后手忙脚乱的,这边的两个42步进电机采用同一个驱动模块进行驱动(D36A),主控肯定采用MSPM0G3507。然后3D打印了一个二维云台的结构并进行组装。本章博客主要是讲这个云台进行绘图的思路以及代码。激光还没有安装上去,目前只是云台的循迹代码
如果无法很好的复现博客里的代码,可以私信作者博取源代码,电赛期间都在线
一、硬件选择
主控:MSPM0G3507 驱动:D36A双路步进电机驱动 电机:42步进电机*2
二、硬件连线
硬件连线部分在上一篇博客里面已经说过了,可以直接去上一篇里面看,这边附上链接 MSPM0开发学习笔记:D36A驱动的42步进电机二维云台(2025电赛 附源代码及引脚配置)
三、软件代码
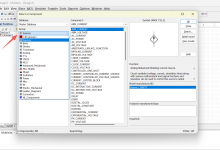
软件部分采用C语言实现,IDE采用keil,基于逐飞库进行编写 这边先进行一下简单的参数说明,便于理解后面的思路
| current_x | 目前的X坐标 |
| current_y | 目前的Y坐标 |
| target_x | 需要移动到的X坐标 |
| target_y | 需要移动到的Y坐标 |
| move_x | 需要移动的X距离 |
| move_y | 需要移动的Y距离 |
| point_count | 绘制圆形时候的点数 |
驱动—电机
代码实现如下:
函数一:限幅函数
#define MAX_ANGLE_X 1000.0f
#define MIN_ANGLE_X –1000.0f
#define MAX_ANGLE_Y 1000.0f
#define MIN_ANGLE_Y –1000.0f
float limit_angle(float angle, float min, float max) {
if (angle < min) return min;
if (angle > max) return max;
return angle;
}
函数二:激光云台绘制正方形
// Function to draw a square trajectory
// Parameters:
// x_len – length of the square's X-axis dimension
// y_len – length of the square's Y-axis dimension
// MOVE_SPEED – speed of movement between points
void draw_square(int x_len, int y_len, int MOVE_SPEED) {
// Structure to store X and Y angle coordinates
typedef struct {
float x_angle; // X-axis angle position
float y_angle; // Y-axis angle position
} Point;
// Invert Y-axis length (likely for coordinate system adjustment)
y_len = y_len * –1;
// Calculate half-lengths for easier coordinate calculation
float x_len_2 = x_len / 2;
float y_len_2 = y_len / 2;
// Define square vertices relative to origin (0,0)
// Coordinates form a square shape when connected sequentially
Point square_points[] = {
{–1 * x_len_2, y_len_2}, // Top-left corner
{x_len_2, y_len_2}, // Top-right corner
{x_len_2, –1 * y_len_2}, // Bottom-right corner
{–1 * x_len_2, –1 * y_len_2},// Bottom-left corner
{–1 * x_len_2, y_len_2}, // Back to top-left to close the square
{0.0f, 0.0f} // Final point: return to origin
};
// Calculate total number of points in the square trajectory
uint8 point_count = sizeof(square_points) / sizeof(Point);
// Initialize current position at origin (0,0)
float current_x = 0;
float current_y = 0;
// Move to each defined point in sequence
for (uint8 i = 0; i < point_count; i++) {
// Ensure target angles stay within allowed range
float target_x = limit_angle(square_points[i].x_angle, MIN_ANGLE_X, MAX_ANGLE_X);
float target_y = limit_angle(square_points[i].y_angle, MIN_ANGLE_Y, MAX_ANGLE_Y);
// Calculate relative movement from current position to target
float move_x = target_x – current_x;
float move_y = target_y – current_y;
// Update current position to target coordinates
current_x = target_x;
current_y = target_y;
// Send movement command to both axes
d36a_set_angle_both(move_x, move_y, MOVE_SPEED);
// Pause 300ms after reaching each point
system_delay_ms(300);
}
// Pause 2 seconds after completing the square
system_delay_ms(2000);
}
一、函数定义:draw_square函数接收三个参数,分别是正方形的 X 轴长度(x_len)、Y 轴长度(y_len)和移动速度(MOVE_SPEED)。 二、数据结构:定义了Point结构体用于存储坐标点的 X 和 Y 角度值。 三、坐标处理: 1、将 Y 轴长度取负值(为了调整坐标系方向) 2、计算半长(x_len_2, y_len_2),用于确定正方形顶点坐标 3、坐标定义:定义了正方形的 4 个顶点坐标和原点(0,0)坐标以中心点为原点,通过半长计算得出四个顶点位置 4、最后回到一个点 (0,0) 用于回到起点 四、绘制逻辑: 1、遍历所有定义的坐标点 2、对每个目标点进行角度限制(通过limit_angle函数确保在有效范围内) 3、计算当前位置到目标点的移动量 4、调用d36a_set_angle_both函数移动到目标点(同时设置 X 和 Y 方向角度) 5、每个点移动后延迟 300 毫秒,绘制完成后延迟 2000 毫秒
函数三:激光云台绘制圆形
// Function to draw a circle trajectory
// Parameters:
// r – radius of the circle
// MOVE_SPEED – speed of movement between points
// point_count – number of points to use for drawing the circle (more = smoother)
void draw_circle(int r, int MOVE_SPEED, const uint8 point_count) {
// Structure to store X and Y angle coordinates
typedef struct {
float x_angle; // X-axis angle position
float y_angle; // Y-axis angle position
} Point;
// Array to store circle points (extra element to close the loop)
Point circle_points[point_count + 1];
// Calculate coordinates for each point on the circle
for (uint8 i = 0; i < point_count; i++) {
// Convert angle from degrees to radians (full circle = 2π radians)
float rad = 2 * 3.1415926f * i / point_count;
// Calculate X and Y positions using trigonometric functions
// cosine for X-axis, sine for Y-axis to form circular path
circle_points[i].x_angle = r * cosf(rad);
circle_points[i].y_angle = r * sinf(rad);
}
// Close the circle by duplicating the first point as the last point
circle_points[point_count] = circle_points[0];
// Initialize current position at origin (0,0)
float current_x = 0.0f;
float current_y = 0.0f;
// Move to each calculated point in sequence
for (uint8 i = 0; i <= point_count; i++) {
// Ensure target angles stay within allowed range
float target_x = limit_angle(circle_points[i].x_angle, MIN_ANGLE_X, MAX_ANGLE_X);
float target_y = limit_angle(circle_points[i].y_angle, MIN_ANGLE_Y, MAX_ANGLE_Y);
// Calculate relative movement from current position to target
float move_x = target_x – current_x;
float move_y = target_y – current_y;
// Update current position to target
current_x = target_x;
current_y = target_y;
// Send movement command to both axes
d36a_set_angle_both(move_x, move_y, MOVE_SPEED);
// Optional delay between point movements
// system_delay_ms(10);
}
// Return to origin (0,0) after completing the circle
float target_x = 0;
float target_y = 0;
// Calculate movement from last circle point to origin
float move_x = target_x – current_x;
float move_y = target_y – current_y;
// Update current position to origin
current_x = target_x;
current_y = target_y;
// Send final movement command to return to origin
d36a_set_angle_both(move_x, move_y, MOVE_SPEED);
// Pause for 2 seconds after completing the circle
system_delay_ms(2000);
}
通过三角函数(X 轴用余弦、Y 轴用正弦)计算圆周上指定数量的点的坐标,这些点基于圆周的等角度增量分布。函数会按顺序在这些点之间移动(带速度控制),同时确保角度在有效范围内;通过回到第一个点来闭合圆形轨迹,最后返回原点,结束时短暂暂停。点的数量越多,绘制的圆越平滑。 以下是函数中涉及的公式:
rad
=
2
×
π
×
i
point_count
\\text{rad} = 2 \\times \\pi \\times \\frac{i}{\\text{point\\_count}}
rad=2×π×point_counti 其中,
i
i
i 为当前点的索引(0 到 point_count-1),
point_count
\\text{point\\_count}
point_count 为圆周上的总点数,
rad
\\text{rad}
rad 为对应角度的弧度值。
x
_
a
n
g
l
e
=
r
×
cos
(
rad
)
x\\_angle = r \\times \\cos(\\text{rad})
x_angle=r×cos(rad) 其中,
r
r
r 为圆的半径,
cos
(
rad
)
\\cos(\\text{rad})
cos(rad) 为弧度对应的余弦值。
y
_
a
n
g
l
e
=
r
×
sin
(
rad
)
y\\_angle = r \\times \\sin(\\text{rad})
y_angle=r×sin(rad) 其中,
sin
(
rad
)
\\sin(\\text{rad})
sin(rad) 为弧度对应的正弦值。
四、总结
这边给的都是一些简单图形的绘制代码,但是思路都是通用的,复杂图形也可以复用这一套逻辑。大家参考参考就好
如果无法很好的复现博客里的代码,可以私信作者博取源代码,电赛期间都在线


评论前必须登录!
注册