【Linux应用】Linux系统日志上报服务,以及thttpd的配置、发送函数
文章目录
- thttpd服务
- 安装thttpd
- 配置thttpd服务
- thttpd函数
- 日志效果和文件
- 附录:开发板快速上手:镜像烧录、串口shell、外设挂载、WiFi配置、SSH连接、文件交互(RADXA ZERO 3为例)
-
- ZERO 3烧录
- ZERO 3串口shell
- 外设挂载
- 连接WiFi
- SSH连接
- SSH的文件交互
- 换源
thttpd服务
通过thttpd可以进行日志上报等服务 thttpd 是一个简单,小型,可移植,快速且安全的 HTTP 服务器,thttpd搭建的Web服务器支持认证、CGI等服务,功能都比较齐全,常用于嵌入式或桌面系统搭建web服务器使用。 从官网即可下载 下载thttpd
安装thttpd
安装共分以下几步
1. 解压 进入目录
2. ./configure
3. sudo make
4. sudo make install
5. 检验 sudo thttpd -V
6. 添加服务
对应步骤shell为:
tar -xzvf thttpd-2.29.tar.gz
cd thttpd-2.29/
./configure
sudo make
sudo make install
sudo thttpd -V
cd ..
sudo chmod 777 thttpd.conf
sudo chmod 777 thttpd-with-timezone.service
sudo cp thttpd.conf /etc/
sudo cp thttpd-with-timezone.service /etc/systemd/system
cd /etc/systemd/system/
sudo systemctl enable thttpd-with-timezone.service
配置thttpd服务
.conf文件配置内容如下:
# This section overrides defaults
dir=/usr/local/thttpd/www/log
chroot
#user=www# default = nobody
logfile=/var/log/thttpd.log
pidfile=/var/run/thttpd.pid
# This section _documents_ defaults in effect
port=80
# nosymlink# default = !chroot
# novhost
# nocgipat
# nothrottles
host=0.0.0.0
# charset=iso-8859-1
.service服务文件如下:
Description=thttpd Web Server with Timezone Setup
After=network.target local-fs.target
[Service]
Type=forking
ExecStartPre=/usr/bin/timedatectl set-timezone Asia/Shanghai
ExecStart=/usr/local/sbin/thttpd -C /etc/thttpd.conf
User=root
Group=root
PIDFile=/var/run/thttpd.pid
Restart=on-failure
[Install]
WantedBy=multi-user.target
thttpd函数
log.h和log.cpp 包含以下API:
#include <stdio.h>
#include <stdlib.h>
#include <time.h>
#include <sys/stat.h>
#include <fcntl.h>
#include <unistd.h>
#include <string.h>
#include <errno.h>
void init_log_file();
void write_log(const char* format, ...);
void log_debug(const char* format, ...);
void log_info(const char* format, ...);
void log_warn(const char* format, ...);
void log_error(const char* format, ...);
常用log_info即可 其与printf一样 
日志效果和文件
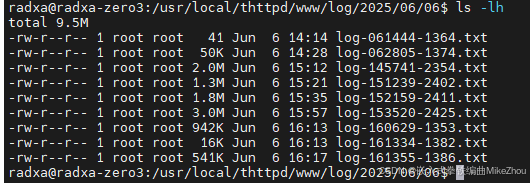
最后的日志效果: 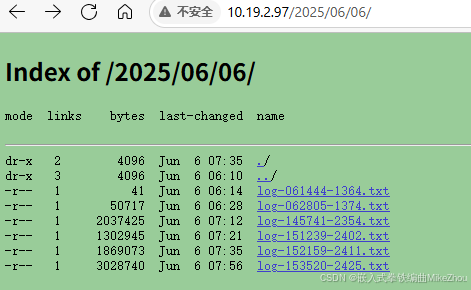 保存在如下目录下:
  目录按日期进行存储
附录:开发板快速上手:镜像烧录、串口shell、外设挂载、WiFi配置、SSH连接、文件交互(RADXA ZERO 3为例)
开发板快速上手:镜像烧录、串口shell、外设挂载、WiFi配置、SSH连接、文件交互(RADXA ZERO 3为例)
ZERO 3烧录
ZERO 3有两种 最本质的就是一个带WiFi一个不带WiFi 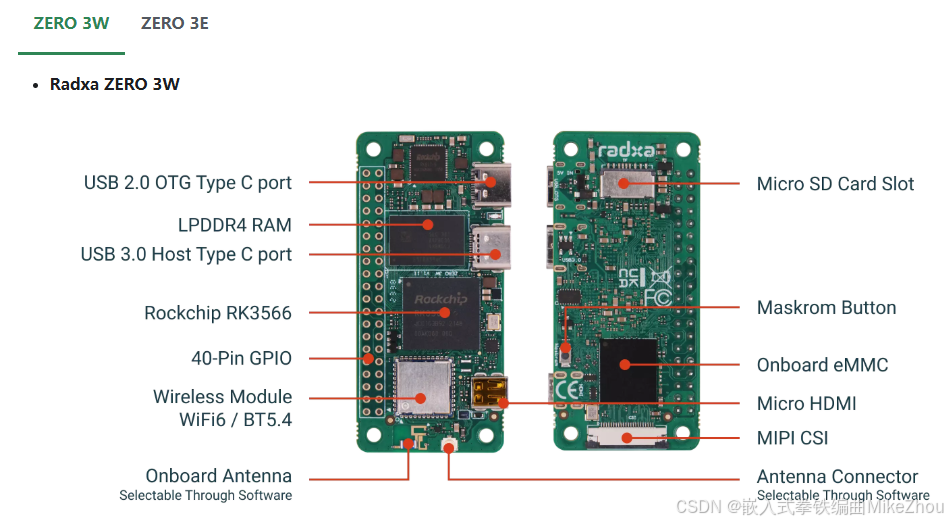
ZERO 3作为一个Linux板 其存储支持从sd卡EFI启动
系统安装则直接通过Balena Etcher来进行 可以使用其Windows版本即可 官方文档: 官方文档快速上手描述
镜像下载则也可以使用官方镜像: Radxa ZERO 3 Debian Build 6
该镜像是最初的镜像 很多依赖都没有 如果开发的话 可以直接下载第三方镜像 或者自己在原有官方镜像上去安装镜像包等等
烧录很简单 直接用工具选择U盘 选择镜像即可
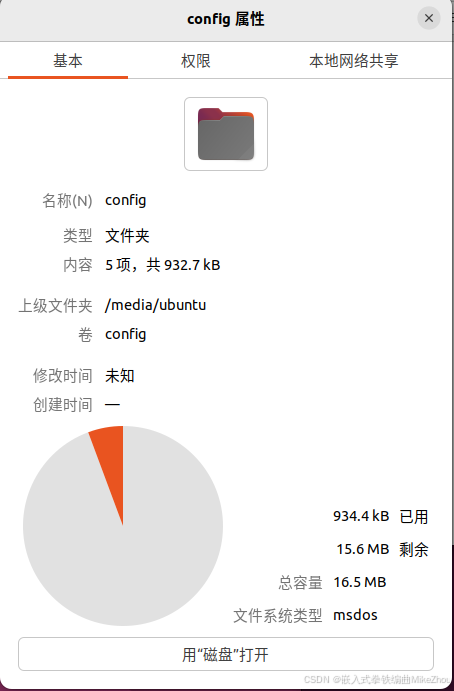
下图为烧录好了的sd卡  除了系统分区外 就是一个config分区 其挂载根根目录名称即为config
ZERO 3串口shell
串口与ZERO 3链接如下图: 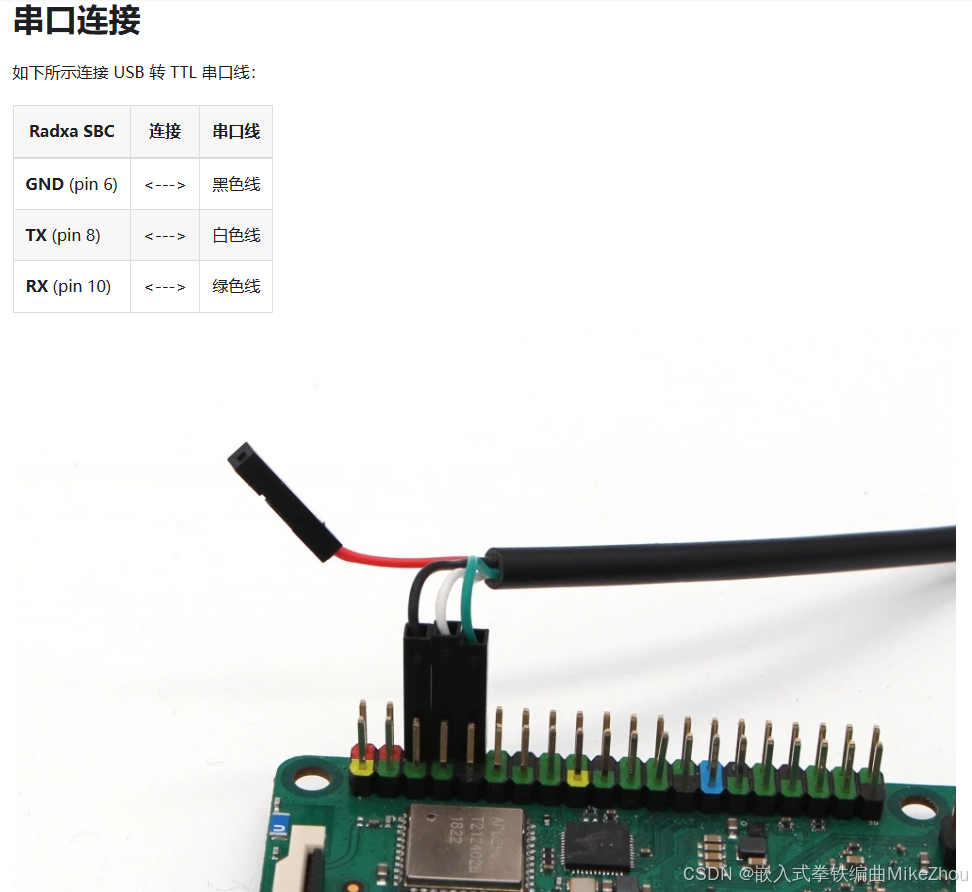 链接后 配置串口为
baudrate: 1500000
data bit: 8
stop bit: 1
parity : none
flow control: none
启动后 用户名和密码都为radxa 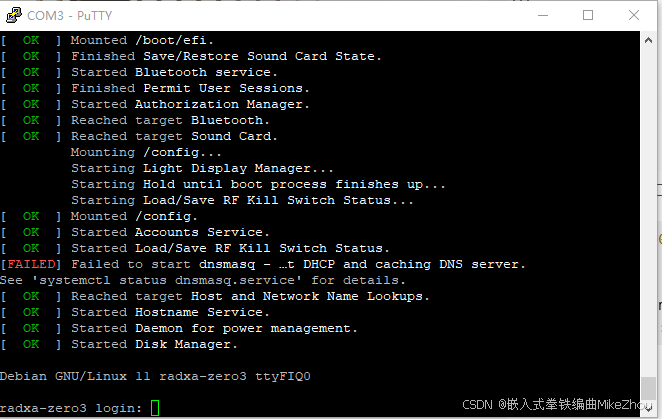
外设挂载
根据df命令查询系统挂载点  其做好了的U盘外部存储空间为/config
连接WiFi
使用如下指令链接WiFi:
nmcli device wifi #扫描WiFi
sudo nmcli device wifi connect <ssid> password <passwd> #连接WiFi
 连上后 使用ip a命令即可查看连接状态和ip
SSH连接
使用命令sudo systemctl status ssh查看ssh状态 前提是要安装ssh 如果没有安装 则通过shell安装ssh:
sudo apt-get update
sudo apt-get install openssh-server openssh-sftp-server
根据Active判断是否需要重启ssh服务: 重启ssh服务:
sudo systemctl restart ssh
启动后如下: 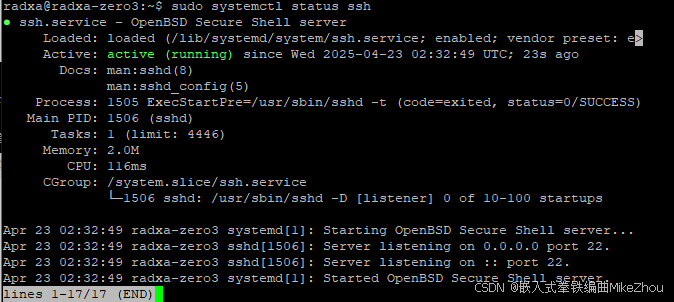 Active状态就被设置为了running
开机自启动ssh则使用命令:
sudo systemctl enable —now ssh
在PC上 支持ssh的设备中 使用以下指令链接到板子:
ssh [username]@[IP address] # or ssh [username]@[hostname]
如下图: 
SSH的文件交互
若是在PC上作为主机去访问设备 那么就是在PC的cmd中运行shell
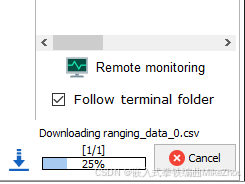
有的终端软件配备了ssh的文件管理传输功能 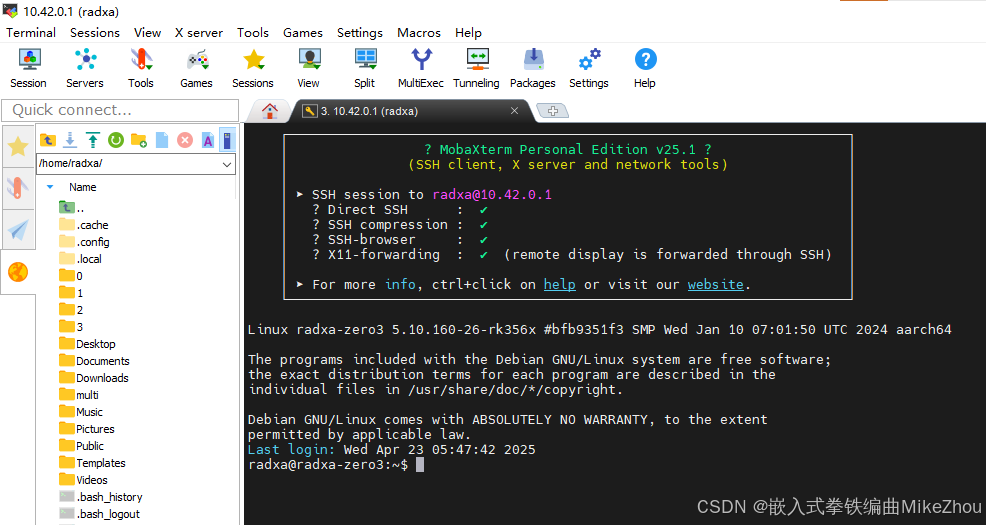 连上以后就可以直接搜素到当前目录下的各类文件 以便于实现文件管理 并且可以直接download
# 复制 Windows 文件到 Linux
scp D:\\data\\1.txt root@192.168.88.161:/root/data
# 复制 Windows 目录到 Linux(记得加 -r)
scp –r D:\\data root@192.168.88.161:/root/data
# 复制 Linux 文件到 Windows
scp root@192.168.88.161:/root/data/1.txt D:\\data
# 复制 Linux 目录到 Windows(记得加 -r)
scp –r root@192.168.88.161:/root/data D:\\data
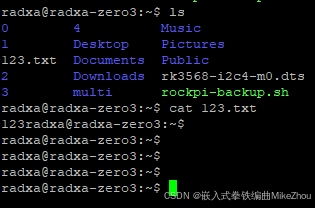
前提是设备开启了ssh可以被链接 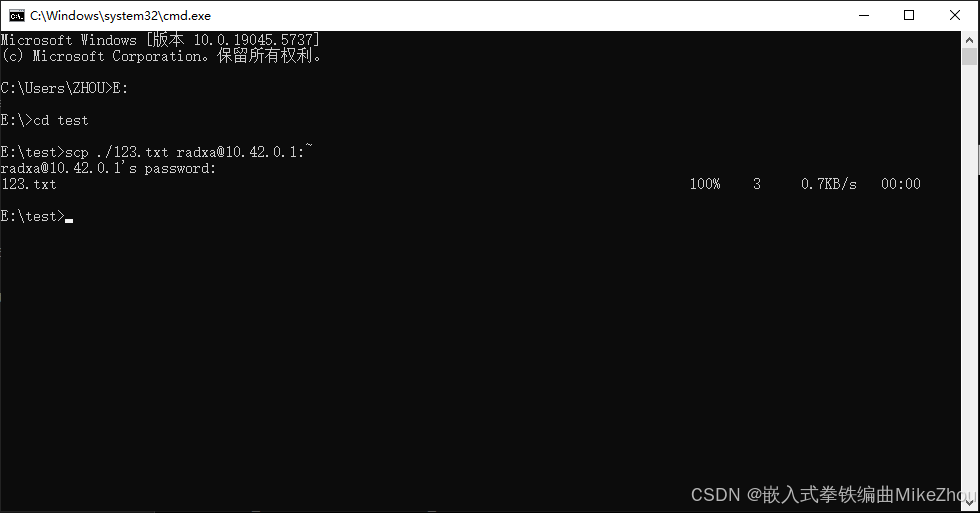 发过去后便能在板子上看到:
回传文件夹: 

如果是Linux设备去连接Windows设备 则需要在Windows里面设置对应的服务 相关教程很多 这里不过多赘述
如果是Linux设备访问Linux设备 则主设备也要指定IP
scp root@192.168.88.161:/root/1.txt root@192.168.88.162:/root
# 如果设置了Linux之间的免密登录,可这样写:
scp 192.168.88.161:///root/1.txt 192.168.88.162:///root
换源
Linux系统的源都在/etc/apt/下 一般有两个文件 一个是sources.list 另外一个是sources.list.d目录下的品牌list文件
如树莓派需要备份原本的源:
sudo cp /etc/apt/sources.list /etc/apt/sources.list.bak
sudo cp /etc/apt/sources.list.d/raspi.list /etc/apt/sources.list.d/raspi.list.bak
而radxa的则是:
sudo cp /etc/apt/sources.list /etc/apt/sources.list.bak
sudo cp /etc/apt/sources.list.d/radxa.list /etc/apt/sources.list.d/radxa.list.bak
将原本的文件进行编辑:
sudo nano /etc/apt/sources.list
注释掉最初的源 并添加新的源:
deb https://mirrors.tuna.tsinghua.edu.cn/debian bookworm main contrib non-free-firmware
deb https://mirrors.tuna.tsinghua.edu.cn/debian-security bookworm-security main contrib non-free-firmware
deb https://mirrors.tuna.tsinghua.edu.cn/debian bookworm-updates main contrib non-free-firmware
如图:  然后再换子目录下的源
sudo nano /etc/apt/sources.list.d/raspi.list
替换成:
deb https://mirrors.tuna.tsinghua.edu.cn/raspberrypi/ bullseye main
不过很可惜 清华源没有radxa 但是可以换debian的源(/etc/apt/sources.list):
deb https://mirrors.tuna.tsinghua.edu.cn/debian/ bullseye main contrib non-free
deb–src https://mirrors.tuna.tsinghua.edu.cn/debian/ bullseye main contrib non-free
deb https://mirrors.tuna.tsinghua.edu.cn/debian/ bullseye-updates main contrib non-free
deb–src https://mirrors.tuna.tsinghua.edu.cn/debian/ bullseye-updates main contrib non-free
deb https://mirrors.tuna.tsinghua.edu.cn/debian/ bullseye-backports main contrib non-free
deb–src https://mirrors.tuna.tsinghua.edu.cn/debian/ bullseye-backports main contrib non-free
deb https://mirrors.tuna.tsinghua.edu.cn/debian-security bullseye-security main contrib non-free
deb–src https://mirrors.tuna.tsinghua.edu.cn/debian-security bullseye-security main contrib non-free
换源后 执行
sudo apt–get upgrade
sudo apt–get update
 网硕互联帮助中心



评论前必须登录!
注册