 网硕互联帮助中心
前言 本文是一个前端示例,是基于nodejs使用express构建一个简单的服务器,并扫描本地资源文件夹,获取视频和图片,网页端通过http来向服务器请求,并将返回的资源在网页端程序,布局为grid。
环境配置 系统:windows 平台:visual studio code 语言:javascript、html、css 库:nodejs
概述 本文是一个前端学习的示例,主要的内容是构建一个服务端,网页端通过路由来访问服务端资源。
代码实现 我们首先创建一个项目文件夹,并在文件夹下新建一个js文件,名为server.js,用于编写服务端代码。 本例中我们使用express来构建服务器:
const express = require('express');
const fs = require('fs');
const path = require('path');
const app = express();
const PORT = 3000;
const videoFolder = path.join(__dirname, 'videos');
const thumbnailFolder = path.join(__dirname, 'thumbnails'); // 假设有预生成的封面图片
console.log(thumbnailFolder);
const supportedExtensions = ['.mp4', '.avi', '.mov', '.mkv']; // 支持的视频格式
const defaultThumbnail='./thumbnails/default.png';
//构建静态文件目录
app.use(express.static(path.join(__dirname,'public')));
app.use('/videos',express.static(path.join(__dirname,'videos')));
function getfiletype(filePath){
const ext=path.extname(filePath).toLowerCase();
const typeMap={
'.mp4':'video',
'.avi':'video',
'.mov':'video',
'.mkv':'video',
'.png':'image',
'.jpg':'image',
'.txt':'text',
'.json':'json'
};
return typeMap[ext] || 'unknown';
}
/**
*扫描资源文件夹
* @param {*} folderPath
* @param {*} files
* @returns
*/
function getallfile(folderPath,files=[]){
const items=fs.readdirSync(folderPath);
const result=[];
items.forEach(item=>{
const itemPath=path.join(folderPath,item);
const stat=fs.statSync(itemPath);
if(stat.isDirectory()){
const subresult={
videos:[],
images:[],
texts:[],
jsons:[]
};
const subitmes=fs.readdirSync(itemPath);
subitmes.forEach(subitem=>{
const subitempath=path.join(itemPath,subitem);
//console.log(subitempath);
const subitem2=path.join('videos',item,subitem);
//console.log(item);
//console.log(subitem2);
const substat=fs.statSync(subitempath);
if (substat.isFile()){
const filetype=getfiletype(subitempath);
if (filetype === 'video'){
subresult.videos.push(subitem2);
//generatethmbnail(item,subitem,'00:00:02.000');
} else if (filetype === 'image'){
subresult.images.push(subitem2);
} else if( filetype === 'text'){
subresult.texts.push(subitem2);
} else if( filetype === 'json'){
subresult.jsons.push(subitem2);
}
}
});
result.push(subresult);
}
});
return result;
}
app.get('/api/videos', (req, res) => {
const allfiles=getallfile(videoFolder);
//console.log(allfiles);
res.json(allfiles);
});
app.get('/play', (req, res) => {
loadfile('./public/play.html',res);
})
app.get('/video',(req,res)=>{
const videoname=req.query.name;
const videoPath = path.join(__dirname, videoname);
//console.log(videoPath);
const stat = fs.statSync(videoPath);
const fileSize = stat.size;
const range = req.headers.range;
if (range) {
const parts = range.replace(/bytes=/, "").split("-");
const start = parseInt(parts[0], 10);
const end = parts[1] ? parseInt(parts[1], 10) : fileSize – 1;
const chunkSize = (end – start) + 1;
const file = fs.createReadStream(videoPath, { start, end });
const head = {
'Content-Range': `bytes ${start}–${end}/${fileSize}`,
'Accept-Ranges': 'bytes',
'Content-Length': chunkSize,
'Content-Type': 'video',
};
res.writeHead(206, head);
file.pipe(res);
} else {
const head = {
'Content-Length': fileSize,
'Content-Type': 'video/mp4',
};
res.writeHead(200, head);
fs.createReadStream(videoPath).pipe(res);
}
})
/**
* 读取html文件内容
* @param {*} filePath
*/
function loadfile(filePath,res){
// 解析文件扩展名
const extname = path.extname(filePath);
let contentType = 'text/html';
switch (extname) {
case '.css':
contentType = 'text/css';
break;
case '.js':
contentType = 'text/javascript';
break;
case '.json':
contentType = 'application/json';
break;
case '.png':
contentType = 'image/png';
break;
case '.jpg':
contentType = 'image/jpg';
break;
// 可以根据需要添加更多的MIME类型
}
// 读取文件内容
fs.readFile(filePath, (error, content) => {
if (error) {
if (error.code == 'ENOENT') {
// 文件未找到,返回404
res.writeHead(404, { 'Content-Type': contentType });
res.end('File not found', 'utf-8');
} else {
// 服务器错误,返回500
res.writeHead(500);
res.end('Sorry, check with the site admin for error: ' + error.code + ' ..\\n', 'utf-8');
}
} else {
// 文件读取成功,返回文件内容
res.writeHead(200, { 'Content-Type': contentType });
res.end(content, 'utf-8');
};
});
};
app.listen(PORT,'localhost', () => {
console.log(`Server is running on port http://localhost:${PORT}`);
});
然后在项目文件夹下,创建public文件夹,配置为静态文件目录,在public文件夹下,新建一个index.html文件:
<!DOCTYPE html>
<html lang="en">
<head>
<meta charset="UTF-8">
<meta name="viewport" content="width=device-width, initial-scale=1.0">
<title>Video Folder Scanner</title>
<link rel="stylesheet" href="styles.css">
<style>
.thumbnail {
width: 150px;
height: 100px;
object-fit: cover;
cursor: pointer;
margin: 10px;
}
</style>
</head>
<body>
<h1>Video Folder</h1>
<div id="thumbnails" class="thumbnails-container">
</div>
<script src="./index.js"></script>
</body>
</html>
再创建一个styles.css文件和一个index.js文件。 index.js
document.addEventListener('DOMContentLoaded', () => {
const urls=[];
async function getallurl(){
const response=await fetch('http://localhost:3000/api/videos');
const data=await response.json();
return data;
}
async function gettext(){
const fileinfos=await getallurl();
console.log(fileinfos);
for(const fileinfo of fileinfos){
console.log(fileinfo);
const videourl=fileinfo.videos[0];
const imgurl=fileinfo.images[0];
const jsonurl=fileinfo.jsons[0];
const response = await fetch(`http://localhost:3000/${jsonurl}`);
if (!response.ok) {
throw new Error('Network response was not ok');
}
const data = await response.json();
const thumbnails=document.getElementById('thumbnails');
const div1=document.createElement('div');
div1.className='div1';
const infodiv=document.createElement('div');
infodiv.className='infodiv';
const imgdiv=document.createElement('div');
imgdiv.className='imgdiv';
const img=document.createElement('img');
const videoname=data['name'];
const p1=document.createElement('p');
p1.textContent=`${videoname}`;
img.className='img';
img.src=imgurl;
img.addEventListener('click',()=>{
//window.location.href= `${video.videoUrl}`;
window.location.href=`./play?path=${videourl}&data=${jsonurl}`;
});
imgdiv.appendChild(img);
imgdiv.appendChild(p1);
thumbnails.appendChild(imgdiv);
console.log(data);
}
};
gettext();
});
styles.css
.thumbnails-container{
display: grid;
grid-template-columns: repeat(auto-fill, minmax(200px, 1fr)); /* 自动填充列,最小宽度200px */
gap: 20px; /* 网格项之间的间距 */
}
.imgdiv{
margin: 10px;
padding: 10px;
border: 1px solid #ddd;
border-radius: 8px;
box-shadow: 0 4px 8px rgba(0, 0, 0, 0.1);
transition: transform 0.2s;
overflow: hidden;
}
.imgdiv:hover{
background-color: #a5dff7;
transform: scale(1.05);
}
.img{
width: 100%;
height: auto;
display: block;
border-radius: 8px;
}
/* 针对不同屏幕尺寸调整布局 */
@media (max-width: 1200px) {
.imgdiv {
width: calc(33.333% – 40px); /* 3列布局,减去间距 */
}
}
@media (max-width: 800px) {
.imgdiv {
width: calc(50% – 40px); /* 2列布局,减去间距 */
}
}
@media (max-width: 500px) {
.imgdiv {
width: calc(80% – 40px); /* 单列布局,减去间距 */
}
}
当我们启动服务器后,并访问http://localhost:3000/,网页端显示如下(仅供参考):  此处,图片与显示名称,依旧实际文件夹内的内容来,以上是我测试时使用的资源文件夹内的图片等内容。 图片相当于是封面图,点击图片后,会跳转到另一个页面:
 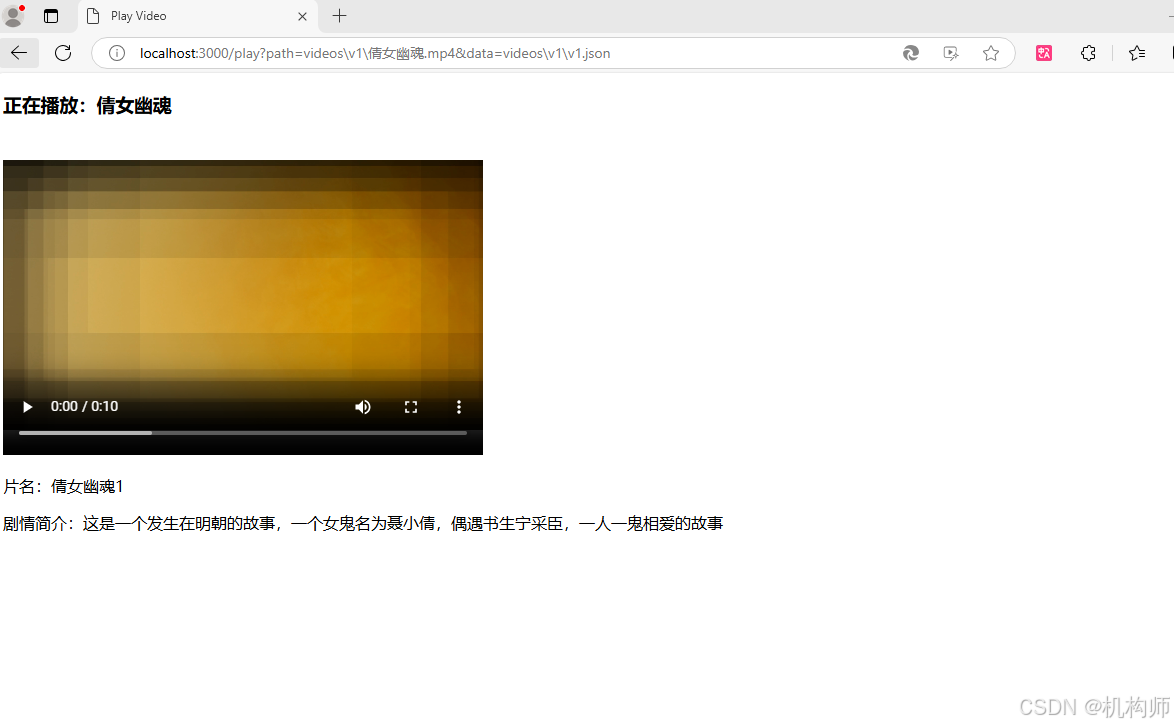 此处,要播放的视频,是在服务器的路由中已经配置的,服务器端会根据请求的视频名称,采用流式媒体播放视频。
注:本文是一个记录,用于以后参考,如果刚好对你也有帮助,那么也是不错的。


评论前必须登录!
注册