 网硕互联帮助中心
1.主从复制和读写分离
摘要: 本文详细介绍了 MySQL 主从复制与读写分离的完整部署与实践流程。首先阐述了主从复制的核心原理(binlog、IO线程、SQL线程)与读写分离的目标(数据冗余、提升并发)。随后,通过一个包含 MySQL 主库、两个从库、Amoeba 代理服务器及测试客户端的实验拓扑,逐步演示了环境准备、时间同步、MySQL 主从配置、Amoeba 中间件安装与配置、以及最终的读写分离验证。文章包含大量命令行与 SQL 操作示例,旨在帮助读者理解并搭建一个高可用、可扩展的数据库集群架构。
1.1主从复制 核心原理
必须记住 3 个核心组件
完整流程(一步一步,逐句理解)
4. 主库执行增删改(insert/update/drop)
5. MySQL 把这些操作记录到 binlog 日志文件
6. 从库的 IO 线程连接主库,请求 binlog
7. 主库的 dump 线程把 binlog 发给从库
8. 从库 IO 线程将内容写到本地 relay log(中继日志)
9. 从库 SQL 线程读取中继日志,重放 SQL 语句
10. 两个 Yes 代表正常:IO_Running、SQL_Running
11. 从库数据和主库完全一致
使用目标:数据冗余和灾难恢复;提升并发能力、避免锁冲突。
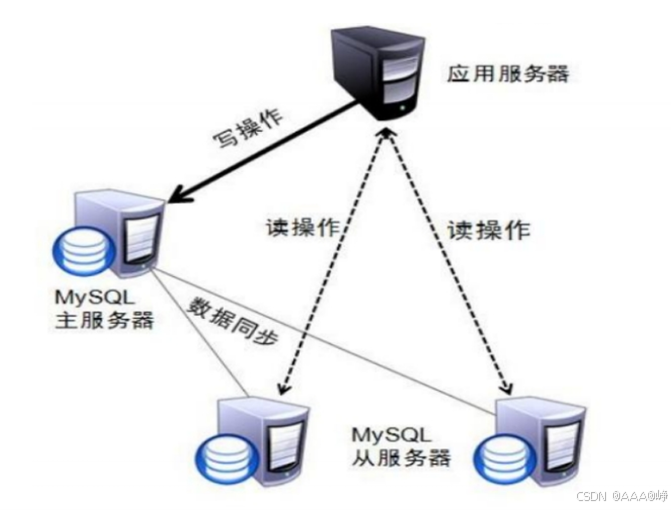
MySQL读写分离原理
- 只在主服务器上写,只在从服务器上读
- 主数据库处理事务性查询,从数据库处理SELECT查询
- 数据库复制用于将事务性查询的变更同步到集群中的从数据库
- 读写分离方案
- 基于程序代码内部实现
- 基于中间代理层实现
- MySQL-Proxy
- Amoeba
- mycat
-
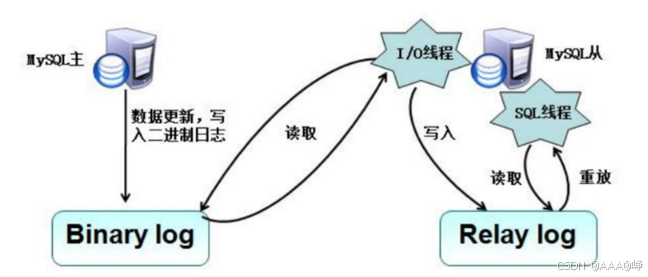
在每个事务更新数据完成之前,Master将这些改变记录进二进制日志。写入二进制日志完成后,Master通知存储引擎提交事务。
-
Slave将Master 的 Binary log复制到其中继日志(Relay log)。首先,Slave开始一个工作线程-I/0线程,I/0线程在Master上打开一个普通的连接,然后开始Binlog dump process。Binlog dump process从Master 的二进制日志中读取事件,如果已经跟上Master,它会睡眠并等待Master产生新的事件。I/0线程将这些事件写入中继日志。
-
SQL slave thread(SQL从线程)处理该过程的最后一步。SQL线程从中继日志读取事件,并重放其中的事件而更新Slave数据,使其与Master中的数据保持一致。只要该线程与I/0线程保持一致,中继日志通常会位于0S的缓存中,所以中继日志的开销很小。复制过程有一个很重要的限制,即复制在Slave上是串行化的,也就是说Master上的并行更新操作不能在Slave上并行操作。
1.2实验拓扑图
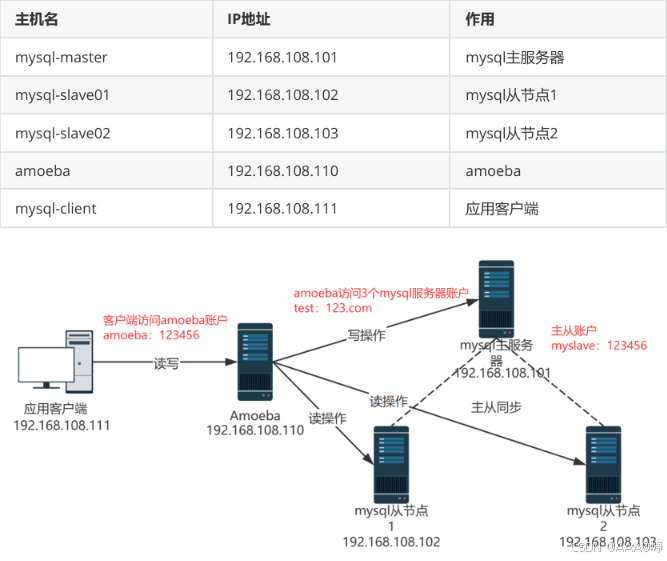
使用Centos-7-template 模板克隆产生应用客户端和amoeba
使用mysql模板克隆产生mysql主服务器,mysql从节点1,mysql从节点2
根据下表,将IP地址,主机名更改好
1.3时间同步
通过时间戳实现业务的一致性
# 所有节点
ntpdate ntp.aliyun.com
date -R
systemctl disable firewalld –now
setenforce 0
如果出现故障:使用此方法,对时完成后,无法重启mysqld服务
原因:之前在windows端使用navicat连接过mysql
解决:pkill -9 mysql;systemctl restart mysqld
1.4mysql主从服务器配置
mysql主服务器配置
# 主库mysql-master修改配置文件
[root@mysql-master ~]# vim /etc/my.cnf
server-id = 11 # 集群内服务器ID不能重复
log-bin = master-bin # 开启二进制日志
log-slave-updates = true # 从服务器同步数据后写入二进制日志
# 重启mysql服务
[root@mysql-master ~]# systemctl restart mysqld
# 登录MySQL
[root@mysql-master ~]# mysql -u root -p
Enter password:
Welcome to the MySQL monitor. Commands end with ; or \\g.
Your MySQL connection id is 7
Server version: 5.7.17-log Source distribution
Copyright (c) 2000, 2016, Oracle and/or its affiliates. All rights reserved.
Oracle is a registered trademark of Oracle Corporation and/or its
affiliates. Other names may be trademarks of their respective
owners.
Type 'help;' or '\\h' for help. Type '\\c' to clear the current input statement.
mysql> FLUSH PRIVILEGES;
Query OK, 0 rows affected (0.00 sec)
# 创建主从复制账号
mysql> GRANT REPLICATION SLAVE ON *.* TO 'myslave'@'192.168.108.%' IDENTIFIED BY '123456';
Query OK, 0 rows affected, 1 warning (0.01 sec)
# 查看主库binlog位置信息
mysql> show master status;
+——————-+———-+————–+——————+——————-+
| File | Position | Binlog_Do_DB | Binlog_Ignore_DB | Executed_Gtid_Set |
+——————-+———-+————–+——————+——————-+
| master-bin.000001 | 604 | | | |
+——————-+———-+————–+——————+——————-+
1 row in set (0.00 sec)
# 验证二进制日志文件是否生成
[root@mysql-master ~]# ls /usr/local/mysql/data
auto.cnf ib_buffer_pool ibdata1 ib_logfile0 ib_logfile1 ibtmp1
master-bin.000001 master-bin.index mysql performance_schema sys
mysql从服务器配置
mysql-slave01,mysql-slave02都要做如下操作
# ===================== mysql-slave01 从库配置 =====================
# 服务器由模板克隆生成,必须删除auto.cnf防止UUID冲突
[root@mysql-slave01 ~]# systemctl stop mysqld
[root@mysql-slave01 ~]# rm -f /usr/local/mysql/data/auto.cnf
[root@mysql-slave01 ~]# systemctl start mysqld
# 修改mysql配置文件
[root@mysql-slave01 ~]# vim /etc/my.cnf
server-id = 22 # 从库ID,slave02使用23
relay-log = relay-log-bin # 从主服务器同步日志文件记录到本地
relay-log-index = slave-relay-bin.index # 定义relay-log的位置和名称
# 重启mysql加载配置
[root@mysql-slave01 ~]# systemctl restart mysqld
# 登录数据库
[root@mysql-slave01 ~]# mysql -u root -p
Enter password:
Welcome to the MySQL monitor. Commands end with ; or \\g.
Your MySQL connection id is 3
Server version: 5.7.17 Source distribution
Copyright (c) 2000, 2016, Oracle and/or its affiliates. All rights reserved.
Oracle is a registered trademark of Oracle Corporation and/or its
affiliates. Other names may be trademarks of their respective
owners.
Type 'help;' or '\\h' for help. Type '\\c' to clear the current input statement.
# 指定主库信息,master_log_file、master_log_pos与主库show master status查询结果保持一致
mysql> change master to master_host='192.168.108.101',master_user='myslave',master_password='123456',master_log_file='master-bin.000001',master_log_pos=604;
Query OK, 0 rows affected, 2 warnings (0.03 sec)
# 启动从库复制
mysql> start slave;
Query OK, 0 rows affected (0.02 sec)
# 查看主从复制状态
mysql> show slave status\\G;
*************************** 1. row ***************************
Slave_IO_State: Waiting for master to send event
Master_Host: 192.168.108.101
Master_User: myslave
Master_Port: 3306
Connect_Retry: 60
Master_Log_File: master-bin.000001
Read_Master_Log_Pos: 604
Relay_Log_File: relay-log-bin.000002
Relay_Log_Pos: 321
Relay_Master_Log_File: master-bin.000001
Slave_IO_Running: Yes
Slave_SQL_Running: Yes
Replicate_Do_DB:
Replicate_Ignore_DB:
Replicate_Do_Table:
Replicate_Ignore_Table:
Replicate_Wild_Do_Table:
Replicate_Wild_Ignore_Table:
Last_Errno: 0
Last_Error:
Skip_Counter: 0
Exec_Master_Log_Pos: 604
Relay_Log_Space: 526
Until_Condition: None
Until_Log_File:
Until_Log_Pos: 0
Master_SSL_Allowed: No
Master_SSL_CA_File:
Master_SSL_CA_Path:
Master_SSL_Cert:
Master_SSL_Cipher:
Master_SSL_Key:
Seconds_Behind_Master: 0
Master_SSL_Verify_Server_Cert: No
Last_IO_Errno: 0
Last_IO_Error:
Last_SQL_Errno: 0
Last_SQL_Error:
Replicate_Ignore_Server_Ids:
Master_Server_Id: 11
Master_UUID: 5d895caf-a1e0-11f0-b3ec-000c29866c0f
Master_Info_File: /usr/local/mysql/data/master.info
SQL_Delay: 0
SQL_Remaining_Delay: NULL
Slave_SQL_Running_State: Slave has read all relay log; waiting for more updates
Master_Retry_Count: 86400
Master_Bind:
Last_IO_Error_Timestamp:
Last_SQL_Error_Timestamp:
Master_SSL_Crl:
Master_SSL_Crlpath:
Retrieved_Gtid_Set:
Executed_Gtid_Set:
Auto_Position: 0
Replicate_Rewrite_DB:
Channel_Name:
Master_TLS_Version:
1 row in set (0.00 sec)
ERROR:
No query specified
# ===================== mysql-slave02 从库配置 =====================
[root@mysql-slave02 ~]# systemctl stop mysqld
[root@mysql-slave02 ~]# rm -f /usr/local/mysql/data/auto.cnf
[root@mysql-slave02 ~]# systemctl start mysqld
# 修改配置文件
[root@mysql-slave02 ~]# vim /etc/my.cnf
server-id = 23
relay-log = relay-log-bin
relay-log-index = slave-relay-bin.index
[root@mysql-slave02 ~]# systemctl restart mysqld
# 登录数据库
[root@mysql-slave02 ~]# mysql -u root -p
Enter password:
Welcome to the MySQL monitor. Commands end with ; or \\g.
Your MySQL connection id is 3
Server version: 5.7.17 Source distribution
Copyright (c) 2000, 2016, Oracle and/or its affiliates. All rights reserved.
Oracle is a registered trademark of Oracle Corporation and/or its
affiliates. Other names may be trademarks of their respective
owners.
Type 'help;' or '\\h' for help. Type '\\c' to clear the current input statement.
mysql> change master to master_host='192.168.108.101',master_user='myslave',master_password='123456',master_log_file='master-bin.000001',master_log_pos=604;
Query OK, 0 rows affected, 2 warnings (0.04 sec)
mysql> start slave;
Query OK, 0 rows affected (0.01 sec)
# 查看复制状态
mysql> show slave status\\G;
*************************** 1. row ***************************
Slave_IO_State: Waiting for master to send event
Master_Host: 192.168.108.101
Master_User: myslave
Master_Port: 3306
Connect_Retry: 60
Master_Log_File: master-bin.000001
Read_Master_Log_Pos: 604
Relay_Log_File: relay-log-bin.000002
Relay_Log_Pos: 321
Relay_Master_Log_File: master-bin.000001
Slave_IO_Running: Yes
Slave_SQL_Running: Yes
Replicate_Do_DB:
Replicate_Ignore_DB:
Replicate_Do_Table:
Replicate_Ignore_Table:
Replicate_Wild_Do_Table:
Replicate_Wild_Ignore_Table:
Last_Errno: 0
Last_Error:
Skip_Counter: 0
Exec_Master_Log_Pos: 604
Relay_Log_Space: 526
Until_Condition: None
Until_Log_File:
Until_Log_Pos: 0
Master_SSL_Allowed: No
Master_SSL_CA_File:
Master_SSL_CA_Path:
Master_SSL_Cert:
Master_SSL_Cipher:
Master_SSL_Key:
Seconds_Behind_Master: 0
Master_SSL_Verify_Server_Cert: No
Last_IO_Errno: 0
Last_IO_Error:
Last_SQL_Errno: 0
Last_SQL_Error:
Replicate_Ignore_Server_Ids:
Master_Server_Id: 11
Master_UUID: 5d895caf-a1e0-11f0-b3ec-000c29866c0f
Master_Info_File: /usr/local/mysql/data/master.info
SQL_Delay: 0
SQL_Remaining_Delay: NULL
Slave_SQL_Running_State: Slave has read all relay log; waiting for more updates
Master_Retry_Count: 86400
Master_Bind:
Last_IO_Error_Timestamp:
Last_SQL_Error_Timestamp:
Master_SSL_Crl:
Master_SSL_Crlpath:
Retrieved_Gtid_Set:
Executed_Gtid_Set:
Auto_Position: 0
Replicate_Rewrite_DB:
Channel_Name:
Master_TLS_Version:
1 row in set (0.00 sec)
ERROR:
No query specified
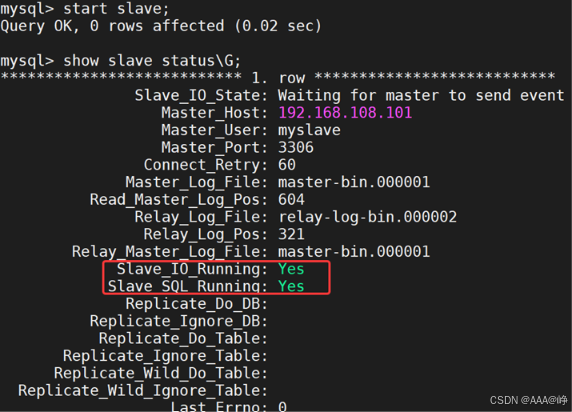
mysql-slave01,mysql-slave02查询结果如下
验证主从同步
# 主服务器上操作
[root@mysql-master ~]# mysql -uroot -phuawei
mysql> create database school;
Query OK, 1 row affected (0.01 sec)
mysql> use school;
mysql> CREATE TABLE student (
id int UNSIGNED AUTO_INCREMENT PRIMARY KEY,
name VARCHAR(20) NOT NULL,
age tinyint UNSIGNED,
#height DECIMAL(5,2),
gender ENUM('M','F') default 'M'
)ENGINE=InnoDB AUTO_INCREMENT=10 DEFAULT CHARSET=utf8mb4;
# 插入测试数据
mysql> insert student (name,age)values('路飞',20);
# 前往从服务器验证数据同步
[root@mysql-slave01 ~]# mysql -uroot -phuawei
mysql> select * from school.student;
+—-+——–+——+——–+
| id | name | age | gender |
+—-+——–+——+——–+
| 10 | 路飞 | 20 | M |
+—-+——–+——+——–+
1 row in set (0.00 sec)
mysql>
1.5amoeba服务器
读写分离 核心原理
基于 主从复制:
- insert/update/delete → 走主库
- select → 走从库
应用程序
↓
读写中间件(或代码判断)
↓
——————————————————————
写请求 → Master(主库)
读请求 → Slave 1
Slave 2
Slave 3
——————————————————————
从库可以有 1 台、2 台、多台,共同分担查询压力
主从复制保证数据一致
读写分离保证性能扩容
Amoeba 是一款基于 Java 开发的 MySQL 数据库代理中间件,核心定位是SQL 路由,帮你在应用与 MySQL 之间实现读写分离、负载均衡、高可用,对应用透明、配置简单,是早期企业实现 MySQL 读写分离的主流方案。
- 角色:应用 ↔ Amoeba ↔ MySQL 主从集群,Amoeba 是中间 “SQL 路由器”。
- 核心能力:自动识别 SQL 类型,写(INSERT/UPDATE/DELETE)走主库,读(SELECT)走从库,并对从库做负载均衡。
- 依赖前提:必须先搭好 MySQL 主从复制,Amoeba 只负责路由,不负责数据同步。
- 优势:零代码侵入、配置基于 XML(比 MySQL Proxy 的 Lua 简单)、轻量易运维。
工作流程(读写分离)
- 写操作 → 转发到配置的 主库池(writePool)。
- 读操作 → 转发到配置的 从库池(readPool),并按轮询 / 权重做负载均衡。
核心组件(配置文件)
Amoeba 核心配置在 $AMOEBA_HOME/conf/ 下,共 7 个,最关键 2 个:

路由规则(读写分离核心)
在 amoeba.xml 中配置:
- writePool :指定写操作转发的主库节点池。
- readPool :指定读操作转发的从库节点池(多从库自动轮询)。
- 规则优先级:readPools/writePools > defaultPools 。
#普通linux克隆部署amoeba
[root@amoeba ~]# hostnamectl set-hostname amoeba
#关闭防火墙与selinux
[root@amoeba ~]# systemctl stop firewalld.service
[root@amoeba ~]# setenforce 0
#赋予jdk安装包执行权限
[root@amoeba ~]# chmod +x jdk-6u14-linux-x64.bin
#执行jdk安装,出现选项时输入yes回车确认
[root@amoeba ~]# ./jdk-6u14-linux-x64.bin
#移动jdk目录到/usr/local下
[root@amoeba ~]# mv jdk1.6.0_14/ /usr/local/jdk1.6
#配置全局环境变量
[root@amoeba ~]# vim /etc/profile
#文件末尾添加如下内容
export JAVA_HOME=/usr/local/jdk1.6 #java家目录
export CLASSPATH=$CLASSPATH:$JAVA_HOME/lib:$JAVA_HOME/jre/lib #类库和jre
export PATH=$JAVA_HOME/lib:$JAVA_HOME/jre/bin/:$PATH:$HOME/bin
export AMOEBA_HOME=/usr/local/amoeba #指定amoeba路径
export PATH=$PATH:$AMOEBA_HOME/bin
#生效环境变量
[root@amoeba ~]# source /etc/profile
#创建amoeba安装目录
[root@amoeba ~]# mkdir /usr/local/amoeba
#解压amoeba程序包
[root@amoeba ~]# tar zxvf amoeba-mysql-binary-2.2.0.tar.gz -C /usr/local/amoeba/
#赋予目录权限
[root@amoeba ~]# chmod -R 755 /usr/local/amoeba/
#测试amoeba安装
#执行后输出 amoeba start|stop 代表安装成功
[root@amoeba ~]# /usr/local/amoeba/bin/amoeba
amoeba start|stop
在三台mysql上添加权限开放给amoeba访问
#amooba访问数据库的账号
#mysql-master
mysql> grant all on *.* to test@'192.168.108.%' identified by '123.com';
#mysql-slave01
mysql> grant all on *.* to test@'192.168.108.%' identified by '123.com';
#mysql-slave02
mysql> grant all on *.* to test@'192.168.108.%' identified by '123.com';
回到amoeba服务器
# 修改amoeba主配置文件
[root@amoeba ~]# cd /usr/local/amoeba/
[root@amoeba amoeba]# vim conf/amoeba.xml
#30行 设置客户端连接amoeba账号
<property name="user">amoeba</property>
#32行 设置客户端连接amoeba密码
<property name="password">123456</property>
#117、120行取消注释
#115行
<property name="defaultPool">master</property>
#118行 指定写池为主库
<property name="writePool">master</property>
#119行 指定读池为从库集群
<property name="readPool">slaves</property>
# 修改数据库后端节点配置
[root@amoeba amoeba]# vim conf/dbServers.xml
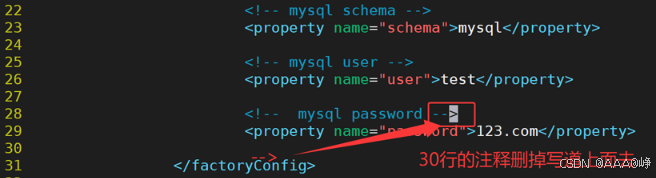
#注意:MySQL5.7默认无test库,schema改为mysql;MySQL5.5可忽略
<!— mysql schema —>
<property name="schema">mysql</property>
<!— mysql user —>
<property name="user">test</property>
<!— mysql password —>
<property name="password">123.com</property>
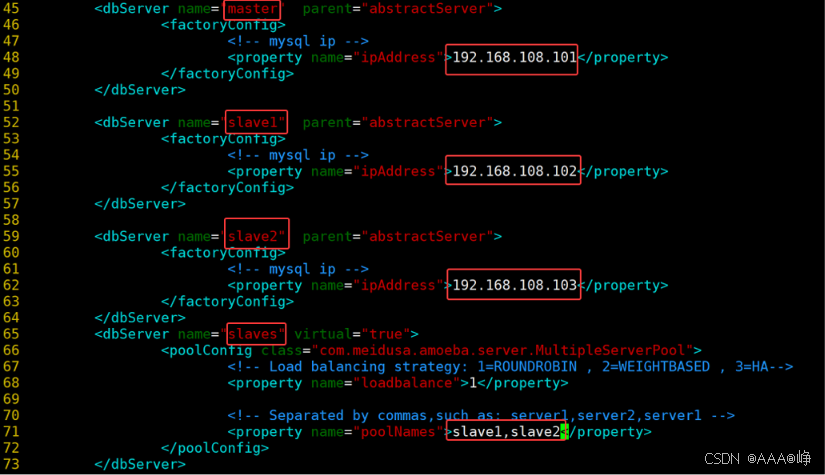
#45行 定义主库节点
<dbServer name="master" parent="abstractServer">
<property name="ipAddress">192.168.108.101</property>
#52行 定义从库slave1
<dbServer name="slave1" parent="abstractServer">
<property name="ipAddress">192.168.108.102</property>
#复制一份配置,定义从库slave2
<dbServer name="slave2" parent="abstractServer">
<property name="ipAddress">192.168.108.103</property>
#定义虚拟读集群,包含slave1、slave2
<dbServer name="slaves" virtual="true">
<poolConfig class="com.meidusa.amoeba.server.MultipleServerPool">
<property name="poolNames">slave1,slave2</property>
</poolConfig>
#后台启动amoeba
[root@amoeba ~]# /usr/local/amoeba/bin/amoeba start&
[1] 33499
#查看java进程监听与连接
[root@amoeba ~]# netstat -anpt | grep java
tcp6 0 0 :::8066 :::* LISTEN 33499/java
tcp6 0 0 127.0.0.1:21128 :::* LISTEN 33499/java
tcp6 0 0 192.168.108.110:41754 192.168.108.101:3306 ESTABLISHED 33499/java
tcp6 0 0 192.168.108.110:41722 192.168.108.102:3306 ESTABLISHED 33499/java
tcp6 0 0 192.168.108.110:36956 192.168.108.103:3306 ESTABLISHED 33499/java
vim conf/dbServers.xml 结果如下
1.6测试客户端
#客户端安装mysql客户端工具
[root@mysql-client ~]# yum install -y mysql
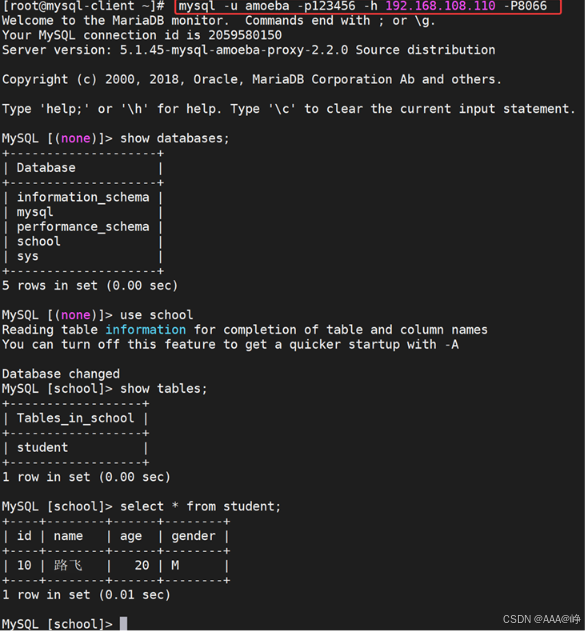
#连接amoeba代理服务,端口8066(可在amoeba服务器通过netstat -anpt|grep java确认监听端口)
[root@mysql-client ~]# mysql -u amoeba -p123456 -h 192.168.108.110 -P8066
Welcome to the MariaDB monitor. Commands end with ; or \\g.
Your MySQL connection id is 927449563
Server version: 5.1.45-mysql-amoeba-proxy-2.2.0
Copyright (c) 2000, 2018, Oracle, MariaDB Corporation Ab and others.
Type 'help;' or '\\h' for help. Type '\\c' to clear the current input statement.
MySQL [(none)]>
在MASTER上
# 在主库写入测试数据
[root@mysql-master ~]# mysql -u root -p
Enter password:
Welcome to the MySQL monitor. Commands end with ; or \\g.
Your MySQL connection id is 10
Server version: 5.7.17-log Source distribution
Copyright (c) 2000, 2016, Oracle and/or its affiliates. All rights reserved.
Oracle is a registered trademark of Oracle Corporation and/or its
affiliates. Other names may be trademarks of their respective
owners.
Type 'help;' or '\\h' for help. Type '\\c' to clear the current input statement.
mysql> use school;
Reading table information for completion of table and column names
You can turn off this feature to get a quicker startup with -A
Database changed
mysql> insert student (name,age)values('鸣人',20);
Query OK, 1 row affected (0.00 sec)
#数据自动同步至两台从库
# 登录mysql-slave01验证同步结果
mysql> select * from student;
+—-+——–+——+——–+
| id | name | age | gender |
+—-+——–+——+——–+
| 10 | 路飞 | 20 | M |
| 11 | 鸣人 | 20 | M |
+—-+——–+——+——–+
2 rows in set (0.00 sec)
# 登录mysql-slave02验证同步结果
mysql> select * from student;
+—-+——–+——+——–+
| id | name | age | gender |
+—-+——–+——+——–+
| 10 | 路飞 | 20 | M |
| 11 | 鸣人 | 20 | M |
+—-+——–+——+——–+
2 rows in set (0.00 sec)
mysql>
在两台从上
# mysql-slave01
mysql> stop slave;
# mysql-slave02
mysql> stop slave;
在客户端上插入数据,内容不会同步
#mysql-client上添加,由于不会同步,只有mysql-master192.168.108.101节点有该记录
# mysql-client
MySQL [school]> insert student (name,age)values('卡卡西',30);
在mysql-slave01上
#mysql-slave01
mysql> use school;
mysql> insert student (name,age)values('卡卡西',31);
mysql-slave02上
# mysql-slave02
mysql> use school;
mysql> insert student (name,age)values('卡卡西',32);
1.7验证主从复制
在mysql-slave01和mysql-slave02上查看
# mysql-slave01 查询数据
mysql> select * from student;
+—-+——–+——+——–+
| id | name | age | gender |
+—-+——–+——+——–+
| 10 | 路飞 | 20 | M |
| 11 | 鸣人 | 20 | M |
| 12 | 卡卡西 | 31 | M |
+—-+——–+——+——–+
3 rows in set (0.00 sec)
# mysql-slave02 查询数据
mysql> select * from student;
+—-+——–+——+——–+
| id | name | age | gender |
+—-+——–+——+——–+
| 10 | 路飞 | 20 | M |
| 11 | 鸣人 | 20 | M |
| 12 | 卡卡西 | 32 | M |
+—-+——–+——+——–+
3 rows in set (0.00 sec)
mysql>
并没有将客户端写入的insert student (name,age)values(‘卡卡西’,30);同步
在mysq-master上查看内容发现写入成功:
# mysql-master 查询数据
mysql> select * from student;
+—-+——–+——+——–+
| id | name | age | gender |
+—-+——–+——+——–+
| 10 | 路飞 | 20 | M |
| 11 | 鸣人 | 20 | M |
| 12 | 卡卡西 | 30 | M |
+—-+——–+——+——–+
3 rows in set (0.00 sec)
mysql>
1.8验证读写分离
在客户端上测试,第一次会向从服务器1读数,据-第二次会向从2读取
#mysql-client 通过amoeba代理查询数据
MySQL [(none)]> select * from school.student;
+—-+——–+——+——–+
| id | name | age | gender |
+—-+——–+——+——–+
| 10 | 路飞 | 20 | M |
| 11 | 鸣人 | 20 | M |
| 12 | 卡卡西 | 31 | M |
+—-+——–+——+——–+
3 rows in set (0.02 sec)
MySQL [(none)]> select * from school.student;
+—-+——–+——+——–+
| id | name | age | gender |
+—-+——–+——+——–+
| 10 | 路飞 | 20 | M |
| 11 | 鸣人 | 20 | M |
| 12 | 卡卡西 | 32 | M |
+—-+——–+——+——–+
3 rows in set (0.00 sec)
#实验结论:查询请求全部下发至从节点,实现读写分离;多次查询结果不同,证明读请求在mysql-slave01、mysql-slave02之间轮询调度。



评论前必须登录!
注册