 网硕互联帮助中心
本次操作系统:centos7.9(x86) IP:11.0.1.150/24
需要PXE安装的系统:centos7.9(x86),设置UEFI启动。
目录
安装软件包
创建目录
配置tftp服务
修改dhcp配置
配置http服务
拷贝文件到tftpboot目录
修改grub.cfg文件
KS文件实例
安装前启动所需服务
虚拟机测试
安装软件包
[root@localhost ~]# yum install dhcp tftp-server xinetd syslinux httpd -y
创建目录
[root@localhost ~]# mkdir /var/lib/tftpboot/centos7
[root@localhost ~]# mkdir /var/www/html/centos7
配置tftp服务
[root@localhost ~]# vim /etc/xinetd.d/tftp
#把 disable = yes 改成 disable = no
#注意tftp路径,因为在tftpboot下创建了centos7,则路径变为server_args= -s /var/lib/tftpboot/centos7
[root@localhost ~]# cat /etc/xinetd.d/tftp
# default: off
# description: The tftp server serves files using the trivial file transfer \\
# protocol. The tftp protocol is often used to boot diskless \\
# workstations, download configuration files to network-aware printers, \\
# and to start the installation process for some operating systems.
service tftp
{
socket_type = dgram
protocol = udp
wait = yes
user = root
server = /usr/sbin/in.tftpd
server_args = -s /var/lib/tftpboot/centos7
disable = no
per_source = 11
cps = 100 2
flags = IPv4
}
修改dhcp配置
[root@localhost ~]# vim /etc/dhcp/dhcpd.conf
ddns-update-style interim;
ignore client-updates;
allow booting;
allow bootp;
subnet 11.0.1.0 netmask 255.255.255.0
{
option subnet-mask 255.255.255.0;
option time-offset -18000;
default-lease-time 1200;
max-lease-time 7200;
range dynamic-bootp 11.0.1.1 11.0.1.250;
filename "centos7/EFI/BOOT/grubx64.efi";
next-server 11.0.1.150;
}
filename里的路径,取决于tftpboot下grubx64.efi的路径!本次的grubx64.efi路径为/var/lib/tftpboot/centos7/EFI/BOOT/grubx64.efi,所以此处填写centos7/EFI/BOOT/grubx64.efi。只用写tftpboot后面的部分
如果是arm构架的系统,只需要将grubx64.efi 更换成 grubaa64.efi 即可,其余不变
若是BIOS启动,filename写为filename “/pxelinux.0”
配置http服务
把需要安装的系统的文件全都拷到/var/www/html/下,也可在html下再创建一个文件,比如我这次要安装centos7,那我就创建/var/www/html/centos7/
提前将安装的操作系统镜像传到服务器上,方便后期挂载复制文件
[root@localhost ~]# mkdir centos7
[root@localhost ~]# mount CentOS-7-x86_64-DVD-2009.iso centos7/
mount: /dev/loop0 is write-protected, mounting read-only
[root@localhost ~]# cp -r centos7/* /var/www/html/centos7/
我这里选择的是先挂载,然后将所有文件都复制到/var/www/html/centos7/下面。
也还可以直接挂载到/var/www/html/centos7/下。
拷贝文件到tftpboot目录
tftpboot下也可以创建一个目录,还是以centos7为例,将EFI和images文件全部拷到/var/lib/tftpboot/centos7/下
[root@localhost ~]# cp -r /var/www/html/centos7/EFI/ /var/lib/tftpboot/centos7/
[root@localhost ~]# cp -r /var/www/html/centos7/images/ /var/lib/tftpboot/centos7/
修改grub.cfg文件
[root@localhost ~]# vim /var/lib/tftpboot/centos7/EFI/BOOT/grub.cfg
set timeout=10
set default=0
menuentry 'Install CentOS7' {
linuxefi /centos7/images/pxeboot/vmlinuz inst.ks=http://11.0.1.150/centos7/centos7_ks.cfg inst.lang=en_US inst.keymap=us ip=dhcp inst.text
initrdefi /centos7/images/pxeboot/initrd.img
}
#要注意的是,因为vmlinue和initrd.img都是在tftpboot下的/centos7/images/pxeboot/目录下,所以grub.cfg里的路径也要改为/centos7/images/pxeboot/
#inst.ks路径是ks文件的路径,也就是/var/www/html/centos7/下
ks文件路径都是在/var/www/html/centos7/下放着,提前写好放着。
KS文件实例
# 使用文本模式安装
text
# 键盘布局
keyboard –vckeymap=us –xlayouts='us'
# 系统语言
lang en_US.UTF-8
# 网络安装源
url –url="http://11.0.1.150/centos7/"
# Root密码
rootpw "root"
# 系统时区
timezone Asia/Shanghai –utc
# 禁用SELinux
selinux –disabled
# 禁用防火墙
firewall –disabled
# 安装期间网络配置
network –bootproto=dhcp –device=link –activate
# 安装磁盘选择
ignoredisk –only-use=sda
bootloader –location=mbr –boot-drive=sda –append="crashkernel=auto"
# 分区清理信息
clearpart –all –initlabel
# 分区
part /boot/efi –fstype="efi" –size=200 –ondisk=sda
part /boot –fstype="xfs" –size=1024 –ondisk=sda
part / –fstype="xfs" –size=153600 –ondisk=sda
part /home –fstype="xfs" –grow –ondisk=sda
# 软件包
%packages
@^minimal
@core
kexec-tools
%end
reboot
安装前启动所需服务
[root@localhost ~]# systemctl enable tftp –now
[root@localhost ~]# systemctl enable httpd –now
[root@localhost ~]# systemctl enable dhcpd –now
#我个人建议,dhcp服务不要设置开机自启,用的时候在手动启动
虚拟机测试
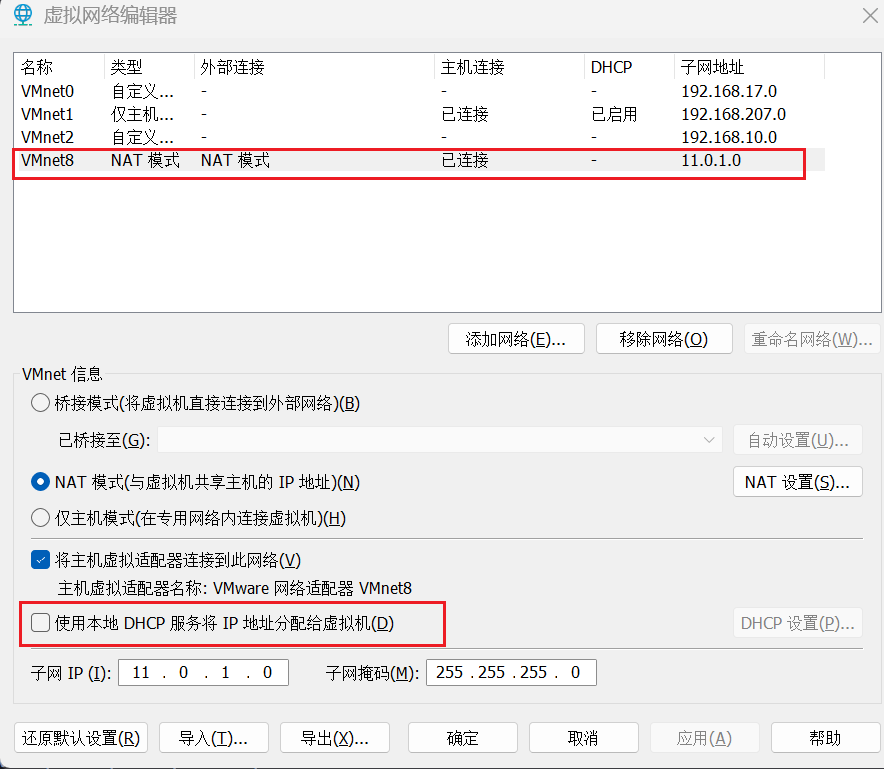
生产环境不好直接操作的话,可以先在VMware测试一下!首先关闭VMware的dhcp功能。尤其是你用的NAT的情况下,虚拟机的IP是DHCP分配的地址,必须得关了。然后进入虚拟机,将IP地址固定下来。
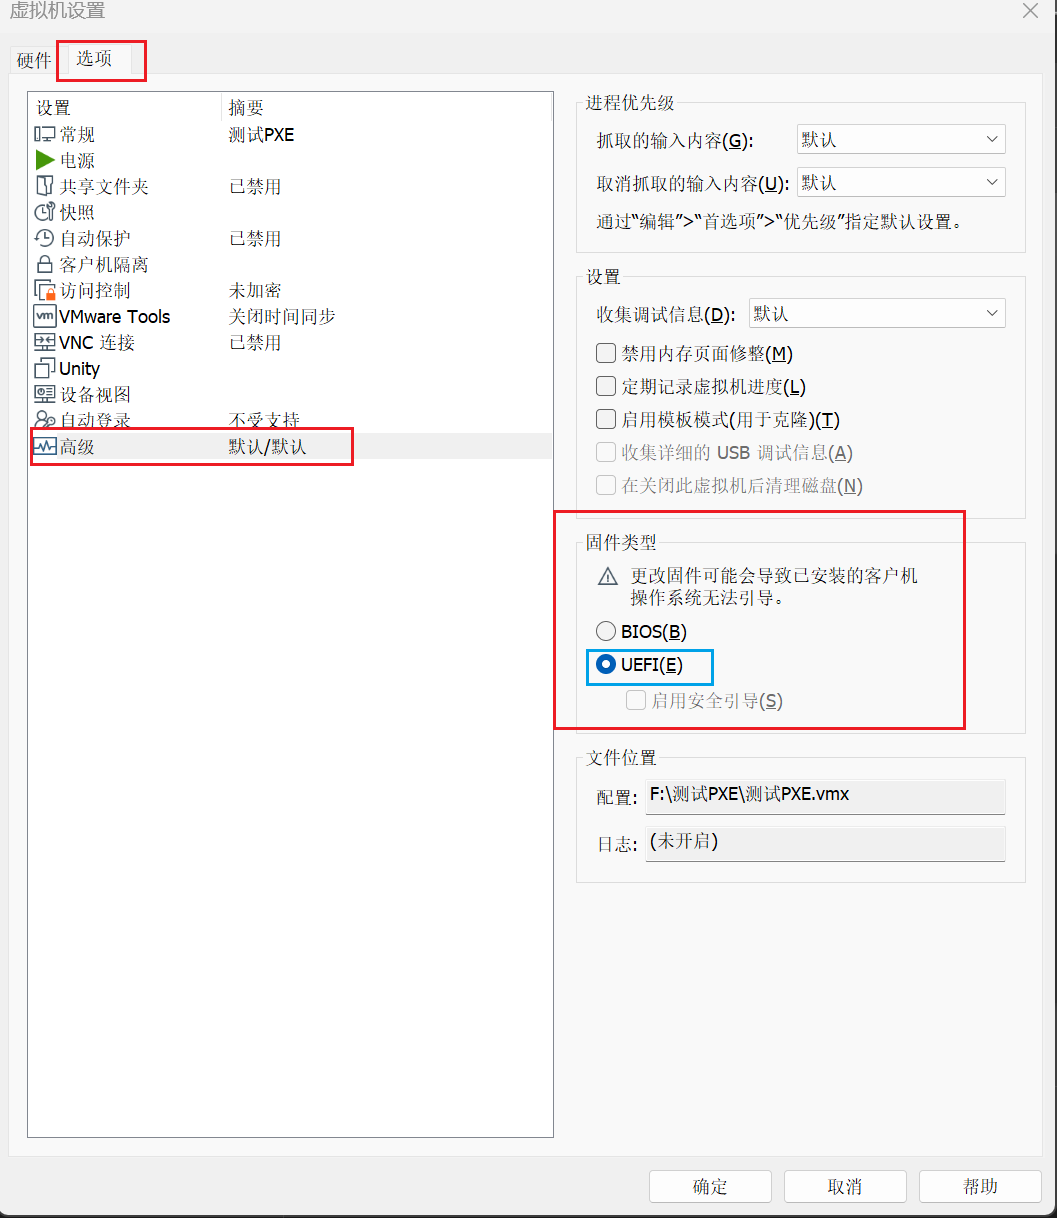
创建一台新的虚拟机,如果使用我这个KS文件的话,磁盘容量要大于等于500GB,否则安装的时候会报错。创建好后,不要选择镜像,然后去设置里边,将启动方式改为UEFI启动。
编辑虚拟机设置–>选项(左上角)–>高级
最后在PXE服务器中重启服务,开机测试的机器即可。
[root@localhost ~]# systemctl restart dhcpd tftp httpd


评论前必须登录!
注册