 网硕互联帮助中心
一、SpringBoot介绍
JavaWeb: JavaWeb项目是用来接收别人发给你的请求,javaweb代码处理请求,并响应。
二、SpringBoot和SSM的关系
SSM虽好,但是通过搭建一个SSM项目还是比较繁琐的,需要大量的xml配置文件。
SSM:SpringMVC + Spring + MyBatis
springboot整合了springmvc、spring、mybatis等核心功能。也就是说本质上实现功能的还是原有的spring、springmvc的包,但是springboot单独包装了一层,这样用户就不必直接对springmvc、spring等,在xml中配置。
三、java 框架之路:
jsp/servlet –> EJB(Sun 公司) –> SSH (Struct2+Spring + Hibernate) –> SSM –> SpringBoot
springboot 的出现是为了解决大部分人认为 java 框架太笨重,难用。
SpringBoot –> Dubbo(阿里巴巴 停更又复活)–> SpringCloud(做分布式开发的)–> SpringCloud Alibaba
–> Spring AI (让 java 再次伟大)
javaWeb 三大件: Servlet,Filter,Listener
四、Springboot的优势
Spring Boot是由Pivotal团队提供的全新框架,其设计目的是用来简化Spring应用的初始搭建以及开发过程。该框架使用了特定的方式来进行配置,从而使开发人员不再需要定义样板化的配置。
不再需要那些千篇一律,繁琐的xml文件。
内嵌Tomcat,不再需要外部的Tomcat
更方便的和各个第三方工具(mysql、redis、elasticsearch、dubbo、kafka等等整合),而只要维护一个配置文件即可。
Spring Boot 开箱即用
JavaWeb 工程师已经开始变为Spring 工程师了。
五、创建模块
1.选择增加新模块
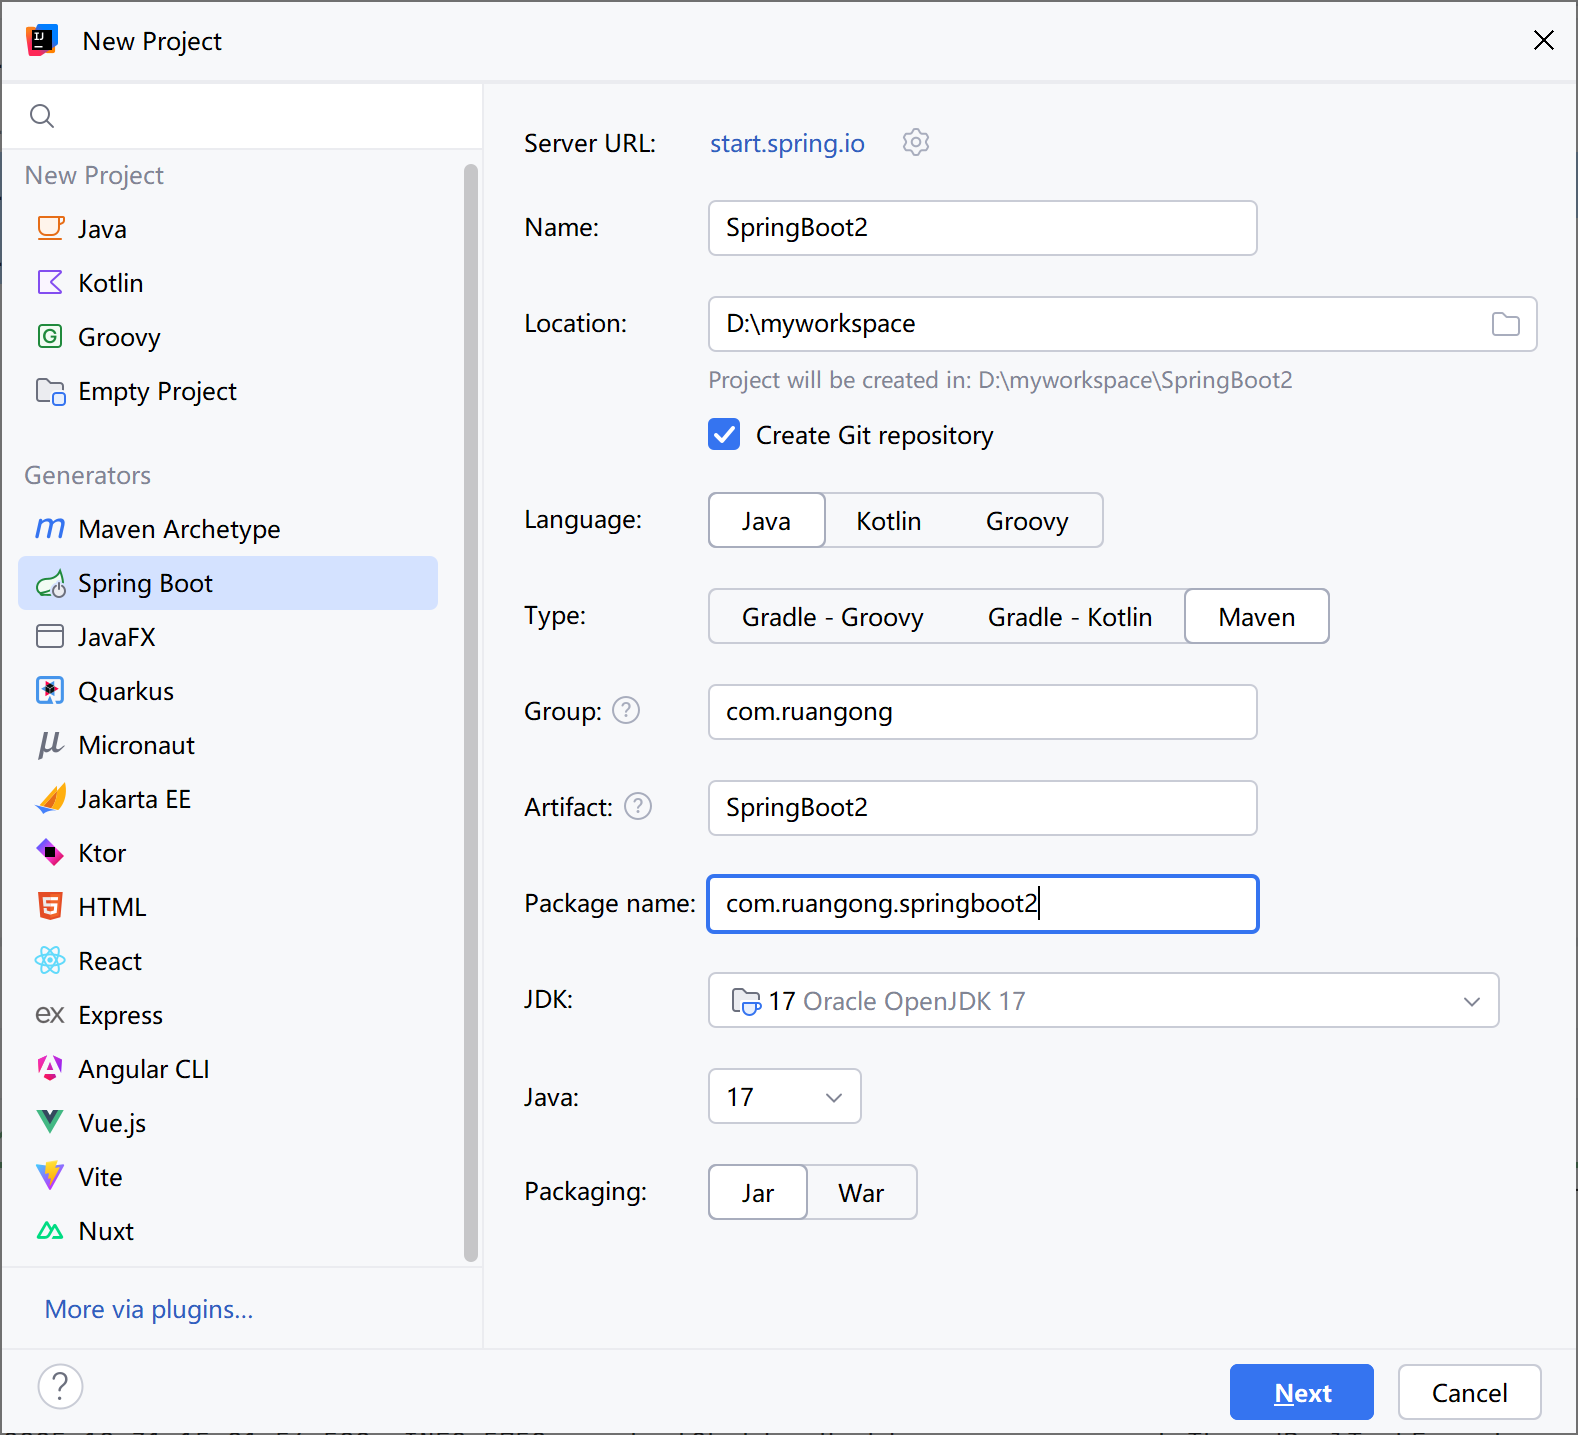
url也可以修改,修改为start.aliyun.com
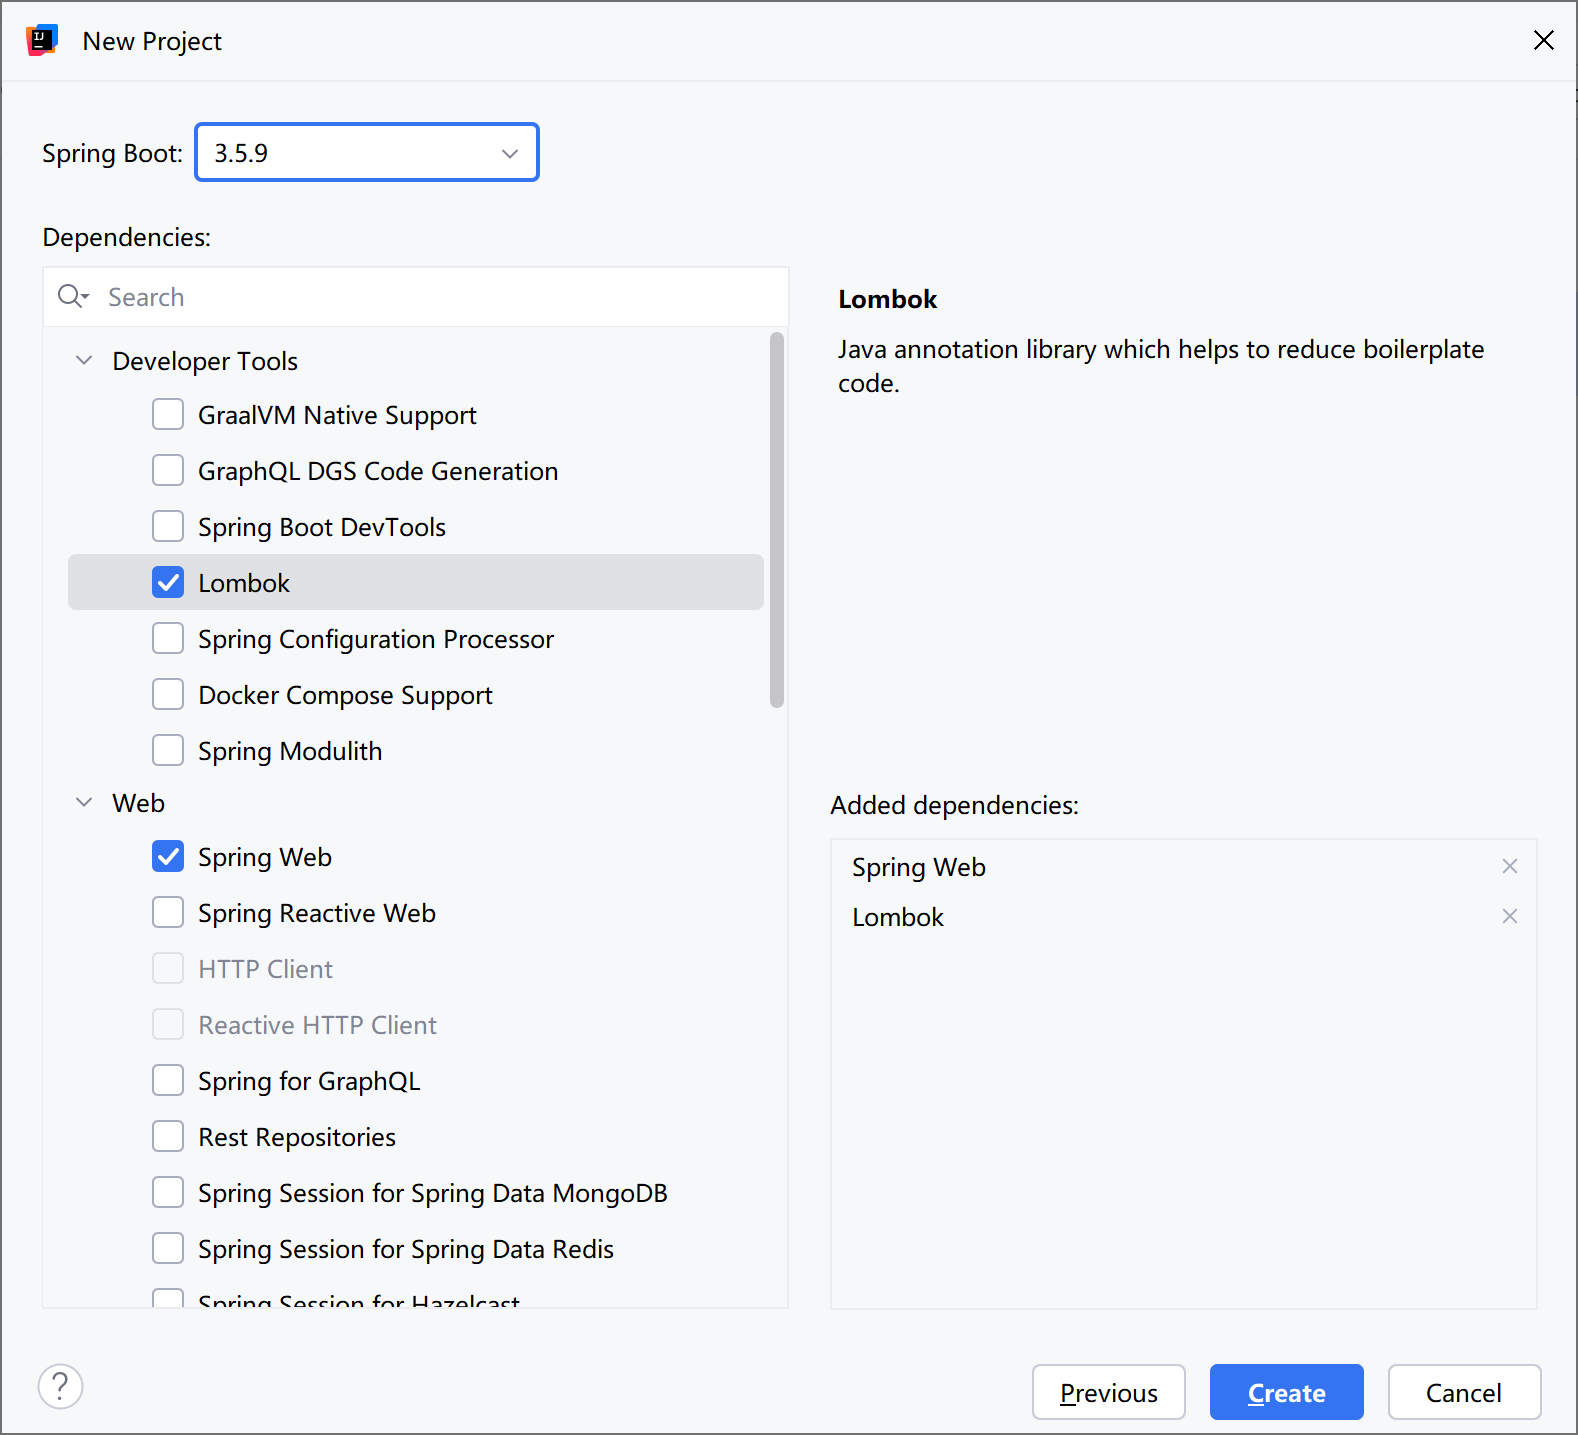
2. 选择依赖
选择spring web 包括web应用的常用注解,以及web容器(默认tomcat)。
选择lombok,修饰实体类的注解插件。
这里不选也可以在之后去pom.xml里添加依赖。
pom.xml中的依赖
<dependencies>
<dependency>
<groupId>org.springframework.boot</groupId>
<artifactId>spring-boot-starter-web</artifactId>
</dependency>
<dependency>
<groupId>org.projectlombok</groupId>
<artifactId>lombok</artifactId>
<optional>true</optional>
</dependency>
</dependencies>
3.自动产生的文件
创建好后的,springboot的工程比maven的工程多了两个文件。其中:
SpringbootDemoApplication 是整个程序的启动类。
application.properties是整个工程的配置文件。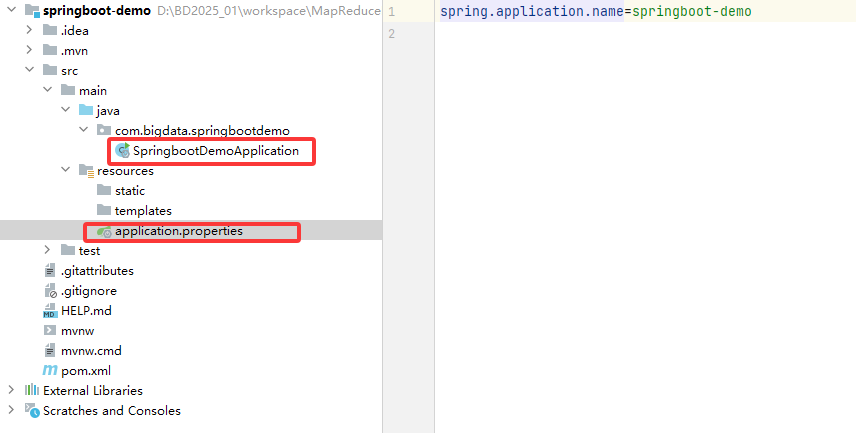
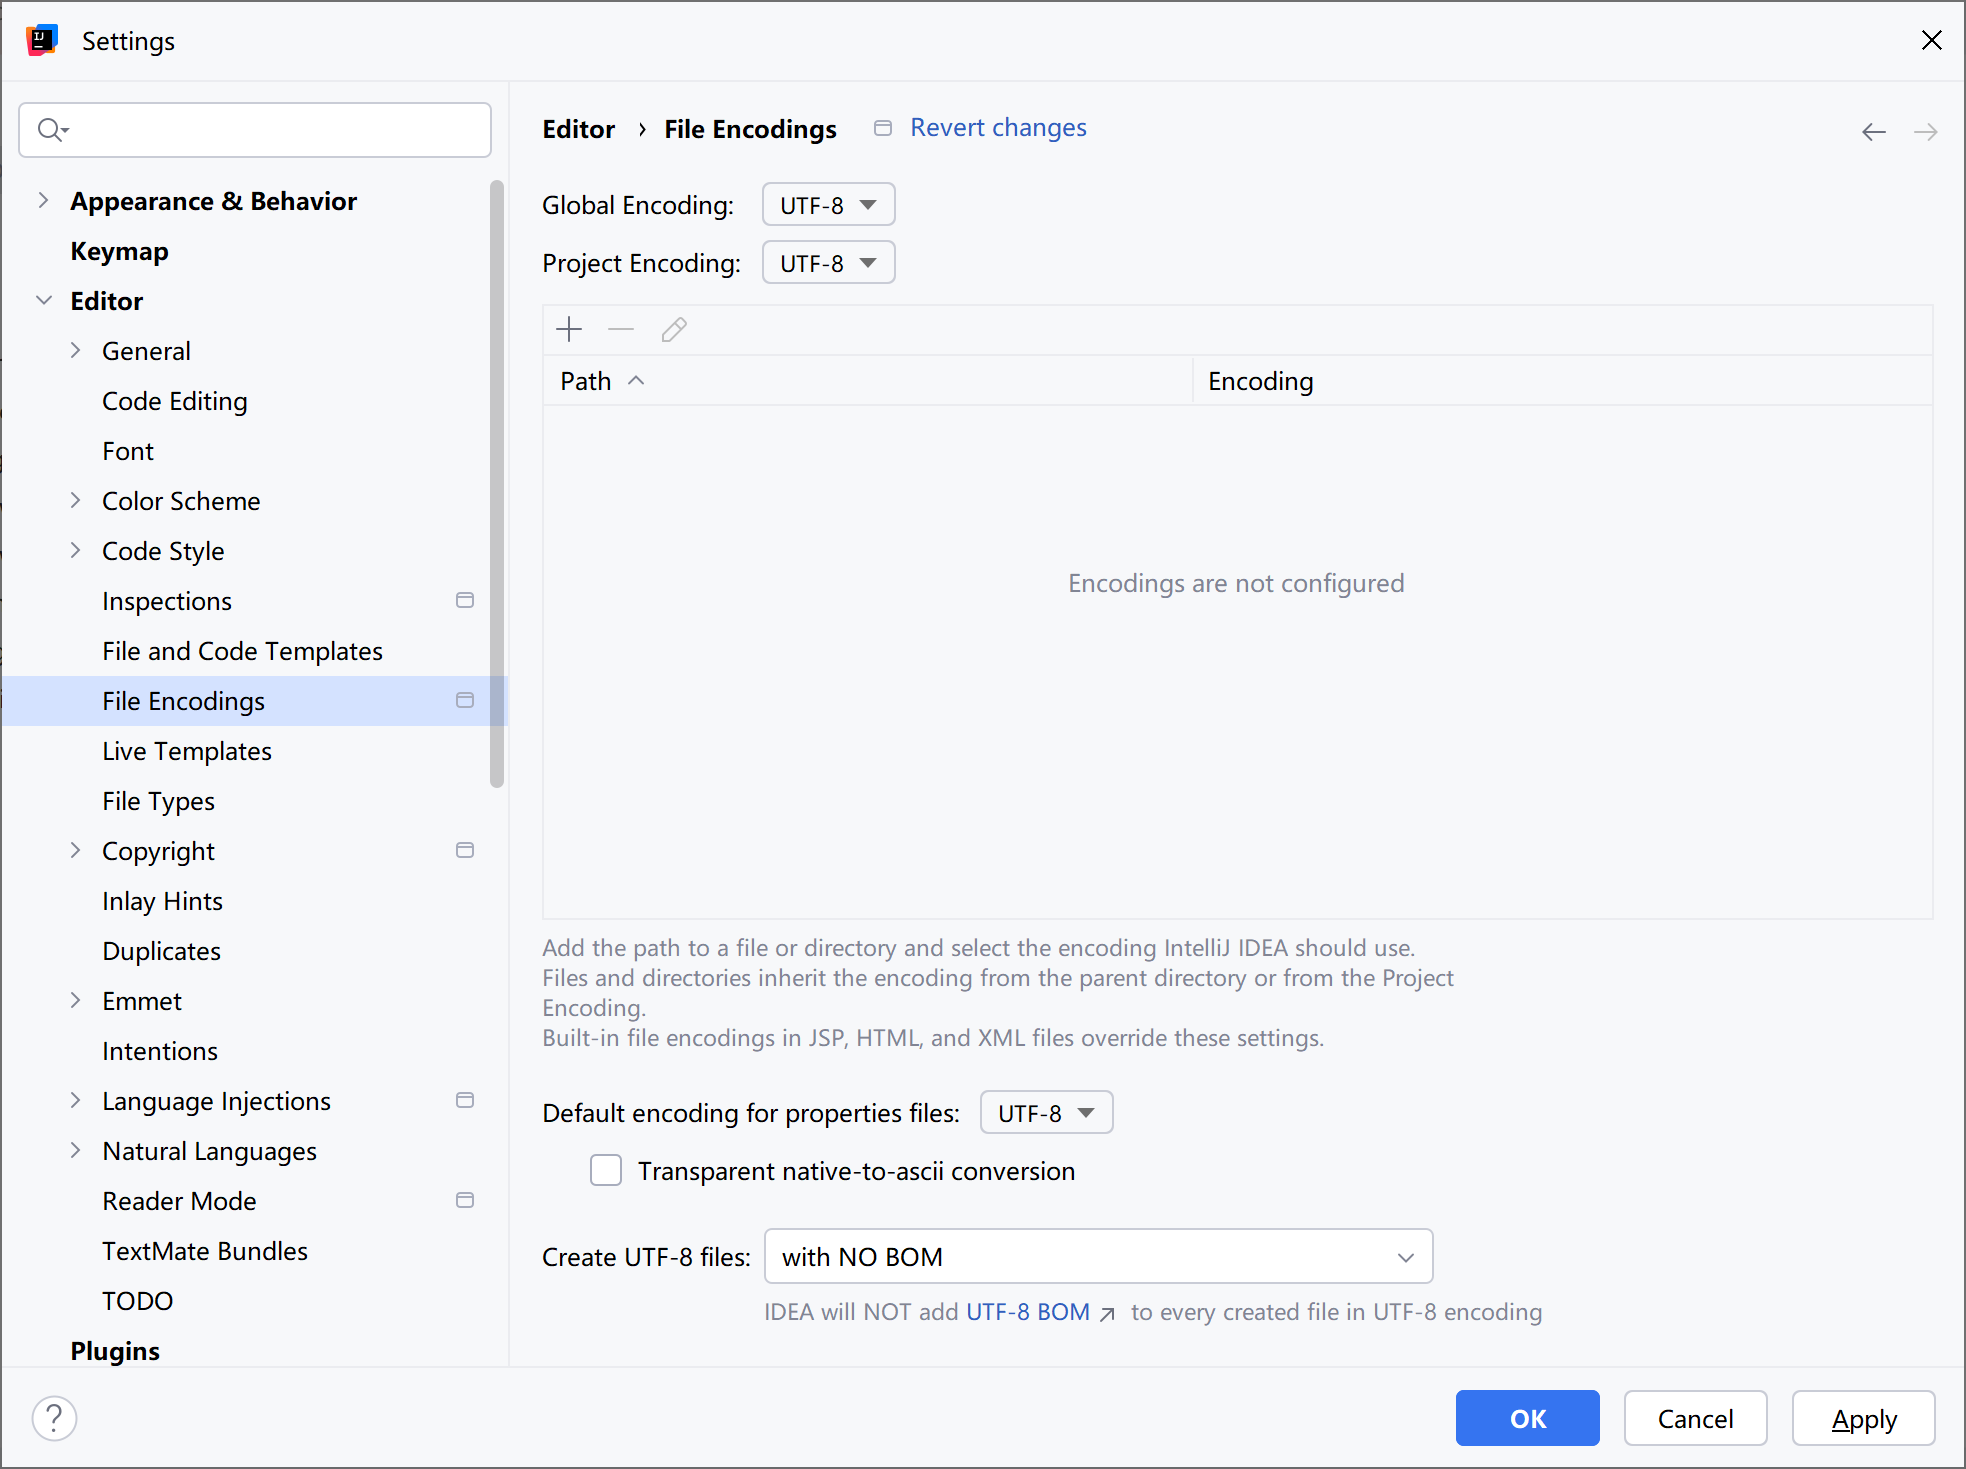
补:乱码的解决方法:
六、Springboot应用开发
应用开发的分层
浏览器 –> 控制层 –> 服务层 –> 数据访问层 –> 数据库
分层的好处: 解耦
控制层 Controller:只负责接收参数和返回参数
服务层 Service:提供一个个服务(一个服务就是一个功能,一个功能有可能调用数据库也可以不调用数据库或者调用多次数据库)
数据访问层 DAO:采用 mybatis或者 mybatis-plus 来操作数据库。对数据库操作进行了封装(操作实体跟操作数据一样简单)
Java编程: 面向对象编程,一切皆为对象。
分层及各层职责
|
分层 |
名称 |
职责 |
涉及的标签 |
|
controller |
控制层 |
1接收请求和参数 2调用服务层 3 返回响应和结果 |
@RestController @RequestMapping @RequestParam @RequestBody |
|
service |
服务层(业务层) |
1接收控制层调用 2 处理业务 3 返回结果 |
@Service @Autowired |
|
mapper |
数据层 |
1接收服务层调用 2数据库的操作 (SQL) 3 返回结果
|
@Select @Insert @Delete @Update @Param |
1. 控制层(controller)
职责
1) 接收请求和参数
2)调用服务层
3)返回响应和结果
注解 说明
|
注解 |
位置 |
|
|
@RestController |
类 |
标识入口类 |
|
@RequestMapping |
方法 |
标识入口方法 |
|
@GetMapping |
方法 |
标识入口方法GET请求专用 |
|
@PostMapping |
方法 |
标识入口方法POST请求专用 |
|
@RequestParam |
参数 |
接收路径上的键值对参数 http://xxxxx/xx?name=xxx&age=xxx |
|
@PathVariable |
参数 |
接收路径上的值 http://xxxxx/customer/123 |
|
@RequestBody |
参数 |
接收请求体 中的参数 |
package com.ruangong.springboot2.controller;
import com.ruangong.springboot2.pojo.Customer;
import org.springframework.stereotype.Controller;
import org.springframework.web.bind.annotation.*;
//@Controller // 是需要走视图解析器的,需要跳转界面的
@RestController // 不走视图解析器,如果返回实体,会封装为json 数据
public class DemoController {
//http://localhost:8080/hello
@RequestMapping("/hello")
public String hello(){
System.out.println("我是hello");
return "hello!";
}
//http://localhost:8080/hello2?name=zhangsan&age=28
@RequestMapping("/hello2")
public String hello2(String name,int age){
System.out.println("我是hello");
return "hello "+name+",年龄:"+age;
}
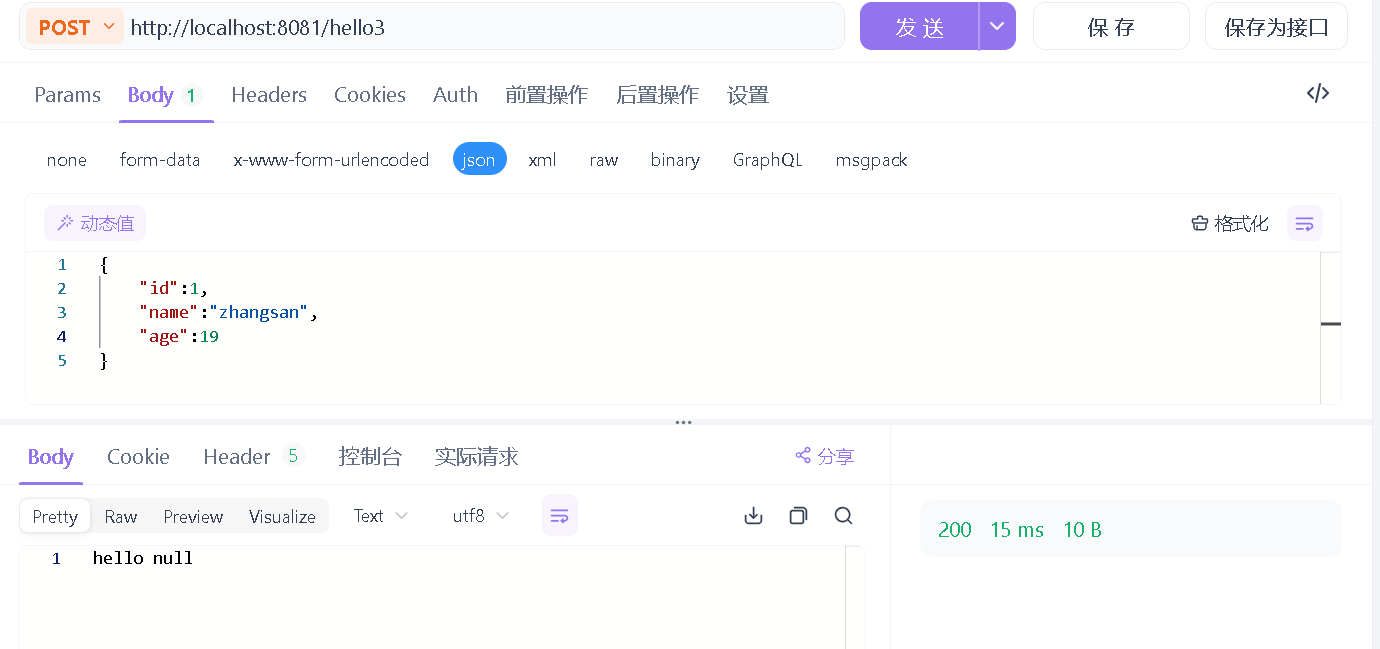
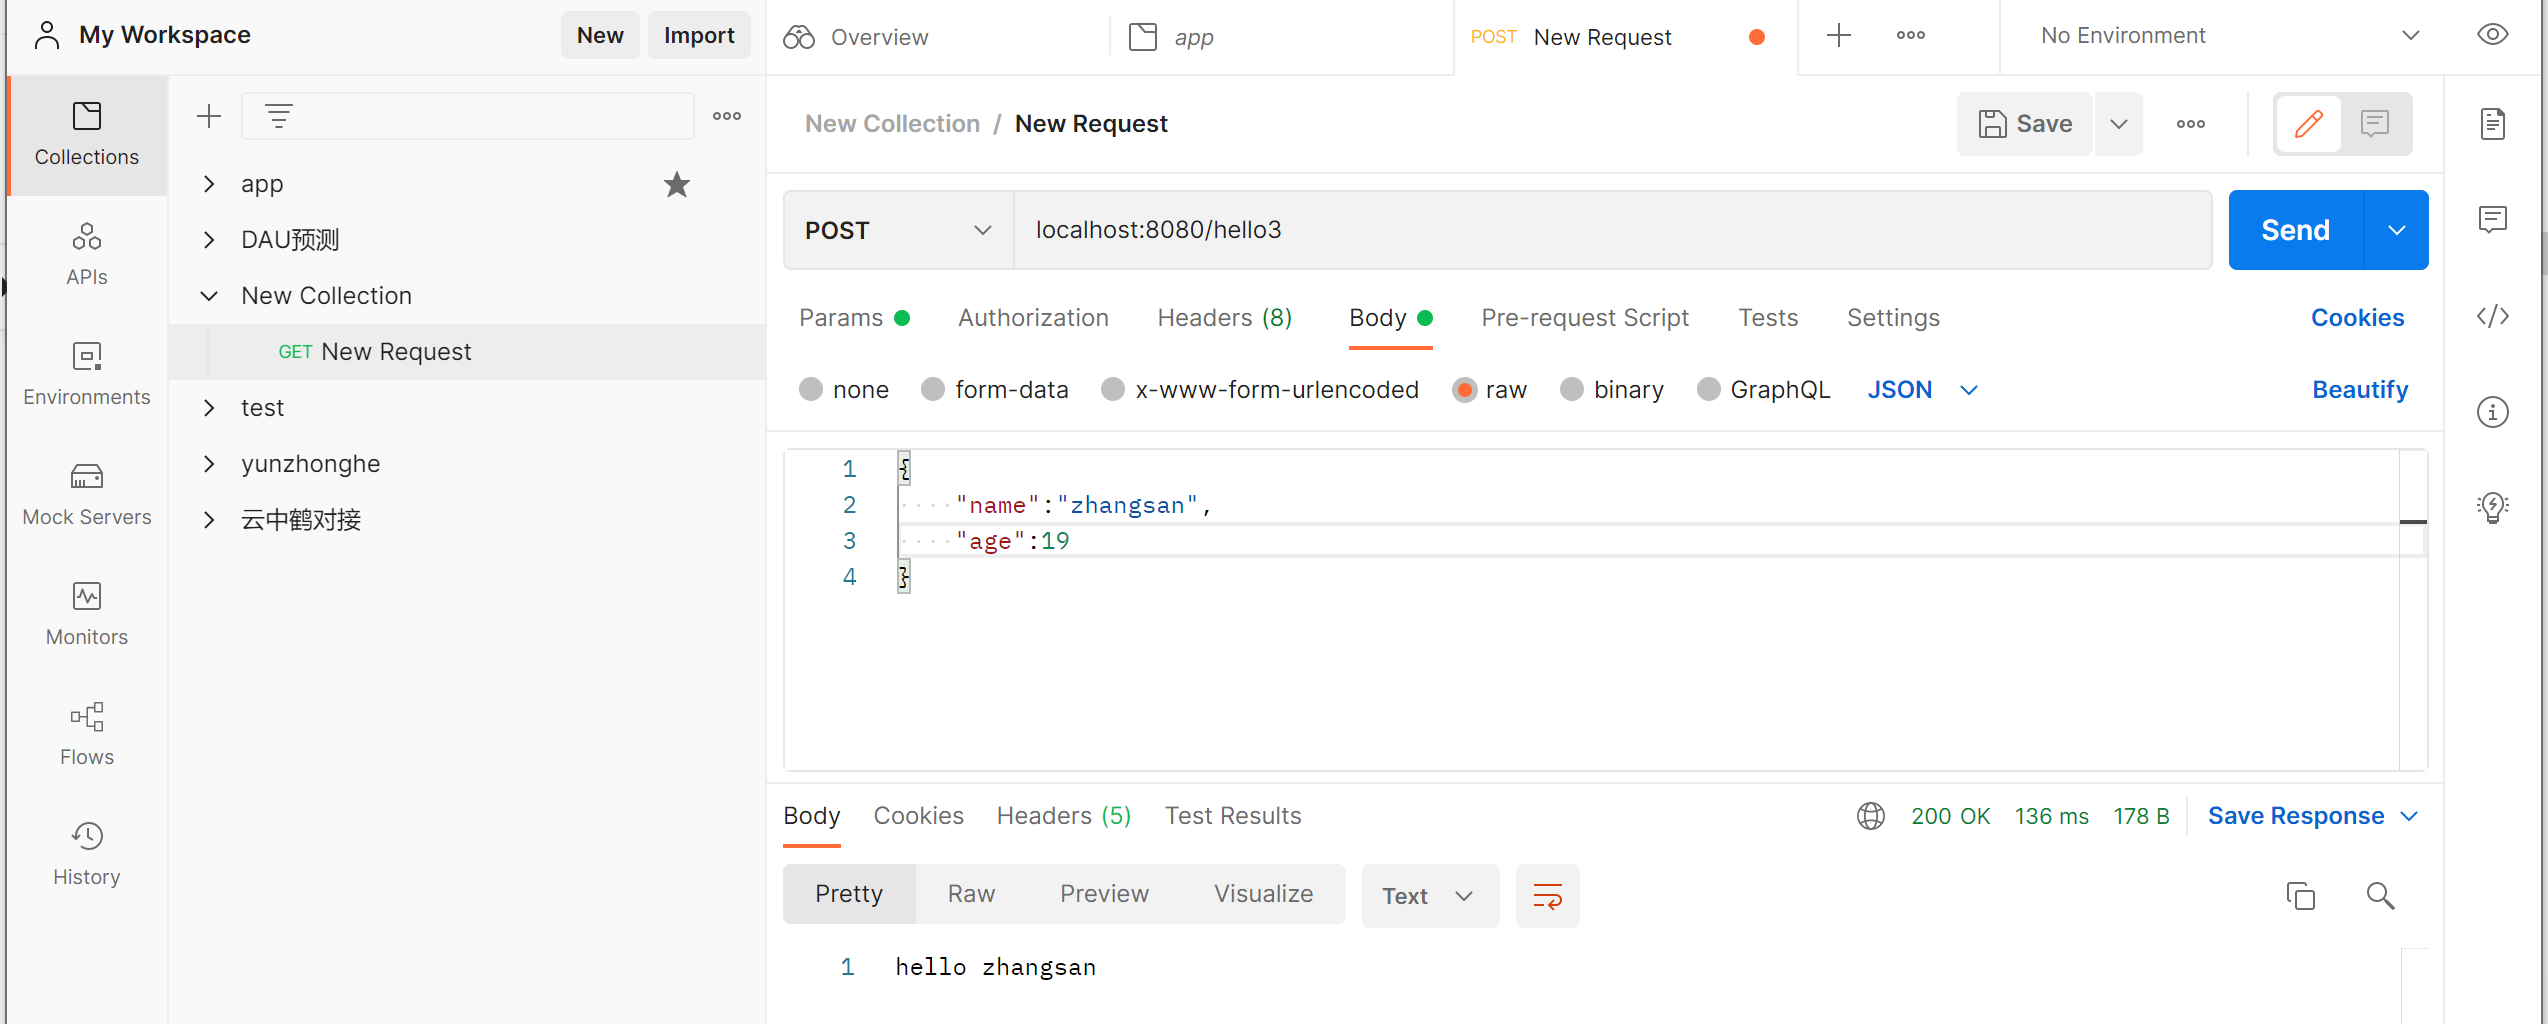
//http://localhost:8080/hello3?ename=zhangsan
@RequestMapping("/hello3")
public String hello3(@RequestParam("ename") String name){
System.out.println("我是hello");
return "hello "+name;
}
@RequestMapping("/hello4")
public String hello4(@RequestBody Customer customer){
System.out.println(customer);
return "hello "+customer.getName();
}
// restful 是一种风格
//http://localhost:8080/hello5/zhangsan/30
@RequestMapping("/hello5/{name}/{age}")
public String hello5(@PathVariable("name") String name,@PathVariable("age") int age){
System.out.println(name);
System.out.println(age);
return "hello "+name;
}
}
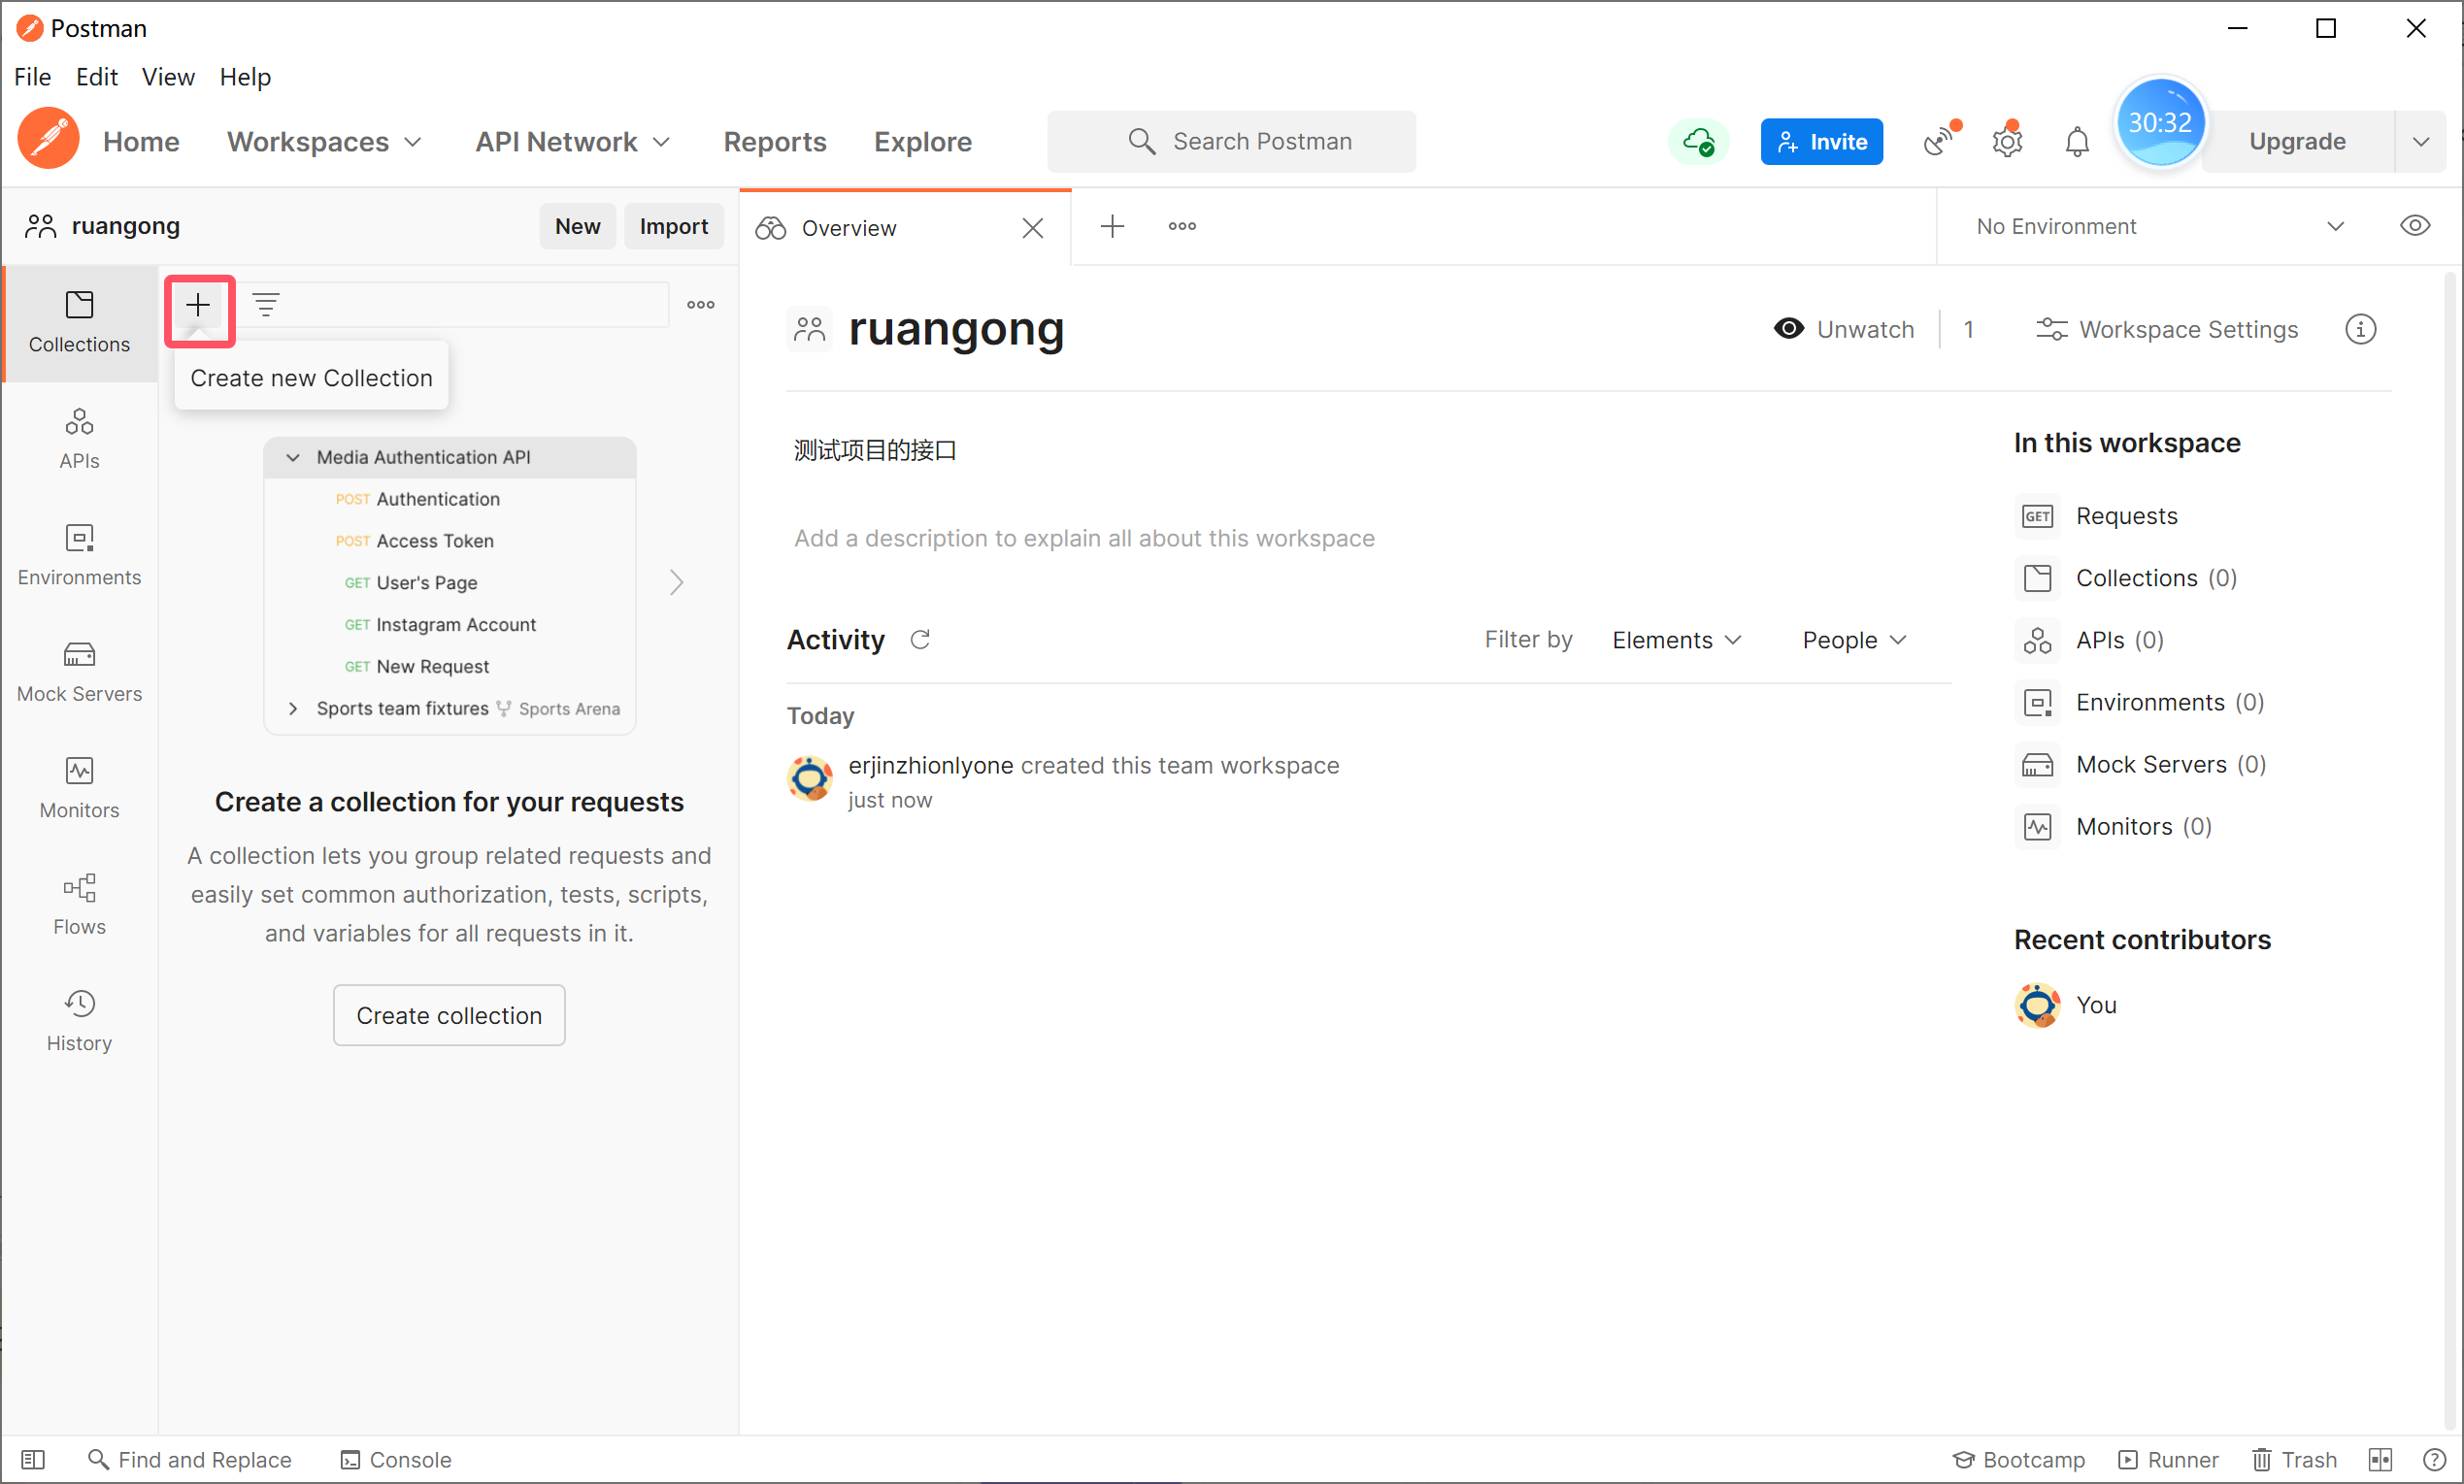
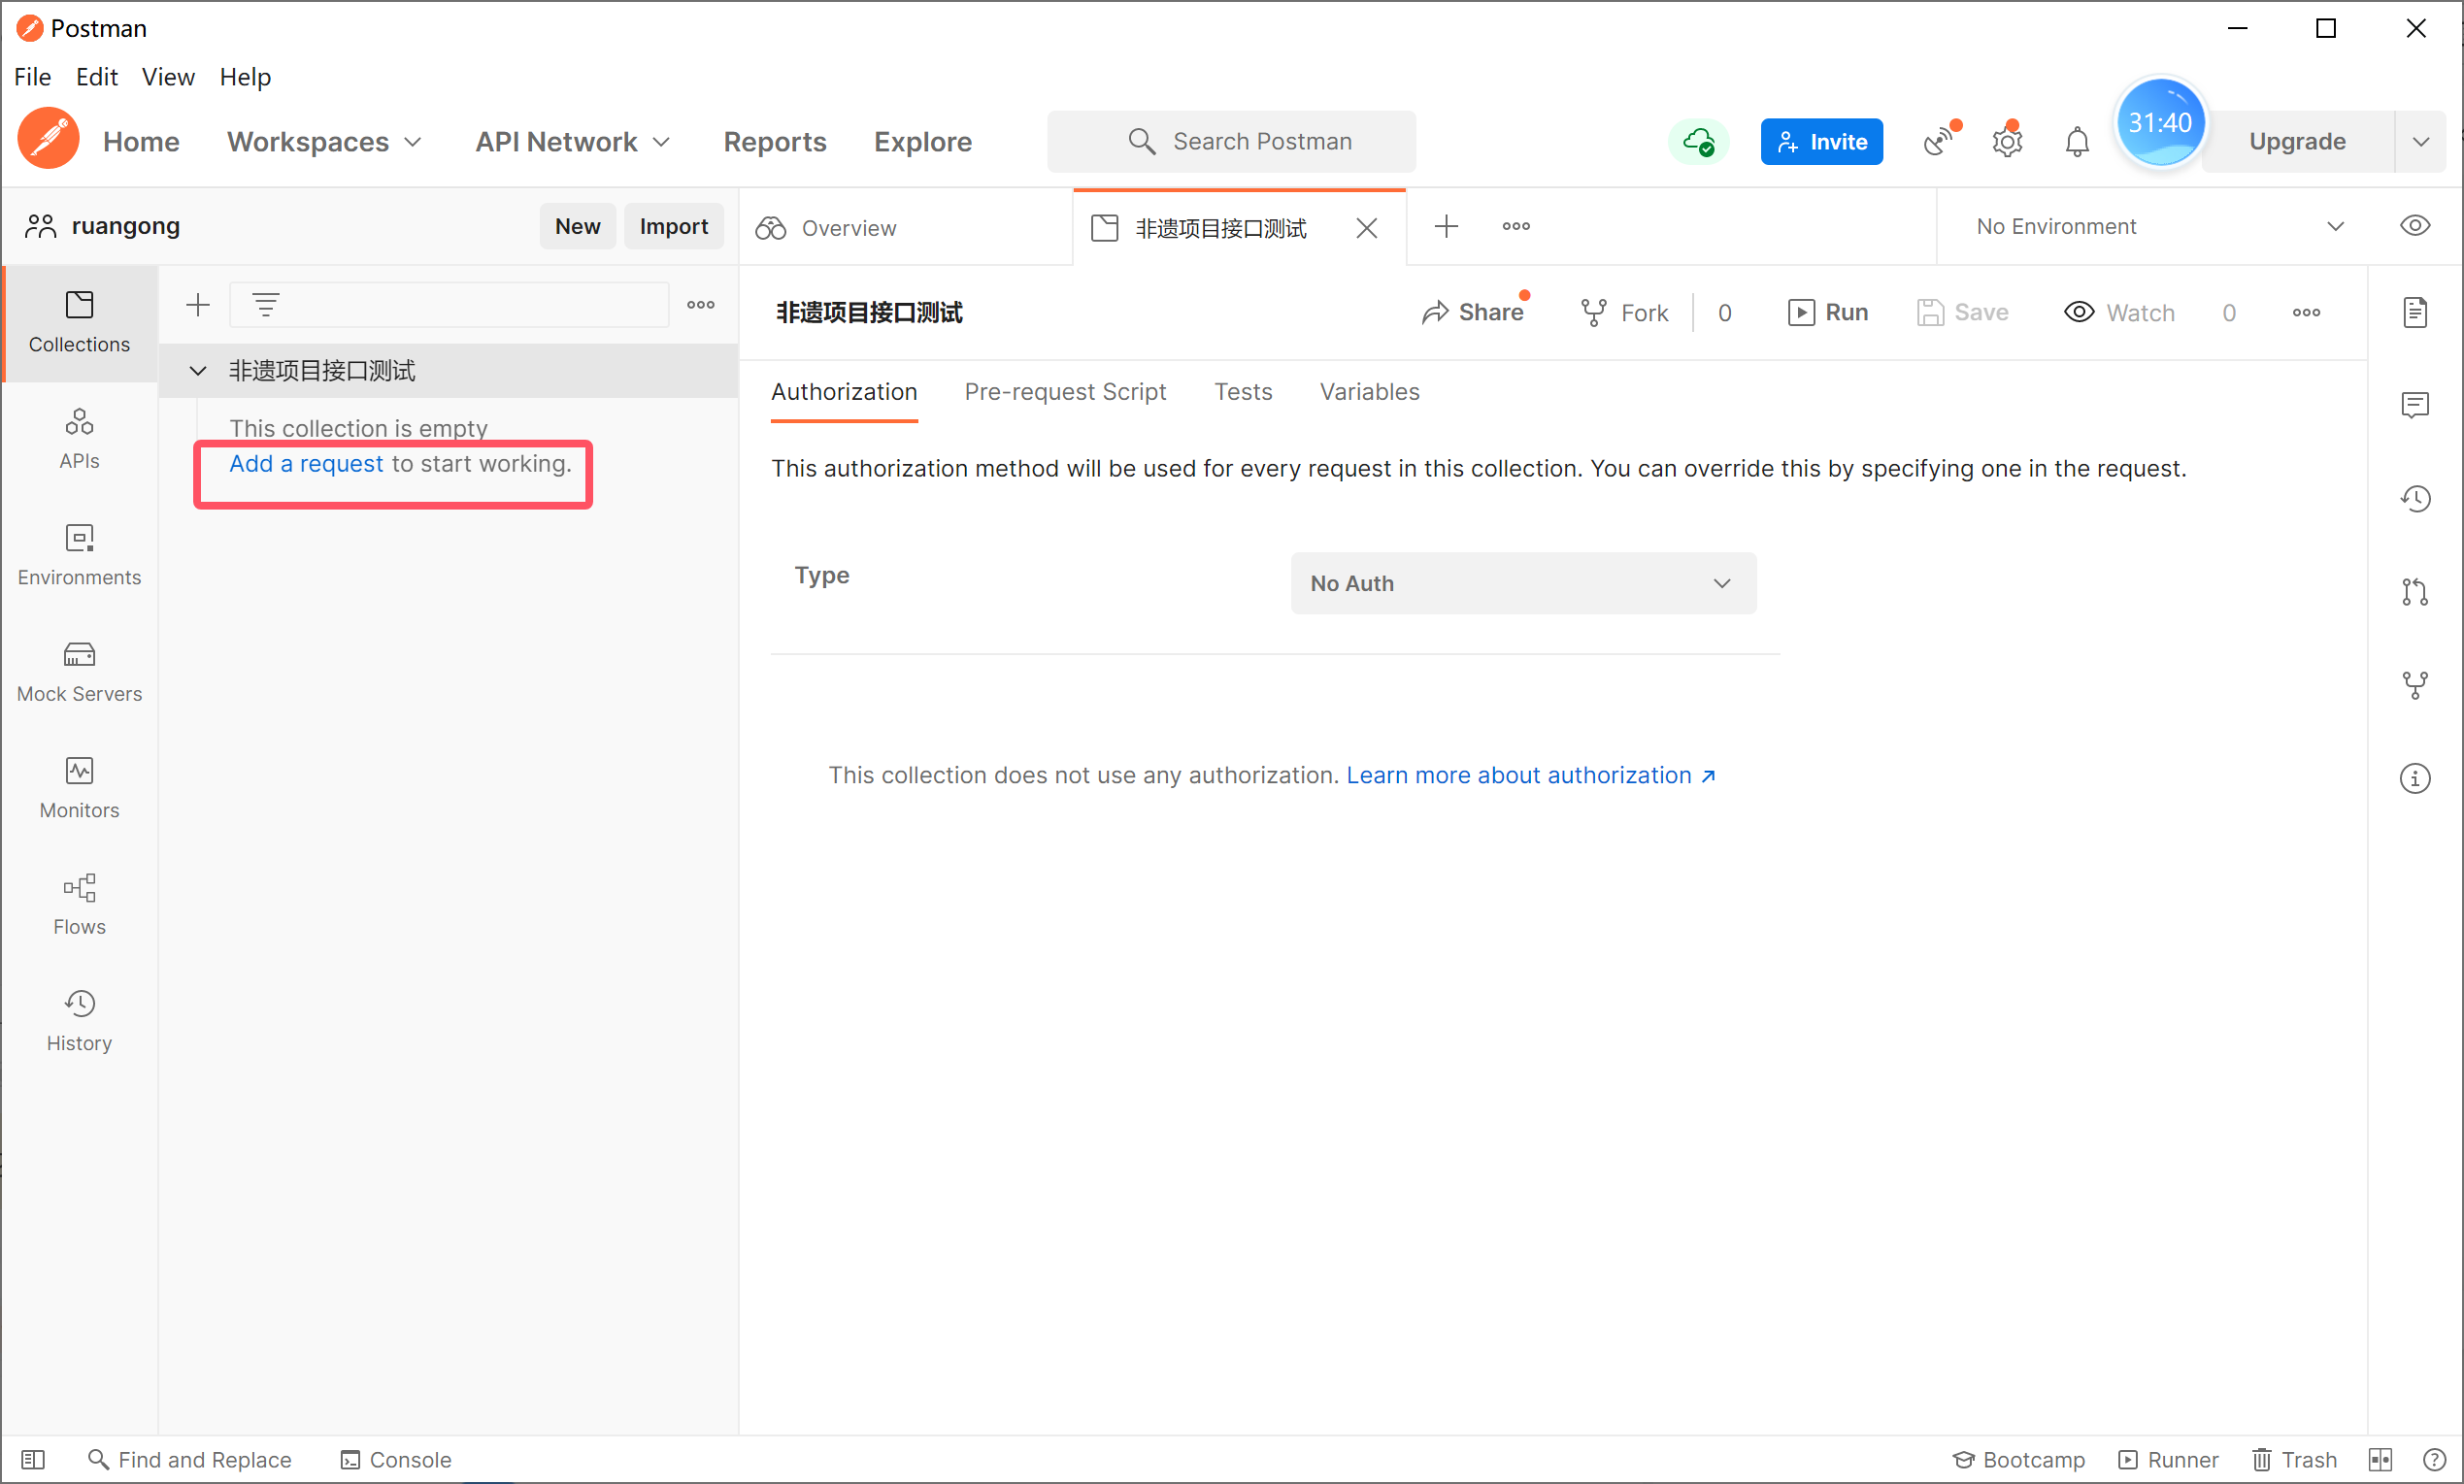
使用API Fox 工具测试,也可以使用postman
Postman的一个使用:
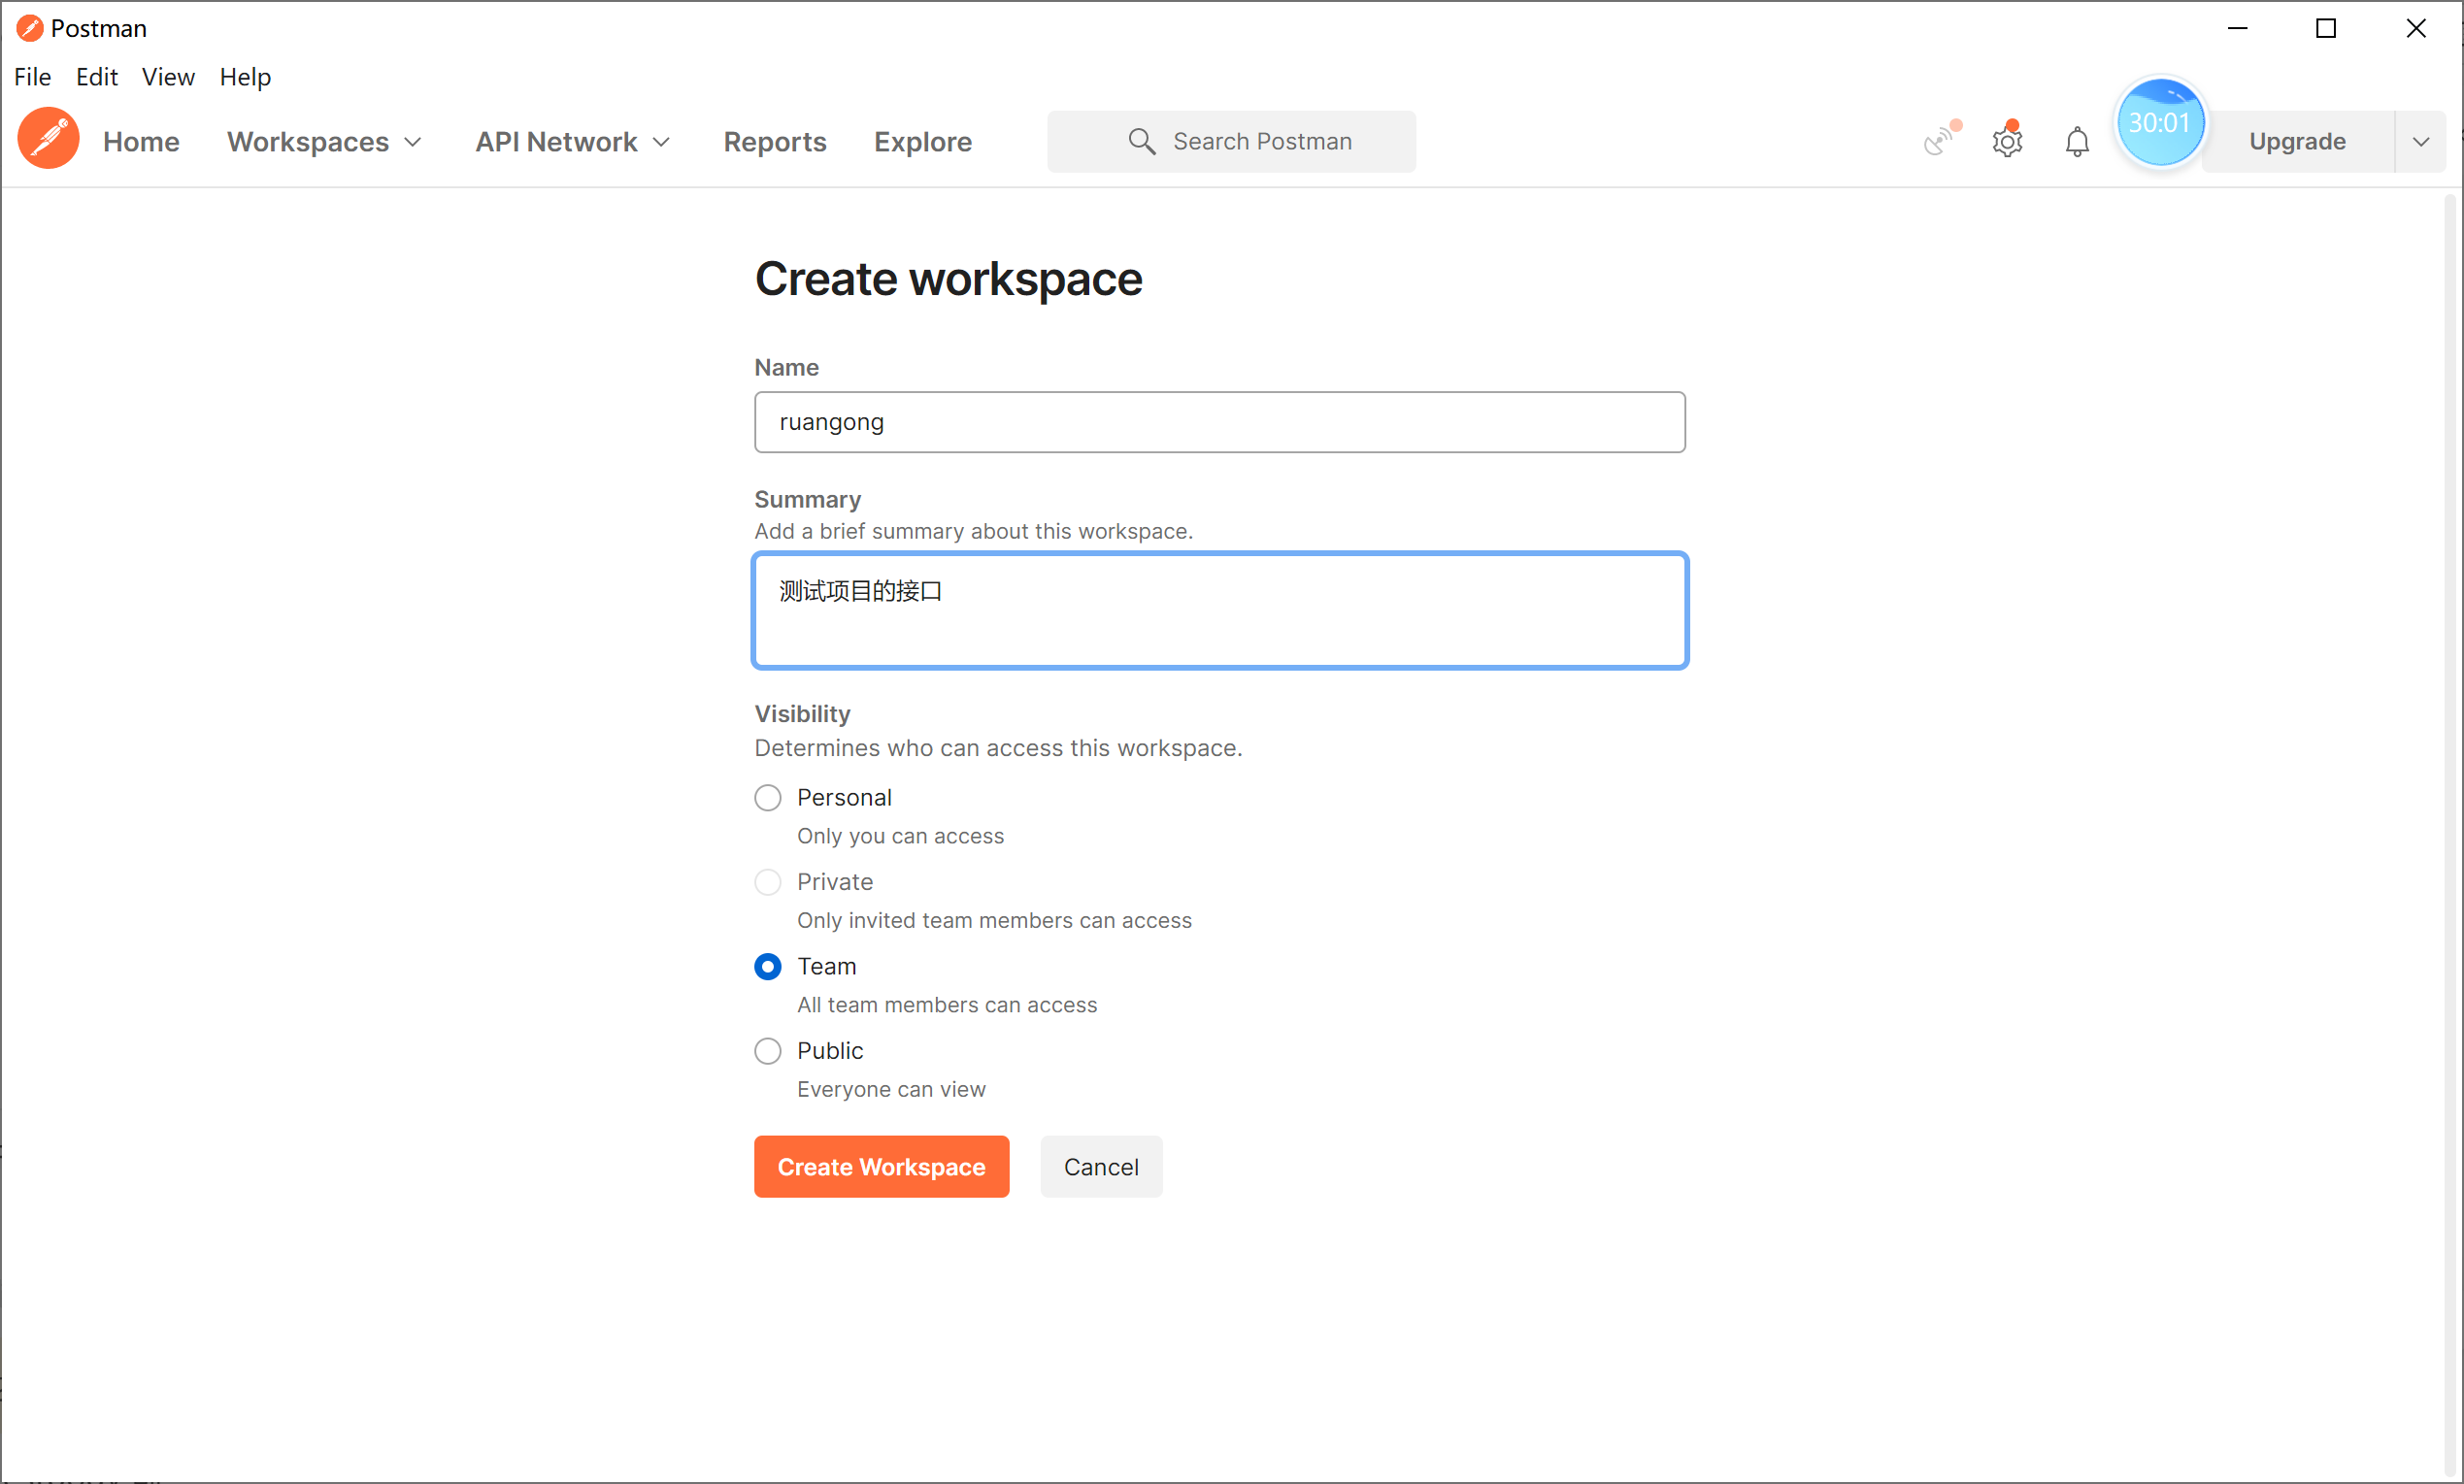
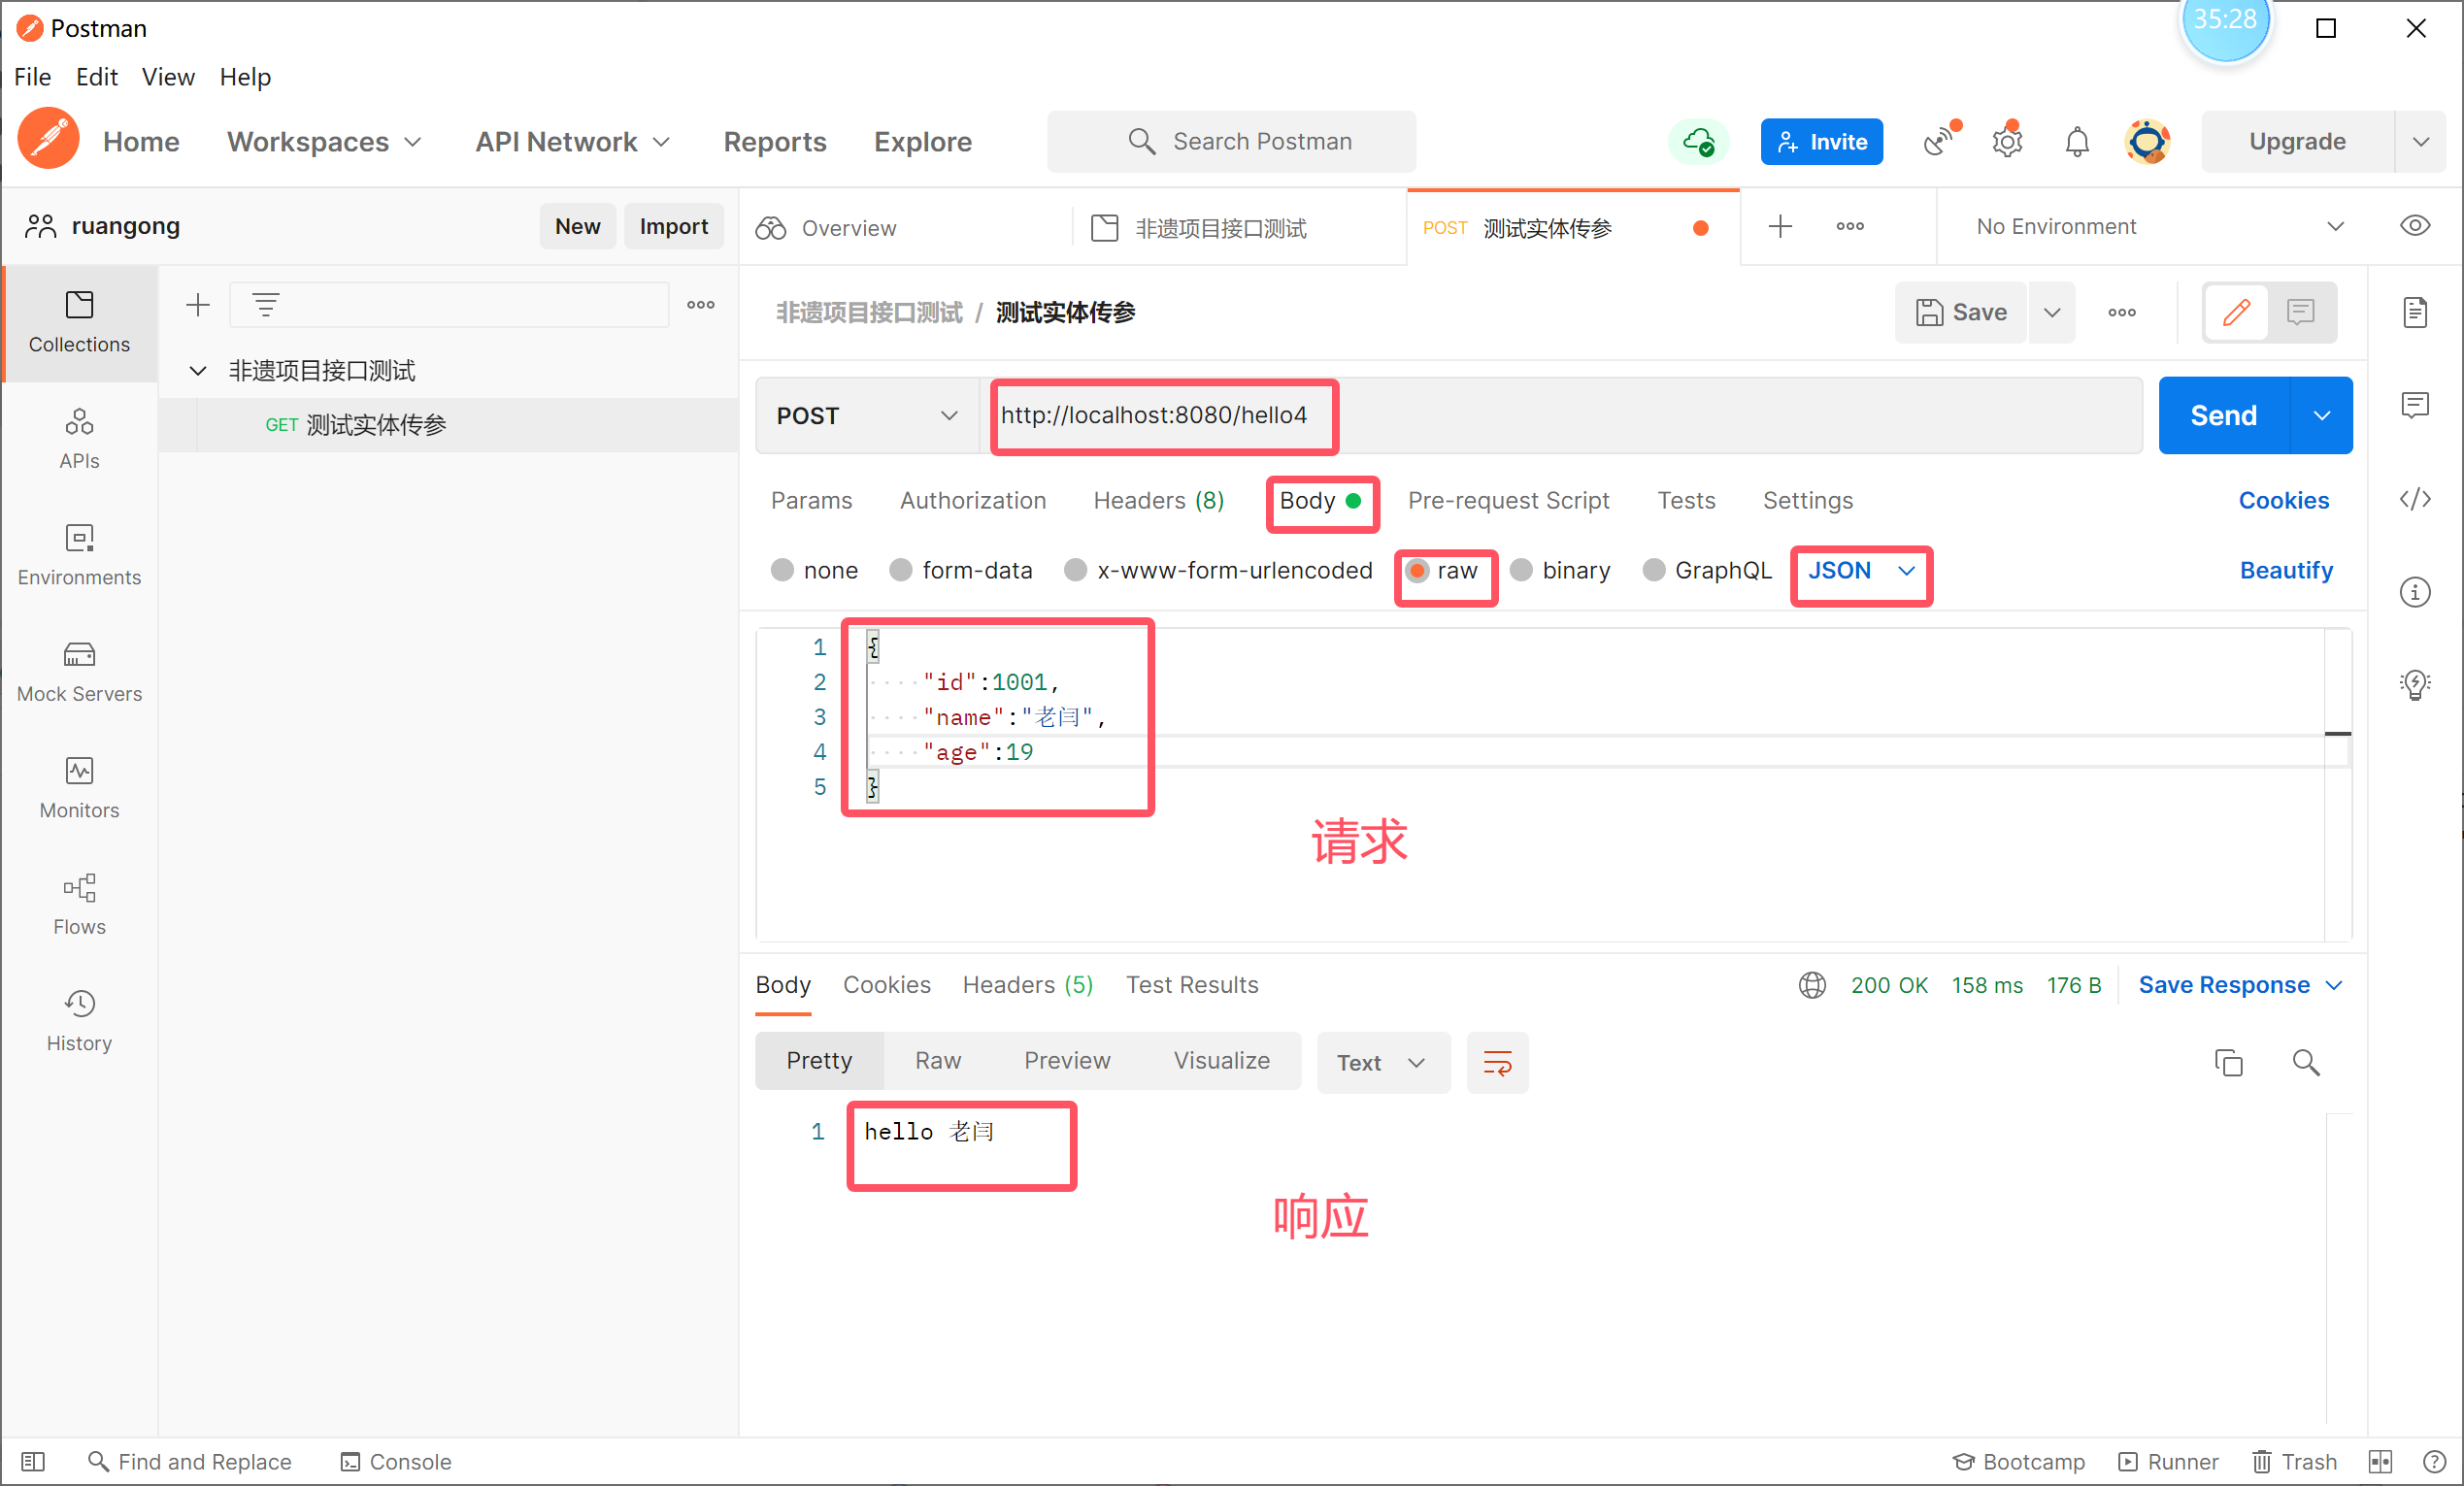
web 请求有很多种,但是我们只需要掌握 Get 和 Post
使用 requestbody前:
使用后:
2.实体类(bean类)
实体类的注解由lombok依赖提供。
|
注解 |
位置 |
说明 |
|
@NoArgsConstructor |
类 |
增加无参构造函数 |
|
@AllArgsConstructor |
类 |
增加全参构造函数 |
|
@Data |
类 |
增加getter setter tostring 方法 |
package com.bigdata.springbootdemo.pojo;
import lombok.AllArgsConstructor;
import lombok.Data;
import lombok.NoArgsConstructor;
@Data
@AllArgsConstructor
@NoArgsConstructor
public class Customer {
String id;
String name;
int age;
}
3.服务层(Service层)
职责
(1)接收控制层调用
(2)处理业务
(3)返回结果
注解说明
|
注解 |
位置 |
说明 |
|
@Service |
类 |
声明该类为Service层Spring容器组件 |
|
@Component |
类 |
声明该类为Spring容器组件,功能上于@Service没有区别 |
|
@Autowired |
类 |
自动将Spring容器中的组件,装配到引用上。 |
Service层由两个类组成,一个接口和一个实体类组成。
package com.ruangong.springboot2.service;
import com.ruangong.springboot2.pojo.Customer;
public interface DemoService {
void saveCustomer(Customer customer);
}
package com.ruangong.springboot2.service.impl;
import com.ruangong.springboot2.pojo.Customer;
import com.ruangong.springboot2.service.DemoService;
import org.springframework.stereotype.Service;
@Service
public class DemoServiceImpl implements DemoService {
@Override
public void saveCustomer(Customer customer) {
System.out.println(customer);
System.out.println("保存客户资料成功!");
}
}
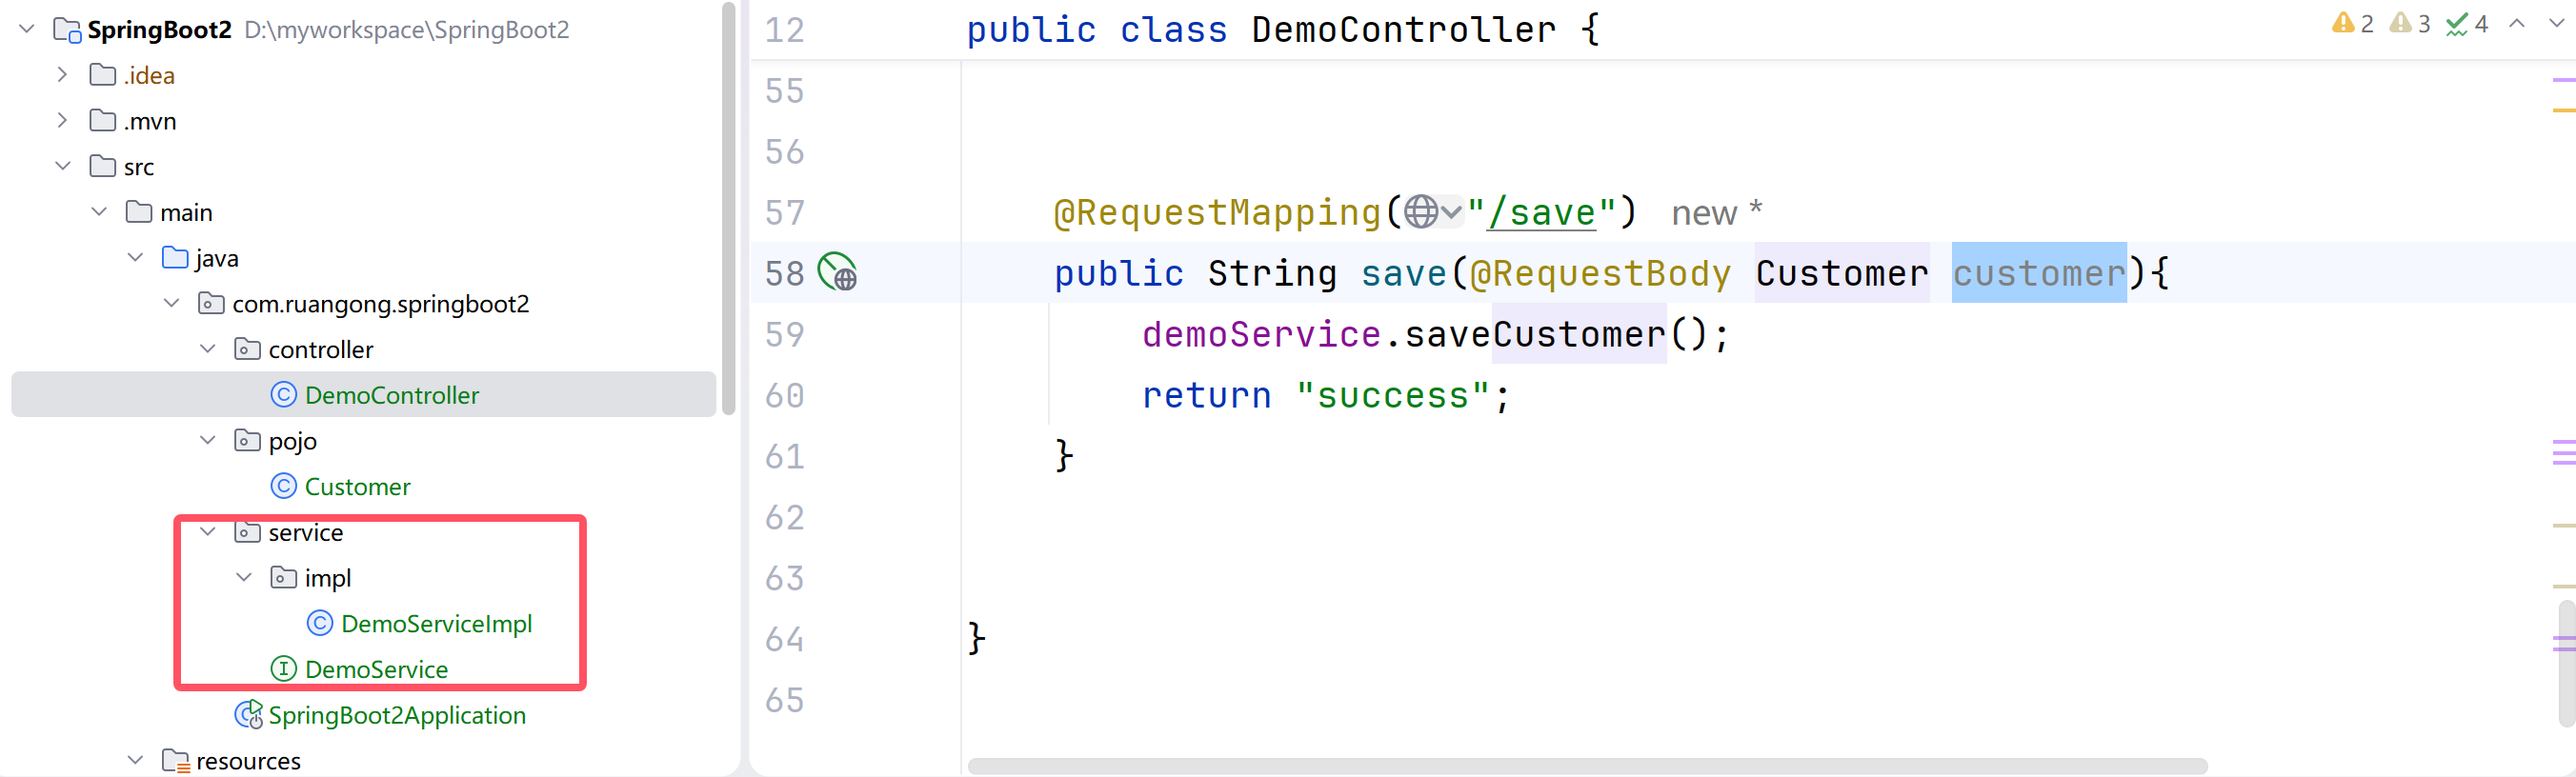
CustomerController中增加由controller访问service层的类。
package com.ruangong.springboot2.controller;
import com.ruangong.springboot2.pojo.Customer;
import com.ruangong.springboot2.service.DemoService;
import org.springframework.beans.factory.annotation.Autowired;
import org.springframework.stereotype.Controller;
import org.springframework.web.bind.annotation.*;
//@Controller // 是需要走视图解析器的,需要跳转界面的
@RestController // 不走视图解析器,如果返回实体,会封装为json 数据
public class DemoController {
// 省略了一些代码
@Autowired
DemoService demoService;
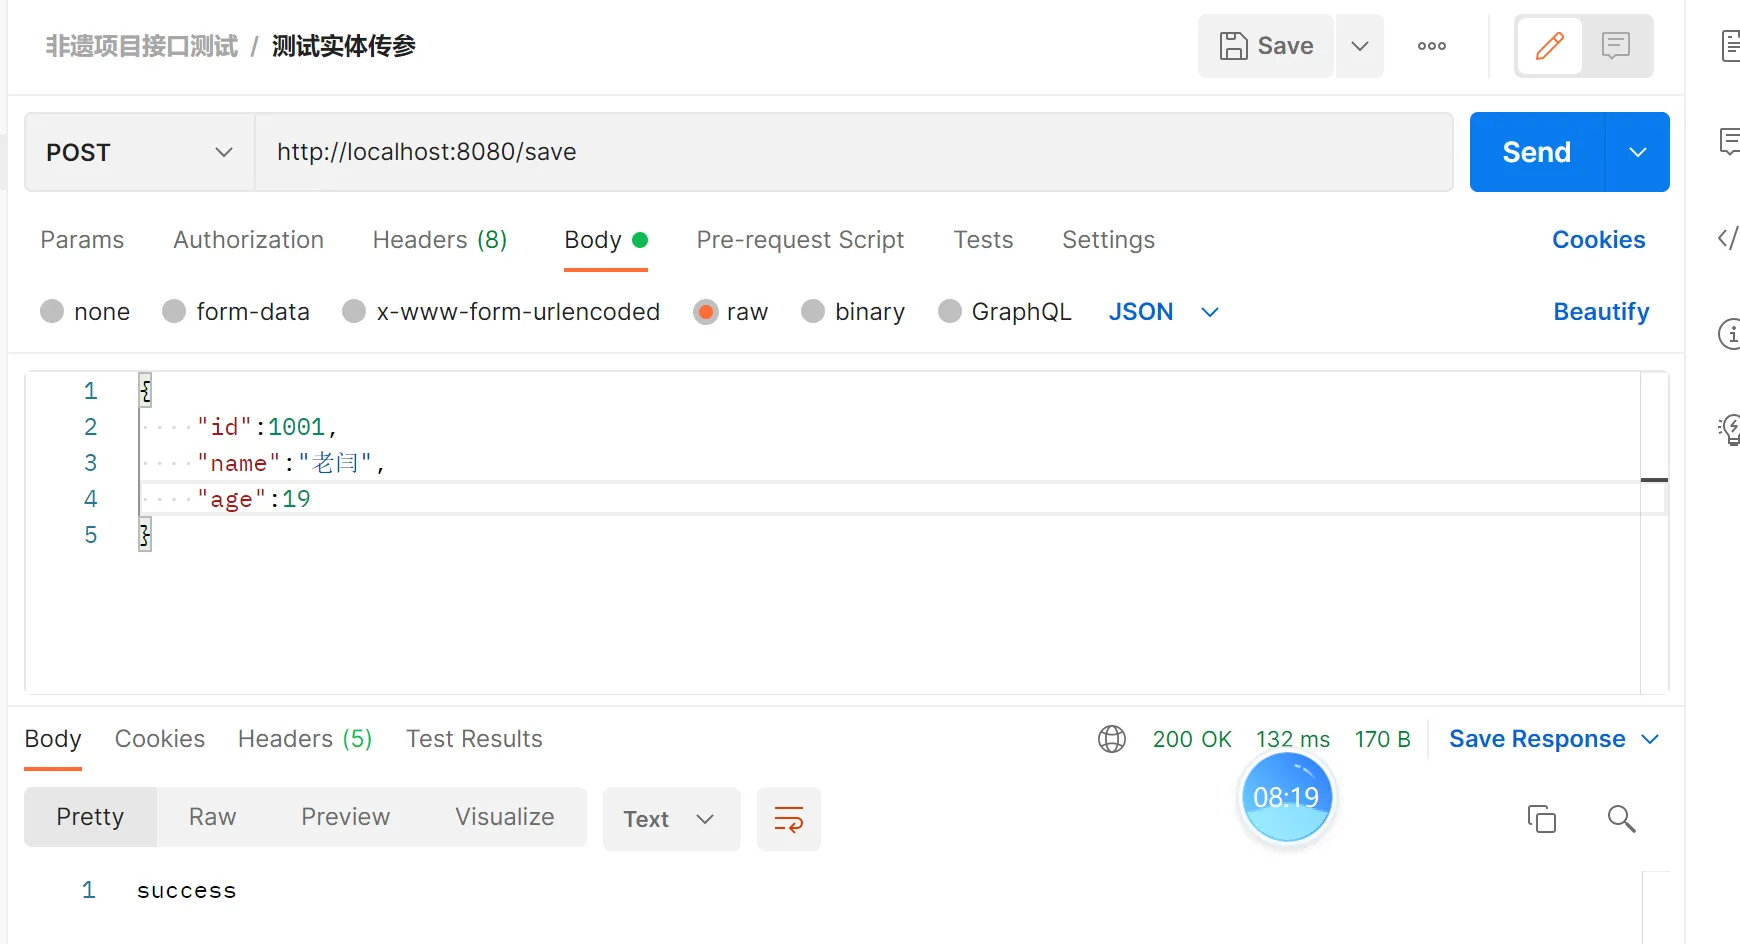
@RequestMapping("/save")
public String save(@RequestBody Customer customer){
demoService.saveCustomer(customer);
return "success";
}
}
使用postman 调用接口:
4.数据层(mapper)mybatis
MyBatis是一款优秀的持久层框架,它支持自定义SQL。MyBatis免除了几乎所有的JDBC代码以及设置参数和获取结果集的工作。MyBatis可以通过简单的XML或注解来配置和映射。
创建表
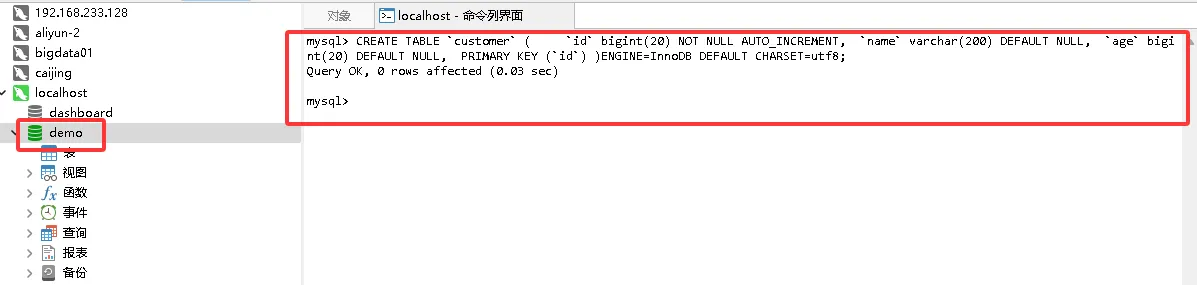
新建数据库 ruangong
CREATE TABLE `customer` (
`id` bigint(20) NOT NULL AUTO_INCREMENT,
`name` varchar(200) DEFAULT NULL,
`age` bigint(20) DEFAULT NULL,
PRIMARY KEY (`id`)
)
ENGINE=InnoDB DEFAULT CHARSET=utf8;
引入依赖
<!–一定要注意springboot和mybatis的版本问题,否则报错–>
<dependency>
<groupId>org.mybatis.spring.boot</groupId>
<artifactId>mybatis-spring-boot-starter</artifactId>
<version>3.0.3</version>
</dependency>
<dependency>
<groupId>org.springframework.boot</groupId>
<artifactId>spring-boot-starter-jdbc</artifactId>
</dependency>
<dependency>
<groupId>com.mysql</groupId>
<artifactId>mysql-connector-j</artifactId>
<scope>runtime</scope>
</dependency>
<dependency>
<groupId>mysql</groupId>
<artifactId>mysql-connector-java</artifactId>
<version>8.0.30</version>
</dependency>
application.properties
spring.application.name=SpringBoot2
spring.datasource.url=jdbc:mysql://localhost:3306/ruangong?serverTimezone=GMT%2B8&characterEncoding=utf-8
spring.datasource.driver-class-name=com.mysql.cj.jdbc.Driver
spring.datasource.username=root
spring.datasource.password=root
server.port=80
创建Mapper接口
package com.bigdata.springdemo.mapper;
import com.bigdata.springdemo.entity.Customer;
import org.apache.ibatis.annotations.*;
import java.util.List;
@Mapper
public interface CustomerMapper {
@Insert("insert into customer(name,age) values (#{customer.name}, #{customer.age} )")
void saveCustomer(@Param("customer") Customer customer);
@Select("select * from customer")
public List<Customer> selectCustomers();
@Select("select * from customer where id=#{id}")
public Customer selectCustomerById(String id);
@Update("update customer set name=#{customer.name} where id=#{customer.id}")
void updateCustomer(@Param("customer") Customer customer);
@Delete("delete from customer where id=#{id}")
void deleteCustomer(String id);
}
注解说明
|
注解 |
位置 |
说明 |
|
@Mapper |
类 |
标识Mapper接口 |
|
@Select |
方法 |
查询语句 |
|
@Update |
方法 |
修改语句 |
|
@Delete |
方法 |
删除语句 |
|
@Insert |
方法 |
插入语句 |
|
@Param |
参数 |
标识SQL参数 |
参数替代符
|
注解 |
说明 |
|
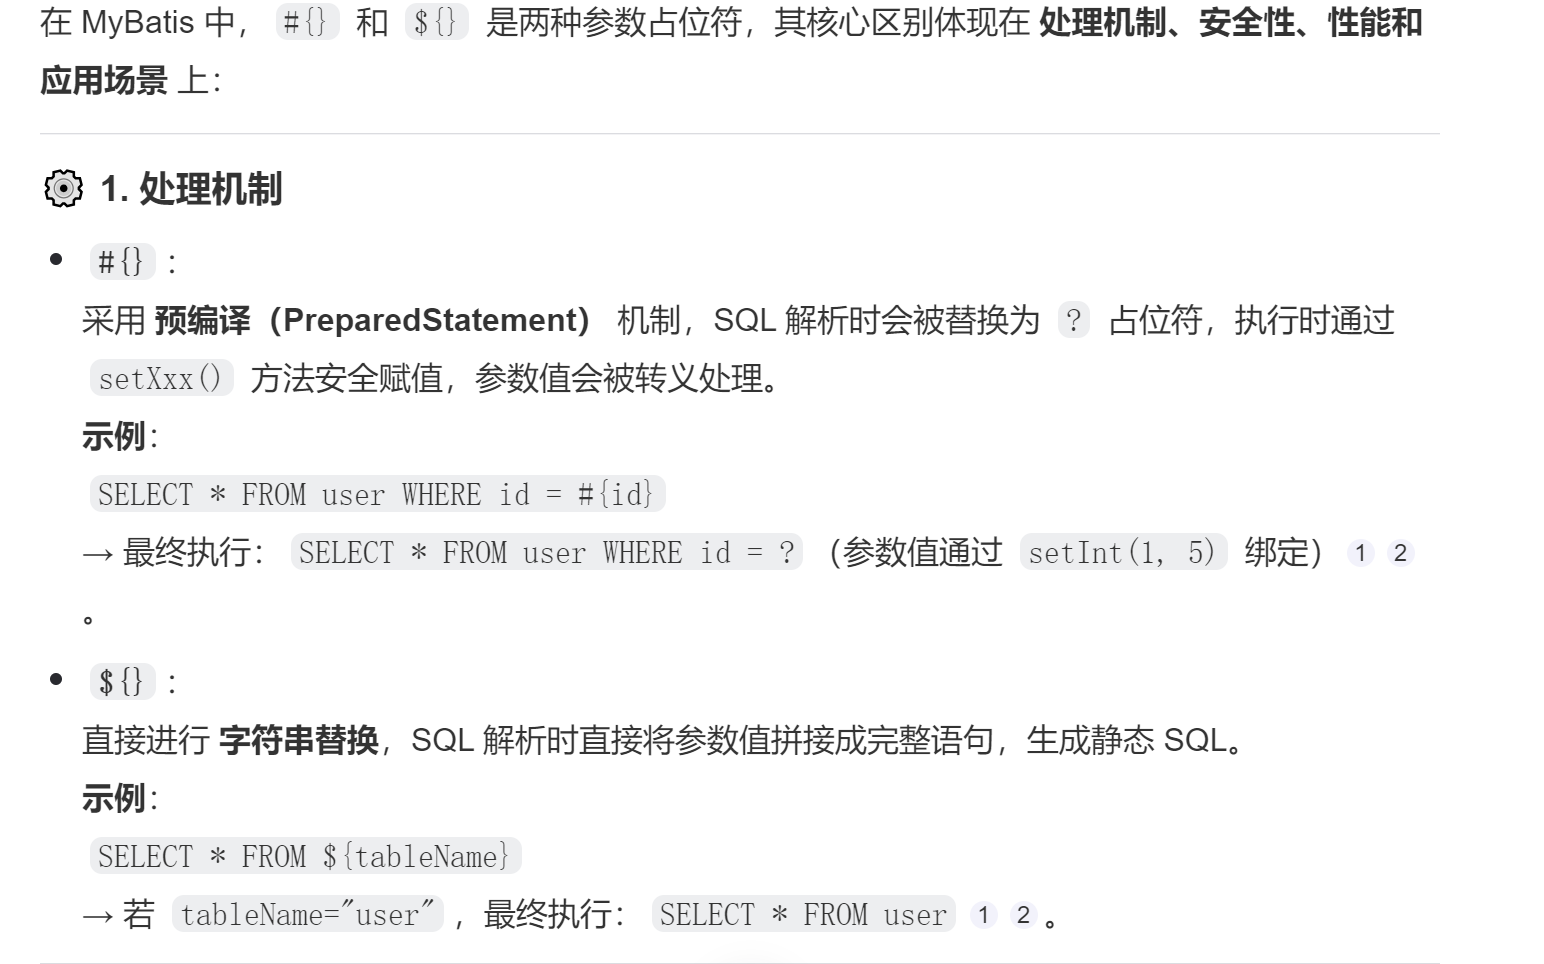
#{} |
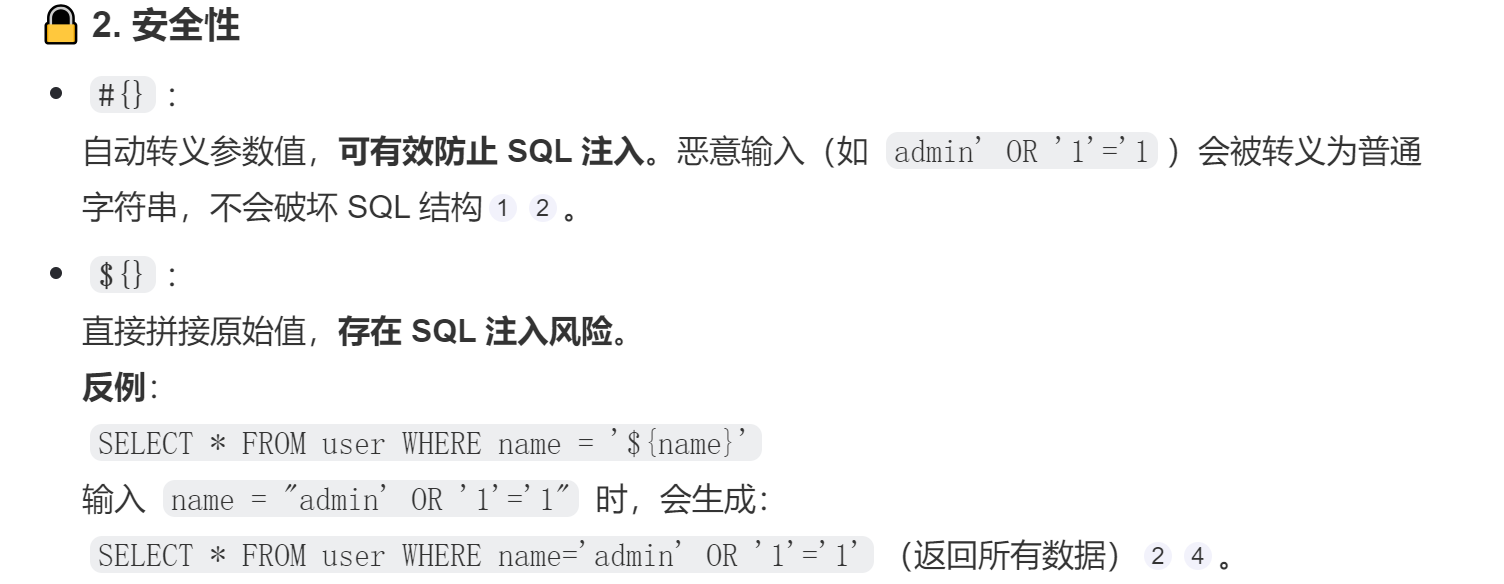
会识别参数的类型会自动补全单引 本身字符串值中的特殊符号会被替换、转义 |
|
${} |
参数原值(一般程序中动态组合sql) |
Service层中加入调用方法
package com.bigdata.springdemo.service;
import com.bigdata.springdemo.entity.Customer;
import java.util.List;
public interface CustomerService {
// 定义规范
public void saveCustomer(Customer customer);
public void updateCustomer(Customer customer);
public void deleteCustomer(String id);
public Customer selectCustomers(String id);
public List<Customer> selectCustomers();
}
package com.bigdata.springdemo.service.impl;
import com.bigdata.springdemo.entity.Customer;
import com.bigdata.springdemo.mapper.CustomerMapper;
import com.bigdata.springdemo.service.CustomerService;
import org.springframework.beans.factory.annotation.Autowired;
import org.springframework.stereotype.Service;
import javax.annotation.Resource;
import java.util.List;
@Service
public class CustomerServiceImpl implements CustomerService {
@Autowired
CustomerMapper customerMapper;
@Override
public void saveCustomer(Customer customer) {
customerMapper.saveCustomer(customer);
System.out.println("保存成功!!");
}
@Override
public void updateCustomer(Customer customer) {
customerMapper.updateCustomer(customer);
}
@Override
public void deleteCustomer(String id) {
customerMapper.deleteCustomer(id);
}
@Override
public Customer selectCustomers(String id) {
return customerMapper.selectCustomerById(id);
}
@Override
public List<Customer> selectCustomers() {
return customerMapper.selectCustomers();
}
}
package com.ruangong.springboot2.controller;
import com.ruangong.springboot2.pojo.Customer;
import com.ruangong.springboot2.service.CustomerService;
import org.springframework.beans.factory.annotation.Autowired;
import org.springframework.web.bind.annotation.PathVariable;
import org.springframework.web.bind.annotation.RequestBody;
import org.springframework.web.bind.annotation.RequestMapping;
import org.springframework.web.bind.annotation.RestController;
import java.util.List;
@RestController
public class CustomerController {
@Autowired
CustomerService customerService;
@RequestMapping("/saveCustomer")
public String saveCustomer(@RequestBody Customer customer){
customerService.saveCustomer(customer);
return "success";
}
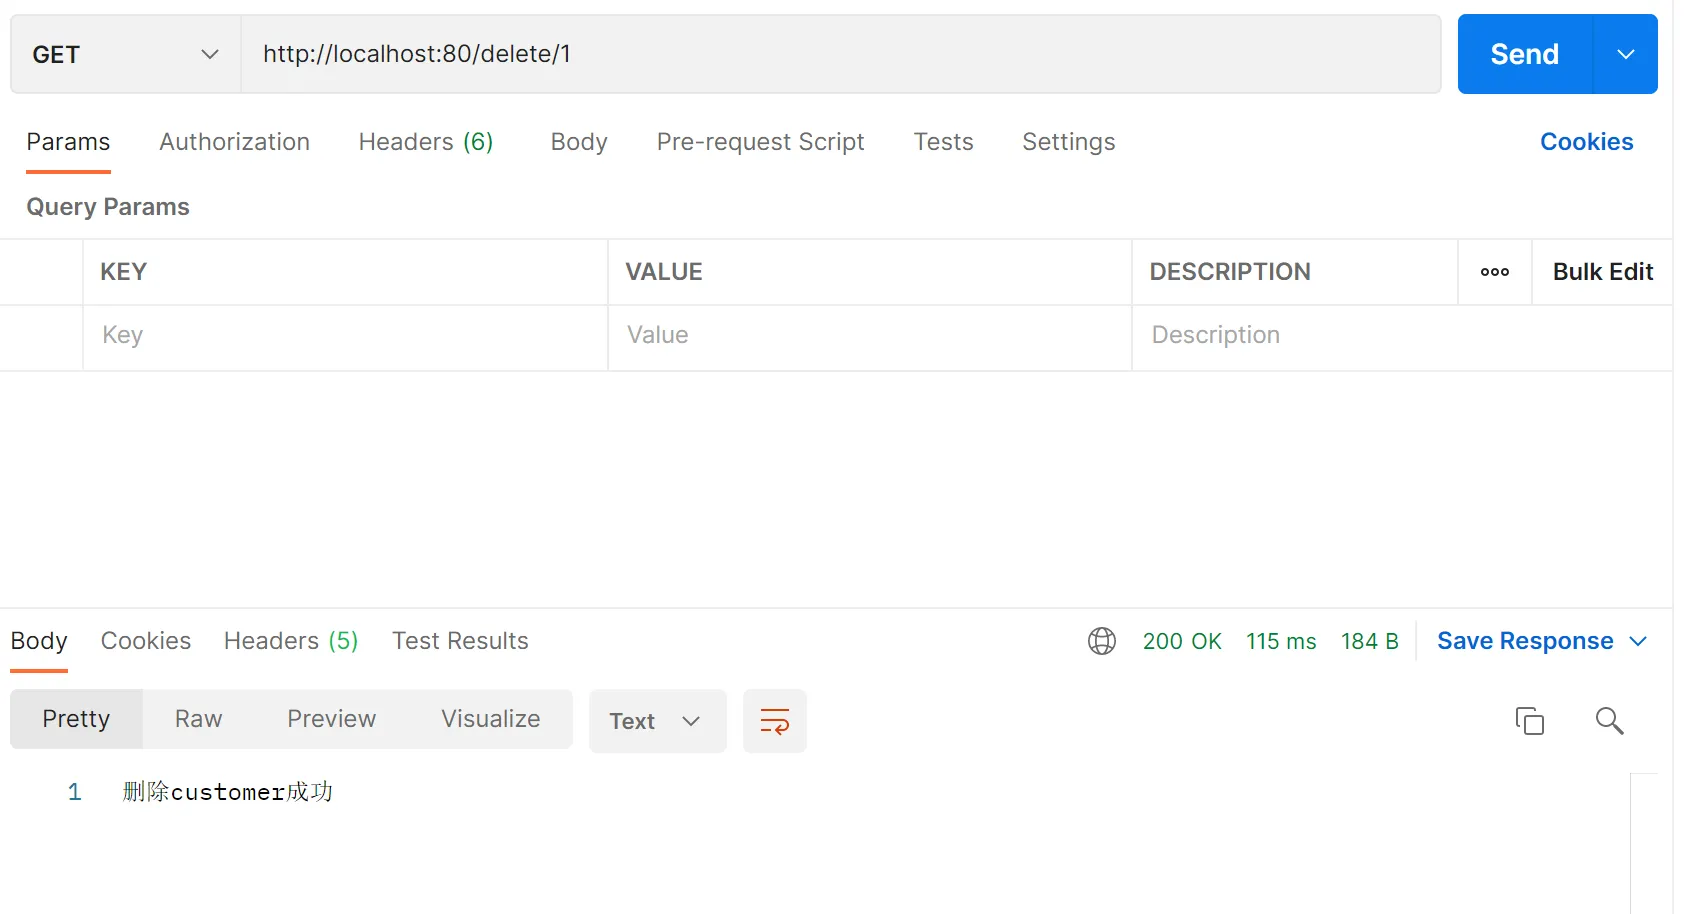
// restful 风格
@RequestMapping("/delete/{id}")
public String deleteCustomerById(@PathVariable("id") String id){
customerService.deleteCustomer(id);
return "删除customer成功";
}
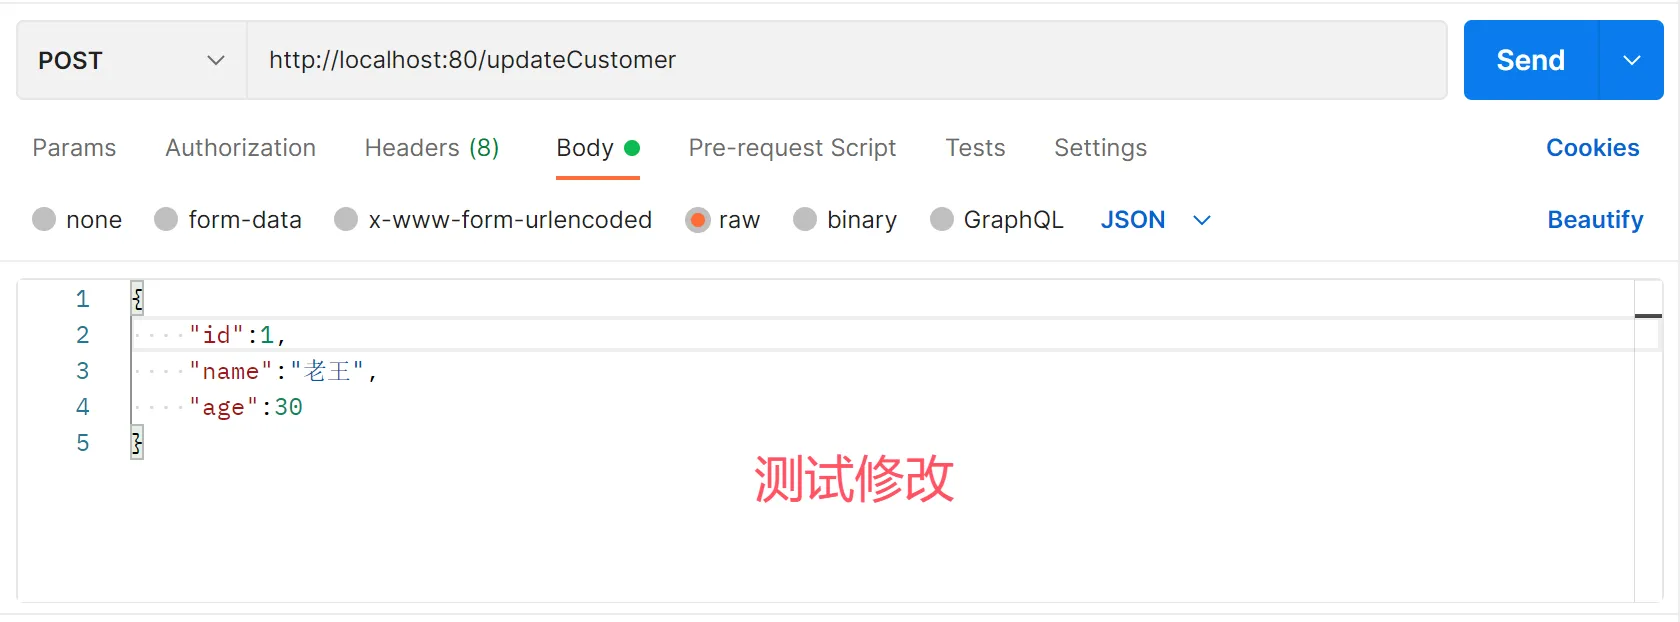
@RequestMapping("/updateCustomer")
public void updateCustomer(@RequestBody Customer customer){
customerService.updateCustomer(customer);
System.out.println("修改customer成功");
}
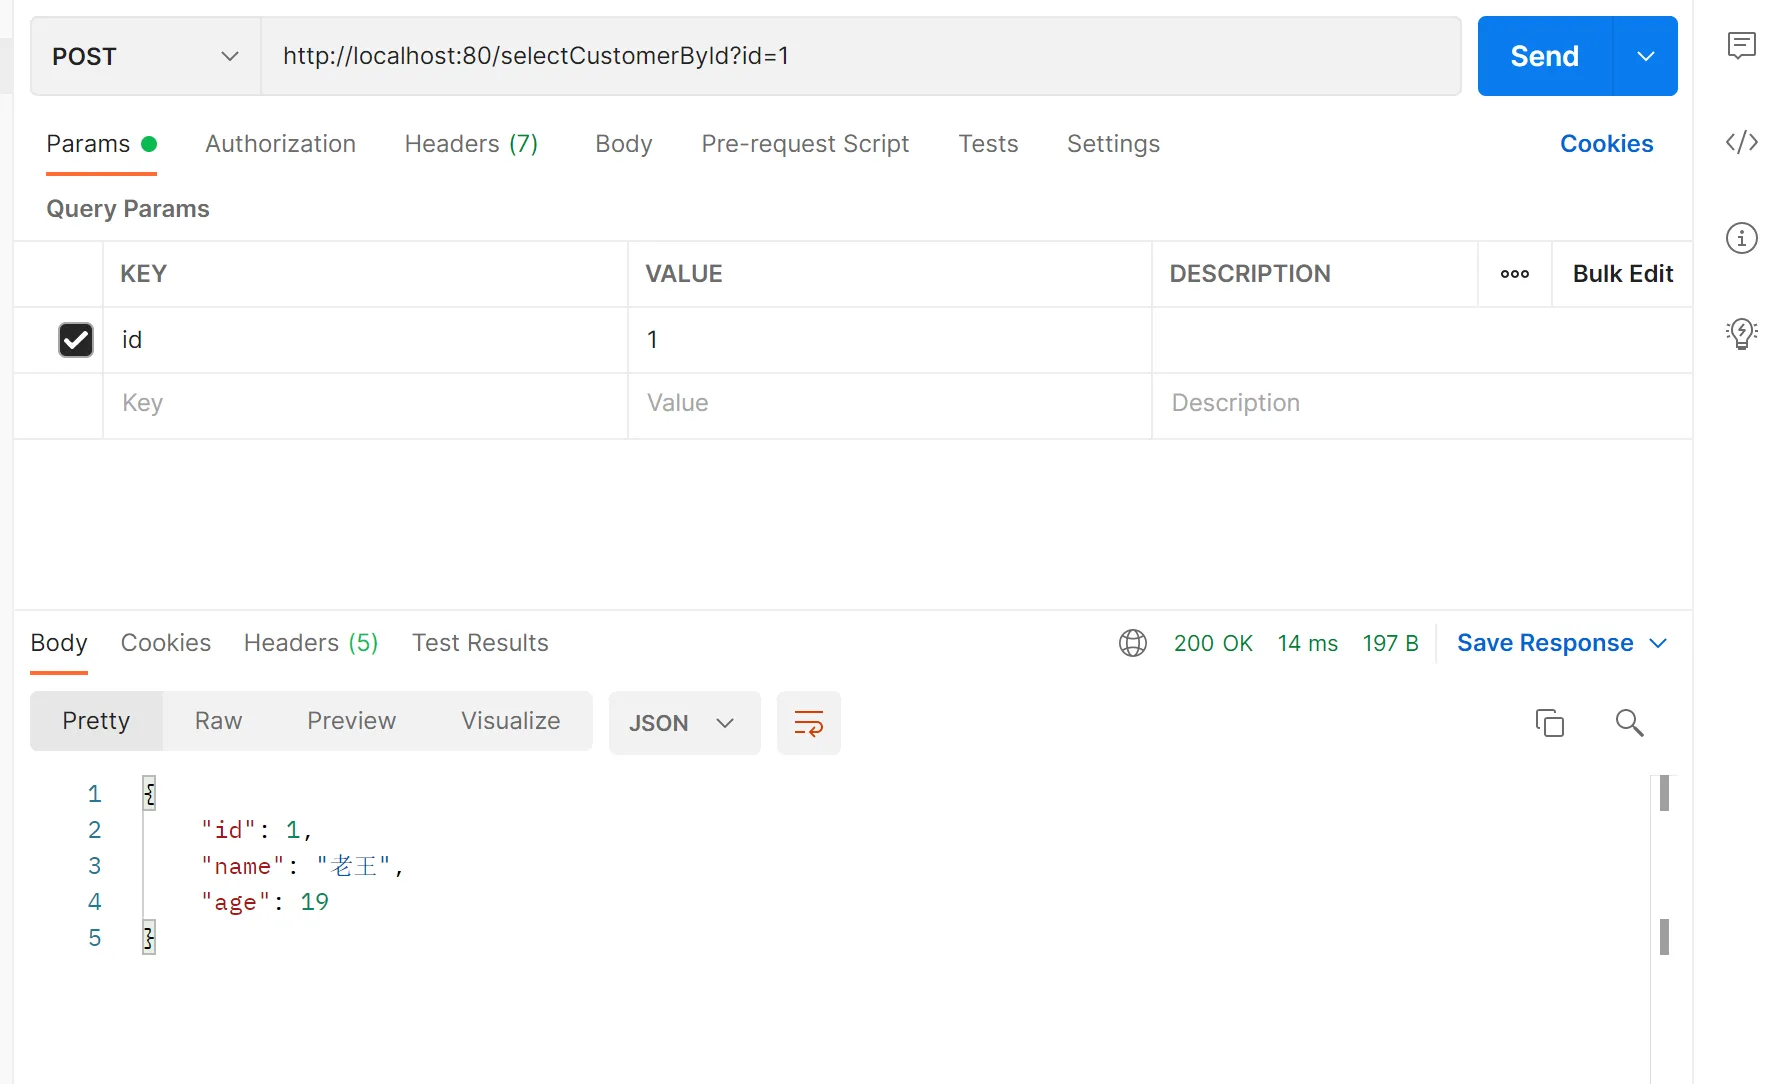
@RequestMapping("/selectCustomerById")
public Customer selectCustomer(String id){
Customer customer = customerService.selectCustomers(id);
return customer;
}
@RequestMapping("/selectCustomers")
public List<Customer> selectCustomers(){
List<Customer> customers = customerService.selectCustomers();
return customers;
}
}

5.MyBatis-Plus
引入mybatis依赖
<?xml version="1.0" encoding="UTF-8"?>
<project xmlns="http://maven.apache.org/POM/4.0.0" xmlns:xsi="http://www.w3.org/2001/XMLSchema-instance"
xsi:schemaLocation="http://maven.apache.org/POM/4.0.0 https://maven.apache.org/xsd/maven-4.0.0.xsd">
<modelVersion>4.0.0</modelVersion>
<!–<parent>
<groupId>org.springframework.boot</groupId>
<artifactId>spring-boot-starter-parent</artifactId>
<version>3.5.9</version>
<relativePath/> <!– lookup parent from repository –>
</parent>–>
<groupId>com.bigdata</groupId>
<artifactId>demo3</artifactId>
<version>0.0.1-SNAPSHOT</version>
<name>demo3</name>
<description>demo3</description>
<properties>
<java.version>1.8</java.version>
<spring-cloud-alibaba.version>2.2.2.RELEASE</spring-cloud-alibaba.version>
<spring-cloud.version>Hoxton.SR8</spring-cloud.version>
<mybatis-plus.version>3.5.5</mybatis-plus.version>
<velocity.version>2.0</velocity.version>
<swagger.version>2.9.2</swagger.version>
<swagger-bootstrap-ui.version>1.9.2</swagger-bootstrap-ui.version>
<commons-lang3.version>3.9</commons-lang3.version>
<commons-fileupload.version>1.3.1</commons-fileupload.version>
<commons-io.version>2.6</commons-io.version>
<fastjson.version>1.2.28</fastjson.version>
<gson.version>2.8.6</gson.version>
<json.version>20170516</json.version>
<jodatime.version>2.10.1</jodatime.version>
<jwt.version>0.7.0</jwt.version>
<httpclient.version>4.5.1</httpclient.version>
</properties>
<parent>
<groupId>org.springframework.boot</groupId>
<artifactId>spring-boot-starter-parent</artifactId>
<version>2.3.4.RELEASE</version>
<relativePath/> <!– lookup parent from repository –>
</parent>
<dependencies>
<dependency>
<groupId>org.springframework.boot</groupId>
<artifactId>spring-boot-starter-web</artifactId>
</dependency>
<dependency>
<groupId>org.springframework.boot</groupId>
<artifactId>spring-boot-starter-test</artifactId>
</dependency>
<!–mybatis-plus–>
<dependency>
<groupId>com.baomidou</groupId>
<artifactId>mybatis-plus-boot-starter</artifactId>
<version>${mybatis-plus.version}</version>
</dependency>
<!–mybatis-plus 代码生成器–>
<dependency>
<groupId>com.baomidou</groupId>
<artifactId>mybatis-plus-generator</artifactId>
<version>${mybatis-plus.version}</version>
</dependency>
<!– Mybatis Plus 代码生成器模板引擎, –>
<dependency>
<groupId>org.apache.velocity</groupId>
<artifactId>velocity-engine-core</artifactId>
<version>${velocity.version}</version>
</dependency>
<dependency>
<groupId>org.projectlombok</groupId>
<artifactId>lombok</artifactId>
</dependency>
<dependency>
<groupId>mysql</groupId>
<artifactId>mysql-connector-java</artifactId>
</dependency>
<dependency>
<groupId>org.springframework.boot</groupId>
<artifactId>spring-boot-starter-freemarker</artifactId>
</dependency>
<!– Spring Data Commons 做分页有用–>
<dependency>
<groupId>org.springframework.data</groupId>
<artifactId>spring-data-commons</artifactId>
</dependency>
</dependencies>
</project>
增加Mybatis-plus规范的服务层和数据层
package com.bigdata.springbootdemo.mapper;
import com.baomidou.mybatisplus.core.mapper.BaseMapper;
import com.bigdata.springbootdemo.pojo.Customer;
import org.apache.ibatis.annotations.*;
import java.util.List;
@Mapper
public interface CustomerMapper2 extends BaseMapper<Customer> {
}
package com.bigdata.springbootdemo.service;
import com.baomidou.mybatisplus.extension.service.IService;
import com.bigdata.springbootdemo.pojo.Customer;
public interface CustomerService2 extends IService<Customer> {
}
ServiceImpl实现类
package com.ruangong.springboot2.service.impl;
import com.baomidou.mybatisplus.extension.service.impl.ServiceImpl;
import com.ruangong.springboot2.mapper.CustomerMapper;
import com.ruangong.springboot2.mapper.CustomerMapper2;
import com.ruangong.springboot2.pojo.Customer;
import com.ruangong.springboot2.service.CustomerService;
import com.ruangong.springboot2.service.CustomerService2;
import org.springframework.stereotype.Service;
@Service
public class CustomerImpl2 extends ServiceImpl<CustomerMapper2, Customer> implements CustomerService2 {
}
只要加上这个三个继承。在controller 中直接就可以使用CRUD(增删改查)命令。
Controller直接调用封装方法
package com.ruangong.springboot2.controller;
import com.baomidou.mybatisplus.core.conditions.query.QueryWrapper;
import com.ruangong.springboot2.pojo.Customer;
import com.ruangong.springboot2.service.CustomerService2;
import org.springframework.beans.factory.annotation.Autowired;
import org.springframework.web.bind.annotation.PathVariable;
import org.springframework.web.bind.annotation.RequestBody;
import org.springframework.web.bind.annotation.RequestMapping;
import org.springframework.web.bind.annotation.RestController;
import java.util.List;
@RestController
public class CustomerController2 {
@Autowired
CustomerService2 customerService2;
@RequestMapping("/saveCustomer2")
public String saveCustomer(@RequestBody Customer customer){
customerService2.save(customer);
return "success";
}
// restful 风格
@RequestMapping("/delete2/{id}")
public String deleteCustomerById(@PathVariable("id") String id){
QueryWrapper<Customer> wrapper = new QueryWrapper<>();
wrapper.eq("id",id);
customerService2.remove(wrapper);
return "删除customer成功";
}
@RequestMapping("/updateCustomer2")
public void updateCustomer(@RequestBody Customer customer){
customerService2.updateById(customer);
System.out.println("修改customer成功");
}
@RequestMapping("/selectCustomerById2")
public Customer selectCustomer(String id){
Customer customer = customerService2.getById(id);
return customer;
}
@RequestMapping("/selectCustomers2")
public List<Customer> selectCustomers(){
List<Customer> customers = customerService2.list();
return customers;
}
}
在Bean上加入对主键的标识
package com.bigdata.springbootdemo.pojo;
import com.baomidou.mybatisplus.annotation.IdType;
import com.baomidou.mybatisplus.annotation.TableId;
import lombok.AllArgsConstructor;
import lombok.Data;
import lombok.NoArgsConstructor;
@Data
@NoArgsConstructor
@AllArgsConstructor
public class Customer {
@TableId(value = "id",type = IdType.AUTO) //标识根据数据库自增生成主键
String id;
String name;
int age;
}


评论前必须登录!
注册