 网硕互联帮助中心
目录
编辑
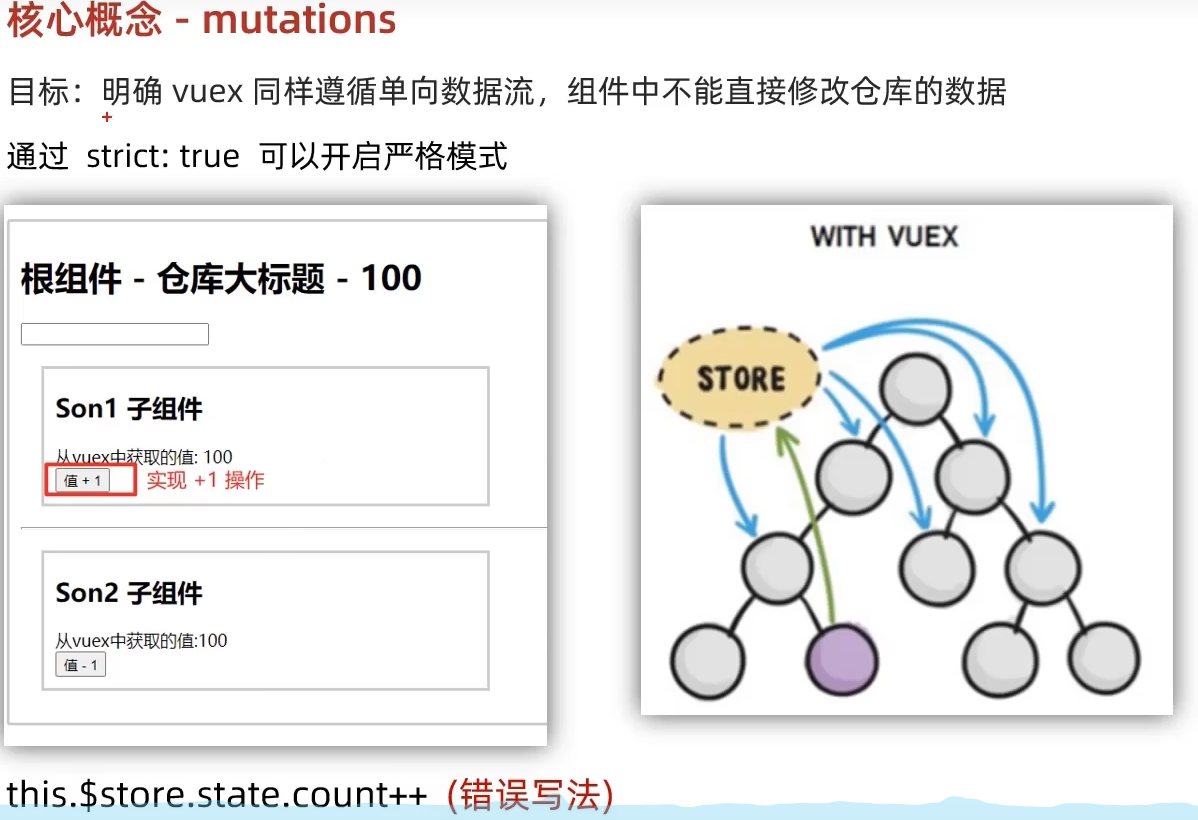
不能直接修改state
不允许直接修改的原因
如何启用严格模式
注意事项
如何修改 state
Mutations
定义 Mutations
提交 Mutations
使用 Vuex 在组件内提交 Mutations
actions
为什么需要 Actions?
定义 Actions
分发 Actions
在组件中使用 Actions
Actions 的返回值
总结
不能直接修改state
state 对象不能直接修改。这是因为 Vuex 设计的核心原则之一是状态的单一数据源和状态的不可变性(immutability)。Vuex 的 state 是响应式的,这意味着当 state 发生变化时,Vue 能够检测到这些变化并更新视图。然而,为了确保状态的变化是可追踪和预测的,Vuex 强制所有的状态变更都必须通过明确的提交(commit)来完成。
不允许直接修改的原因
响应式机制:如果直接修改 state,Vue 的响应式系统可能无法检测到这些变化,导致视图不会正确更新。
调试和开发工具支持:Vuex 提供了时间旅行和状态快照等功能,这些功能依赖于对状态变更的明确记录。如果可以随意修改 state,那么调试将会变得非常困难。
维护性和可读性:通过定义明确的 mutation 来改变状态,可以使代码更加清晰、易于理解和维护。
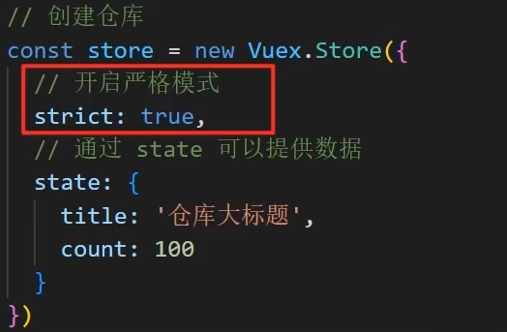
为了让直接修改 Vuex 的 state 报错,你可以利用 Vue 和 Vuex 提供的严格模式(strict mode)。在严格模式下,任何不在 mutation 函数中进行的 state 修改都会抛出错误。这有助于确保所有的状态变更都是通过明确的提交来完成的,从而增强应用的可维护性和调试能力。
如何启用严格模式
在创建 Vuex store 时,可以通过设置 strict: true 来启用严格模式:
const store = new Vuex.Store({
state: {
// your state
},
mutations: {
// your mutations
},
strict: true // 启用严格模式
})
注意事项
开发环境:严格模式会对性能有轻微影响,因为它会在每次状态变更时进行额外的检查。因此,建议只在开发环境中启用严格模式,在生产环境中应将其关闭以避免不必要的性能开销。
生产环境禁用:通常情况下,你会根据环境变量来决定是否启用严格模式。例如,可以这样做:
const store = new Vuex.Store({
state: {
// your state
},
mutations: {
// your mutations
},
strict: process.env.NODE_ENV !== 'production' // 根据环境变量判断
})
通过这种方式,你可以在开发过程中捕获所有对 Vuex 状态的非法直接修改,帮助你更好地遵循 Vuex 的最佳实践,即所有的状态变更都应该通过 mutation 进行。这不仅提高了代码的可维护性,也使得调试变得更加容易。
如何修改 state
Mutations
为了修改 Vuex 中的 state,你需要使用 mutations。Mutations 是唯一能够改变 state 的方式,并且它们必须是同步函数。这意味着所有状态的变更都必须通过 mutations 来进行。这样做的好处是可以集中管理和追踪所有的状态变化,有助于调试和维护。以下是一个简单的例子:
// 在 store 中定义 mutation
const store = new Vuex.Store({
state: {
count: 0
},
mutations: {
increment(state) {
// 变更状态
state.count++
}
}
})
// 在组件中提交 mutation
this.$store.commit('increment')
基本概念
同步性: Mutations 必须是同步函数。这意味着当你调用一个 mutation handler,这个调用完成后,状态应该已经被更新了。这使得 Vuex 能够记录每一次的状态变更,并允许开发者使用 devtools 进行时间旅行调试(time travel debugging)。
Payload: 你可以向 mutations 提交额外的参数,这些参数被称为 payload(载荷)。这允许你传递需要的数据到 mutation 函数中。
提交风格: 可以使用两种方式提交 mutations:普通风格和对象风格。
定义 Mutations
在 Vuex store 中定义 mutations:
const store = new Vuex.Store({
state: {
count: 0
},
mutations: {
increment(state) {
// 修改状态
state.count++
},
decrement(state, payload) {
// 使用载荷来修改状态
state.count -= payload.amount
}
}
})
在这个例子中,我们定义了两个 mutations: increment 和 decrement。increment 不接受任何参数,而 decrement 接受一个包含 amount 属性的对象作为其载荷。
提交 Mutations
可以通过 store.commit 方法来提交 mutations。有两种提交风格:
-
普通风格
store.commit('increment')
-
对象风格
对象风格允许你在提交时同时指定 mutation 类型和载荷。
store.commit({
type: 'decrement',
amount: 10
})
对于带载荷的 mutation 调用,你也可以这样写:
store.commit('decrement', { amount: 10 })
使用 Vuex 在组件内提交 Mutations
在 Vue 组件内部,你可以通过 this.$store.commit 来提交 mutations,或者更推荐的方式是使用 mapMutations 辅助函数将组件的方法映射为 store.commit 调用。
使用 mapMutations:
import { mapMutations } from 'vuex'
export default {
methods: {
…mapMutations([
'increment',
'decrement'
]),
someMethod() {
this.increment()
this.decrement({ amount: 5 })
}
}
}
这样做可以让组件的方法直接映射到对应的 mutations 上,使代码更加简洁。
Mutations 是 Vuex 中用于修改 state 的唯一合法途径,确保了所有状态的变化都是可预测和可追踪的。通过定义明确的 mutations 并遵循严格的提交规则,可以帮助开发者更好地管理应用的状态,提升代码的可读性和可维护性。
actions
如果你需要执行异步操作,应该使用 actions。Actions 可以包含任意异步操作,并且最终通过提交 mutation 来改变状态。
// 在 store 中定义 action
const store = new Vuex.Store({
actions: {
incrementAsync({ commit }) {
setTimeout(() => {
commit('increment')
}, 1000)
}
}
})
// 在组件中分发 action
this.$store.dispatch('incrementAsync')
通过这种方式,你可以确保所有状态的更改都是透明和可控的,这有助于保持应用的一致性和可维护性。
Actions 类似于 Mutations,但不同之处在于:
- Actions 提交的是 Mutations,而不是直接变更状态。
- Actions 可以包含任意异步操作。
简单来说,Actions 是处理业务逻辑(尤其是异步操作)的地方,而 Mutations 是唯一修改状态的地方。
为什么需要 Actions?
定义 Actions
在 Vuex store 的 actions 选项中定义 Actions。每个 Action 函数接收一个名为 context 的对象作为第一个参数。这个 context 对象包含以下属性和方法:
- state: 指向 store.state。
- rootState: 指向根模块的 state(在模块化 store 中使用)。
- commit: 用于提交 Mutation。
- dispatch: 用于分发(调用)其他 Action。
- getters: 指向 store.getters。
- rootGetters: 指向根模块的 getters(在模块化 store 中使用)。
通常,我们使用 ES2015 的参数解构语法来直接提取 commit(以及 state, getters 等),使代码更简洁。
const store = new Vuex.Store({
state: {
count: 0,
userInfo: null
},
mutations: {
increment(state) {
state.count++
},
setUserInfo(state, userInfo) {
state.userInfo = userInfo
}
},
actions: {
// 基本形式:使用 context.commit
incrementAsync(context) {
setTimeout(() => {
context.commit('increment') // 提交 mutation
}, 1000)
},
// 使用参数解构:直接解构出 commit
incrementAsync2({ commit }) {
setTimeout(() => {
commit('increment')
}, 1000)
},
// 包含异步操作和复杂逻辑
fetchUserInfo({ commit, state }) {
// 可以检查当前状态,例如避免重复请求
if (state.userInfo) {
console.log('User info already exists, skipping fetch.')
return
}
// 模拟异步 API 调用
api.getUserInfo().then(userInfo => {
commit('setUserInfo', userInfo) // 成功后提交 mutation
}).catch(error => {
console.error('Failed to fetch user info:', error)
// 可以提交一个错误处理的 mutation
// commit('setError', error.message)
})
},
// 组合多个 actions (使用 dispatch)
initializeApp({ dispatch }) {
// 可以并行或串行地调用其他 actions
dispatch('fetchUserInfo')
dispatch('fetchSettings')
// … 其他初始化逻辑
}
}
})
分发 Actions
使用 store.dispatch 方法来触发(分发)Actions。与 commit 不同,dispatch 可以返回一个 Promise(如果 Action 内部返回了 Promise),这使得你可以处理异步操作的完成状态。
// 1. 基本分发
store.dispatch('incrementAsync')
// 2. 分发时携带载荷 (Payload)
store.dispatch('fetchUserInfo', { userId: 123 }) // 载荷作为第二个参数
// 在 Action 中,可以通过第二个参数接收载荷
// actions: { fetchUserInfo({ commit }, payload) { … } }
// 3. 使用对象风格分发
store.dispatch({
type: 'fetchUserInfo',
userId: 123
})
// 4. 处理返回的 Promise
store.dispatch('fetchUserInfo').then(() => {
console.log('User info fetched successfully!')
}).catch(error => {
console.error('Fetch failed:', error)
})
在组件中使用 Actions
在 Vue 组件中,可以通过 this.$store.dispatch 来分发 Actions,或者使用 mapActions 辅助函数。
方法一:直接使用 this.$store.dispatch
export default {
methods: {
async handleFetchUser() {
try {
await this.$store.dispatch('fetchUserInfo')
console.log('User loaded!')
} catch (error) {
console.error('Error:', error)
}
}
}
}
方法二:使用 mapActions 辅助函数
import { mapActions } from 'vuex'
export default {
methods: {
// 将 this.incrementAsync() 映射为 this.$store.dispatch('incrementAsync')
…mapActions([
'incrementAsync',
'fetchUserInfo'
]),
// 也可以将 action 映射到不同的方法名
…mapActions({
loadUser: 'fetchUserInfo' // 将 this.loadUser() 映射为 this.$store.dispatch('fetchUserInfo')
}),
async handleInitialize() {
// 使用映射后的方法
await this.loadUser()
// 或者
// await this.fetchUserInfo()
}
}
}
Actions 的返回值
Actions 可以返回任何值,但通常返回一个 Promise,以便调用者可以知道异步操作何时完成。
actions: {
async fetchUserInfoAsync({ commit }) {
try {
const userInfo = await api.getUserInfo() // 假设 api.getUserInfo 返回 Promise
commit('setUserInfo', userInfo)
return userInfo // 返回获取到的数据
} catch (error) {
console.error(error)
throw error // 重新抛出错误,让调用者处理
}
}
}
// 在组件中使用
methods: {
async loadUser() {
try {
const userInfo = await this.$store.dispatch('fetchUserInfoAsync')
console.log('Fetched user:', userInfo)
} catch (error) {
// 处理错误
}
}
}
总结
- Actions 是处理异步操作和复杂业务逻辑的中心。
- Actions 通过 context.commit 来提交 Mutations 以修改状态。
- 使用 store.dispatch (或 this.$store.dispatch / mapActions) 来触发 Actions。
- Actions 支持载荷和对象风格的分发。
- Actions 可以返回 Promise,便于处理异步流程。
遵循 "Actions 处理逻辑,Mutations 修改状态" 的模式,是构建可维护、可调试的 Vuex 应用的关键。
写在最后.
能入手一个可以的项目. 框架是基础. 底层的js+html+css 也需要打牢.
博主也完结了 前端 基础课程 .参考 https://blog.csdn.net/chxii/category_12913839.html


评论前必须登录!
注册