 网硕互联帮助中心
NFS 服务器
NFS 服务介绍
是一种网络文件共享协议,最初由 Sun Microsystems 开发,用于在网络中将某台服务器上的目录共享出来,供其他客户端主机挂载和访问。它允许用户像访问本地磁盘一样访问远程服务器上的文件系统。
NFS 的作用和特点
| 文件共享 | 多台主机共享访问一套文件目录 |
| 网络透明 | 用户访问远程文件就像本地一样 |
| 多用户访问 | 支持多个客户端同时读写 |
| 灵活控制 | 支持基于 IP 地址和权限的访问控制 |
| Unix/Linux 原生支持 | 不需额外软件,轻松配置 |
部署服务
NFS 网络文件系统共享并结合 Apache 网站服务
# 安装软件包,服务端和客户端都要安装
# 就像给服务器和客户端都安装“共享柜管理工具”,不管是当“柜主”(server)还是“取文件的”(client),都得会用钥匙开门。
[root@server ~ 10:09:55]# yum install -y nfs-utils
[root@client ~ 10:06:03]# yum install -y nfs-utils
# 准备用户
# 确保客户端和服务端操作文件的“用户”一致,否则可能发生“你打不开别人上锁的柜子”的情况。Apache 用户(UID 48)是网页服务的代表,要给它权限。
[root@server ~ 10:10:38]# id yuxb
uid=1000(yuxb) gid=1000(yuxb) 组=1000(yuxb),10(wheel)
# server 端准备共享目录
# 权限设置的和apache一样,确保网页访问权限。
[root@client ~ 10:13:46]# id apache
uid=48(apache) gid=48(apache) 组=48(apache)
[root@server ~ 10:11:40]# mkdir -p /shares/webapp
# 在 server 上放了一个“共享文件柜”,并把柜子的钥匙交给 Apache 用户管理(即给 Apache 权限)。
[root@server ~ 10:21:00]# chown 48:48 /shares/webapp
[root@server ~ 10:21:35]# ll -d /shares/webapp/
drwxr-xr-x 2 48 48 6 8月 7 10:21 /shares/webapp/
# 配置服务器
# 在这个文件里登记:“我家的哪个文件柜可以被哪些人访问、他们能做什么事”。
# rw 表示可读写,10.1.8.0/24 表示允许整个网段的主机来访问。
[root@server ~ 10:21:43]# vim /etc/exports
[root@server ~ 10:24:01]# cat /etc/exports
/shares/webapp 10.1.8.0/24(rw) *(ro)
# 启用并启动服务
# 启动服务后,客户端用 showmount 就能看到“共享文件柜列表”,就像在公告栏上看公司资源清单。
[root@server ~ 10:24:07]# systemctl enable nfs-server.service –now
Created symlink from /etc/systemd/system/multi-user.target.wants/nfs-server.service to /usr/lib/systemd/system/nfs-server.service.
[root@client ~ 10:25:32]# showmount -e server
Export list for server:
/shares/webapp (everyone)
# 这里会发现后面是everyone,*是全网共享,带有只读权限
# 去掉*后表示只允许 10.1.8.0/24 网段的主机 读写访问,更合理安全。
# 修改下配置
[root@server ~ 10:25:15]# vim /etc/exports
[root@server ~ 10:26:48]# cat /etc/exports
/shares/webapp 10.1.8.0/24(rw)
[root@server ~ 10:26:18]# systemctl restart nfs-server
[root@client ~ 10:25:37]# showmount -e server
Export list for server:
/shares/webapp 10.1.8.0/24
# 挂载和写入
[root@client ~ 10:27:34]# mount server:/shares/webapp /var/www/html
[root@server ~ 10:28:13]# echo Welcome to yuxb website. > /shares/webapp/index.html
[root@client ~ 10:28:33]# systemctl enable httpd –now
Created symlink from /etc/systemd/system/multi-user.target.wants/httpd.service to /usr/lib/systemd/system/httpd.service.
# 配置防火墙
[root@server ~ 10:28:22]# systemctl status firewalld.service
● firewalld.service – firewalld – dynamic firewall daemon
Loaded: loaded (/usr/lib/systemd/system/firewalld.service; disabled; vendor preset: enabled)
Active: inactive (dead)
Docs: man:firewalld(1)
[root@client ~ 10:28:42]# systemctl status firewalld.service
● firewalld.service – firewalld – dynamic firewall daemon
Loaded: loaded (/usr/lib/systemd/system/firewalld.service; disabled; vendor preset: enabled)
Active: inactive (dead)
Docs: man:firewalld(1)
# 验证客户端
[root@client ~ 10:27:48]# ls /var/www/html
index.html
# 浏览器输入10.1.8.11,可看到网页内容,说明挂载成功、服务可访问。
配置 NFS 挂载并测试
# 写内容测试
[root@client ~ 10:44:00]# cd /var/www/html/
[root@client html 10:47:48]# ls
index.html
[root@client html 10:47:49]# echo hahah > web1.html
-bash: web1.html: 权限不够
[root@client ~ 10:50:30]# grep apache /etc/passwd
apache:x:48:48:Apache:/usr/share/httpd:/sbin/nologin
# 切换成 Apache 身份来写文件,就像你换上保安制服,保安就不会拦你了。解决“权限不够”的问题
[root@client ~ 10:49:07]# su -l -s /bin/bash apache
-bash-4.2$ echo 666 > /var/www/html/web1.html
-bash-4.2$ 登出
[root@client ~ 10:51:12]# df
文件系统 1K-块 已用 可用 已用% 挂载点
devtmpfs 485776 0 485776 0% /dev
tmpfs 497816 0 497816 0% /dev/shm
tmpfs 497816 7780 490036 2% /run
tmpfs 497816 0 497816 0% /sys/fs/cgroup
/dev/mapper/centos-root 52403200 1670752 50732448 4% /
/dev/sda1 1038336 142216 896120 14% /boot
tmpfs 99564 0 99564 0% /run/user/1000
server:/shares/webapp 52403200 1673600 50729600 4% /var/www/html
[root@client ~ 10:51:13]# vim /etc/fstab
[root@client ~ 10:51:46]# cat /etc/fstab
#
# /etc/fstab
# Created by anaconda on Fri Aug 1 15:45:32 2025
#
# Accessible filesystems, by reference, are maintained under '/dev/disk'
# See man pages fstab(5), findfs(8), mount(8) and/or blkid(8) for more info
#
/dev/mapper/centos-root / xfs defaults 0 0
UUID=b5c926d1-b582-436b-95a9-38664b23e619 /boot xfs defaults 0 0
/dev/mapper/centos-swap swap swap defaults 0 0
server:/shares/webapp /var/www/html nfs defaults 0 0
[root@client ~ 10:52:12]# umount /var/www/html/
[root@client ~ 10:52:22]# mount /var/www/html/
# reboot重启后直接浏览器输入10.1.8.11测试
# 10.1.8.11/web1.html可以成功
[root@client ~ 11:02:51]# mount -a
[root@client ~ 11:03:03]# ls /var/www/html
index.html web1.html
iSCSI 服务器
iSCSI 服务介绍
什么是 iSCSI?
iSCSI(Internet Small Computer System Interface) 是一种通过 IP 网络传输 SCSI 命令 的协议,它可以让远程磁盘像本地磁盘一样挂载到主机上,从而实现 块级存储共享。
iSCSI 的特点
| 使用标准 IP 网络 | 不需要专用光纤设备(如 Fibre Channel) |
| 支持块级访问 | 更适合数据库等高性能需求场景 |
| 可扩展性强 | 多个 Initiator 可连接多个 Target |
| 成本低 | 利用现有以太网实现存储网络 |
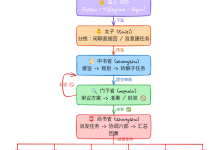
iSCSI 架构
iSCSI 架构基于 客户端-服务器 模型,由两大核心组成:
-
Initiator(发起端):客户端,发起连接、使用远程磁盘
-
Target(目标端):服务器,提供存储资源(LUN)
它们通过 TCP/IP 网络 通信,将存储资源通过网络“映射”到客户端,就像插上了一块“远程硬盘”。
配置 iSCSI Targets
配置 iSCSI Targets需要安装以下软件:
-
targetd,服务端软件。
-
targetcli,用于配置targetd服务。
相当于在服务器上安装了“远程硬盘制造工厂”,用 targetcli 工具来造盘、包装、贴标签。
# 安装软件
[root@server ~ 11:05:50]# yum install -y targetd targetcli
[root@server ~ 11:06:19]# systemctl enable target –now
Created symlink from /etc/systemd/system/multi-user.target.wants/target.service to /usr/lib/systemd/system/target.service.
# dd 制作了一个2G的“压缩饼干盘”,再把它注册成 file1,也可以被客户端当硬盘用。
[root@server ~ 14:37:29]# dd if=/dev/zero of=/tmp/bigfile bs=1M count=2048
记录了2048+0 的读入
记录了2048+0 的写出
2147483648字节(2.1 GB)已复制,5.66996 秒,379 MB/秒
[root@server ~ 11:12:35]# targetcli
Warning: Could not load preferences file /root/.targetcli/prefs.bin.
targetcli shell version 2.1.53
Copyright 2011-2013 by Datera, Inc and others.
For help on commands, type 'help'.
/> ls
o- / …………………………………………………………………………….. […]
o- backstores …………………………………………………………………… […]
| o- block ………………………………………………………… [Storage Objects: 0]
| o- fileio ……………………………………………………….. [Storage Objects: 0]
| o- pscsi ………………………………………………………… [Storage Objects: 0]
| o- ramdisk ………………………………………………………. [Storage Objects: 0]
o- iscsi …………………………………………………………………. [Targets: 0]
o- loopback ………………………………………………………………. [Targets: 0]
/>
配置 backstore 对象
backstore类型:
-
block:服务器中的块设备,例如磁盘驱动器,磁盘分区或逻辑卷。
-
fileio:本地文件系统中的常规文件。targetcli将该文件用作磁盘映像。
-
pscsi:物理SCSI设备。 这种类型的存储允许客户端通过网络访问服务器上的物理SCSI设备。
-
ramdisk:内存中的磁盘设备。 这种类型的存储不会持久存储数据。 服务器重新启动后,数据将丢失。
要使用targetcli创建后备存储,请使用其create命令。 该命令的行为取决于您在配置树中的当前位置。
示例:
# 把 /dev/sdb 这块物理硬盘“注册成产品”,命名为 myblock1,准备发货。
/> cd /backstores/block
/backstores/block> create myblock1 /dev/sdb
Created block storage object myblock1 using /dev/sdb.
/backstores/block> ls
o- block ……………………………………………………………. [Storage Objects: 1]
o- myblock1 ………………………………….. [/dev/sdb (200.0GiB) write-thru deactivated]
o- alua …………………………………………………………….. [ALUA Groups: 1]
o- default_tg_pt_gp ……………………………………. [ALUA state: Active/optimized]
配置 Target IQN
在/iscsi伪目录中,创建IQN,将您选择的IQN名称作为其第一个参数。
给这块硬盘贴上“身份证号码”,这就是 IQN(iSCSI Qualified Name),确保唯一且可识别。
/backstores/block> cd
/iscsi>
/iscsi> create iqn.2025-08.cloud.yuxb.server:myblock1
Created target iqn.2025-08.cloud.yuxb.server:myblock1.
Created TPG 1.
Global pref auto_add_default_portal=true
Created default portal listening on all IPs (0.0.0.0), port 3260.
/> cd /backstores/fileio
/backstores/fileio> create file1 /tmp/bigfile
Created fileio file1 with size 2147483648
/backstores/fileio> ls /
o- / …………………………………………………………………………….. […]
o- backstores …………………………………………………………………… […]
| o- block ………………………………………………………… [Storage Objects: 1]
| | o- myblock1 ………………………………. [/dev/sdb (200.0GiB) write-thru deactivated]
| | o- alua …………………………………………………………. [ALUA Groups: 1]
| | o- default_tg_pt_gp ………………………………… [ALUA state: Active/optimized]
| o- fileio ……………………………………………………….. [Storage Objects: 1]
| | o- file1 ……………………………….. [/tmp/bigfile (2.0GiB) write-back deactivated]
| | o- alua …………………………………………………………. [ALUA Groups: 1]
| | o- default_tg_pt_gp ………………………………… [ALUA state: Active/optimized]
| o- pscsi ………………………………………………………… [Storage Objects: 0]
| o- ramdisk ………………………………………………………. [Storage Objects: 0]
o- iscsi …………………………………………………………………. [Targets: 1]
| o- iqn.2025-08.cloud.yuxb.server:myblock1 …………………………………….. [TPGs: 1]
| o- tpg1 ……………………………………………………… [no-gen-acls, no-auth]
| o- acls ……………………………………………………………….. [ACLs: 0]
| o- luns ……………………………………………………………….. [LUNs: 0]
| o- portals ………………………………………………………….. [Portals: 1]
| o- 0.0.0.0:3260 …………………………………………………………… [OK]
o- loopback ………………………………………………………………. [Targets: 0]
配置 LUN
每块硬盘或文件都要分配一个编号(LUN),客户端通过这个编号访问特定存储资源。
/iscsi/iqn.20…myblock1/tpg1> luns/ create /backstores/block/myblock1
Created LUN 0.
Created LUN 0->0 mapping in node ACL iqn.2025-08.cloud.yuxb.server:client
/iscsi/iqn.20…myblock1/tpg1> luns/ create /backstores/fileio/file1
Created LUN 1.
Created LUN 1->1 mapping in node ACL iqn.2025-08.cloud.yuxb.server:client
配置 ACL
为客户创建了“访问授权”,否则别人知道 IQN 也不能访问硬盘,相当于刷门禁卡。
/iscsi> cd iqn.2025-08.cloud.yuxb.server:myblock1/tpg1/
/iscsi/iqn.20…myblock1/tpg1> acls/ create iqn.2025-08.cloud.yuxb.server:client
Created Node ACL for iqn.2025-08.cloud.yuxb.server:client
/iscsi/iqn.20…myblock1/tpg1> ls /
o- / …………………………………………………………………………….. […]
o- backstores …………………………………………………………………… […]
| o- block ………………………………………………………… [Storage Objects: 1]
| | o- myblock1 ………………………………… [/dev/sdb (200.0GiB) write-thru activated]
| | o- alua …………………………………………………………. [ALUA Groups: 1]
| | o- default_tg_pt_gp ………………………………… [ALUA state: Active/optimized]
| o- fileio ……………………………………………………….. [Storage Objects: 1]
| | o- file1 …………………………………. [/tmp/bigfile (2.0GiB) write-back activated]
| | o- alua …………………………………………………………. [ALUA Groups: 1]
| | o- default_tg_pt_gp ………………………………… [ALUA state: Active/optimized]
| o- pscsi ………………………………………………………… [Storage Objects: 0]
| o- ramdisk ………………………………………………………. [Storage Objects: 0]
o- iscsi …………………………………………………………………. [Targets: 1]
| o- iqn.2025-08.cloud.yuxb.server:myblock1 …………………………………….. [TPGs: 1]
| o- tpg1 ……………………………………………………… [no-gen-acls, no-auth]
| o- acls ……………………………………………………………….. [ACLs: 1]
| | o- iqn.2025-08.cloud.yuxb.server:client …………………………… [Mapped LUNs: 2]
| | o- mapped_lun0 ………………………………………. [lun0 block/myblock1 (rw)]
| | o- mapped_lun1 ………………………………………… [lun1 fileio/file1 (rw)]
| o- luns ……………………………………………………………….. [LUNs: 2]
| | o- lun0 …………………………….. [block/myblock1 (/dev/sdb) (default_tg_pt_gp)]
| | o- lun1 …………………………… [fileio/file1 (/tmp/bigfile) (default_tg_pt_gp)]
| o- portals ………………………………………………………….. [Portals: 1]
| o- 10.1.8.10:3260 …………………………………………………………. [OK]
o- loopback ………………………………………………………………. [Targets: 0]
配置 Portal
“Portal”是发货的门牌号,默认是全网可访问0.0.0.0,换成内部地址10.1.8.10更安全
/iscsi/iqn.20…/tpg1/portals> delete 0.0.0.0 3260
Deleted network portal 0.0.0.0:3260
/iscsi/iqn.20…/tpg1/portals> create 10.1.8.10 3260
Using default IP port 3260
Created network portal 10.1.8.10:3260.
/iscsi/iqn.20…/tpg1/portals> ls
o- portals …………………………………………………………………. [Portals: 1]
o- 10.1.8.10:3260 ………………………………………………………………… [OK]
保存配置
/iscsi/iqn.20…/tpg1/portals> exit
Global pref auto_save_on_exit=true
Last 10 configs saved in /etc/target/backup/.
Configuration saved to /etc/target/saveconfig.json
非交互式管理 Targets
targetcli /backstores/block create myblock1 /dev/sda3
targetcli /backstores/fileio create file1 /tmp/bigfile
targetcli /iscsi create iqn.2024-12.cloud.yuxb.server:disk1
targetcli /iscsi/iqn.2024-12.cloud.yuxb.server:disk1/tpg1/luns create /backstores/block/myblock1
targetcli /iscsi/iqn.2024-12.cloud.yuxb.server:disk1/tpg1/luns create /backstores/fileio/file1
targetcli /iscsi/iqn.2024-12.cloud.yuxb.server:disk1/tpg1/acls create iqn.2025-08.cloud.yuxb.server:client
targetcli /iscsi/iqn.2024-12.cloud.yuxb.server:disk1/tpg1/portals delete 0.0.0.0 3260
targetcli /iscsi/iqn.2024-12.cloud.yuxb.server:disk1/tpg1/portals create 10.1.8.10 3260
targetcli saveconfig
访问 iSCSI 存储
准备系统
# 安装软件
# 客户端也需要“快递接收器”,这个工具能发起连接请求并挂载远程硬盘。
[root@client ~ 11:05:40]# yum install -y iscsi-initiator-utils
# 告诉快递员:“我是谁,我的地址是哪里”。这个名称必须和服务器上 ACL 配置的一致。
[root@client ~ 13:55:21]# vim /etc/iscsi/initiatorname.iscsi
[root@client ~ 13:57:31]# cat /etc/iscsi/initiatorname.iscsi
InitiatorName=iqn.2025-08.cloud.yuxb.server:client
连接 iSCSI 目标
# 在“查快递” → 找到快递 → 正式签收。
# 回到client端
# 扫描
[root@client ~ 13:58:07]# iscsiadm -m discovery -t st -p 10.1.8.10
10.1.8.10:3260,1 iqn.2025-08.cloud.yuxb.server:myblock1
# 登录
[root@client ~ 13:59:47]# iscsiadm -m node -T iqn.2025-08.cloud.yuxb.server:myblock1 -l
Logging in to [iface: default, target: iqn.2025-08.cloud.yuxb.server:myblock1, portal: 10.1.8.10,3260] (multiple)
Login to [iface: default, target: iqn.2025-08.cloud.yuxb.server:myblock1, portal: 10.1.8.10,3260] successful.
# 验证
[root@client ~ 14:01:46]# lsblk
NAME MAJ:MIN RM SIZE RO TYPE MOUNTPOINT
sda 8:0 0 200G 0 disk
├─sda1 8:1 0 1G 0 part /boot
└─sda2 8:2 0 52G 0 part
├─centos-root 253:0 0 50G 0 lvm /
└─centos-swap 253:1 0 2G 0 lvm [SWAP]
sdb 8:16 0 200G 0 disk
sdc 8:32 0 2G 0 disk
sr0 11:0 1 4.4G 0 rom
# 先格式化
[root@client ~ 15:25:03]# mkfs.xfs /dev/sdb
meta-data=/dev/sdb isize=512 agcount=4, agsize=13107200 blks
= sectsz=512 attr=2, projid32bit=1
= crc=1 finobt=0, sparse=0
data = bsize=4096 blocks=52428800, imaxpct=25
= sunit=0 swidth=0 blks
naming =version 2 bsize=4096 ascii-ci=0 ftype=1
log =internal log bsize=4096 blocks=25600, version=2
= sectsz=512 sunit=0 blks, lazy-count=1
realtime =none extsz=4096 blocks=0, rtextents=0
[root@client ~ 15:25:32]# mount /dev/sdb /var/www/html
mount: 挂载点 /var/www/html 不存在
[root@client ~ 15:25:52]# yum install -y httpd
[root@client ~ 15:26:04]# mount /dev/sdb /var/www/html/
[root@client ~ 15:26:15]# echo dsfghn > /var/www/html/index.html
[root@client ~ 15:26:30]# systemctl enable httpd –now
Created symlink from /etc/systemd/system/multi-user.target.wants/httpd.service to /usr/lib/systemd/system/httpd.service.
[root@client ~ 15:26:47]# blkid /dev/sdb
/dev/sdb: UUID="15b6a982-850c-408c-b195-63790b69f359" TYPE="xfs"
# 去浏览器输入10.1.8.11就可以访问到页面和内容


评论前必须登录!
注册