 网硕互联帮助中心
一、ROS中的service通信机制
服务通信也是ROS中一种极其常用的通信模式,服务通信是基于请求响应模式的,是一种应答机制。也即:一个节点A向另一个节点B发送请求,B接收处理请求并产生响应结果返回给A。比如如下场景:
机器人巡逻过程中,控制系统分析传感器数据发现可疑物体或人… 此时需要拍摄照片并留存。
在上述场景中,就使用到了服务通信。
- 数据分析节点A需要向相机相关节点B发送图片存储请求,节点B处理请求,并返回处理结果。
与上述应用类似的,服务通信更适用于对实时性有要求、具有一定逻辑处理的应用场景。
概念
服务通信是以请求响应的方式实现不同节点之间数据传输的通信模式。发送请求数据的对象称为客户端,接收请求并发送响应的对象称之为服务端,同话题通信一样,客户端和服务端也通过话题相关联,不同的是服务通信的数据传输是双向交互式的。
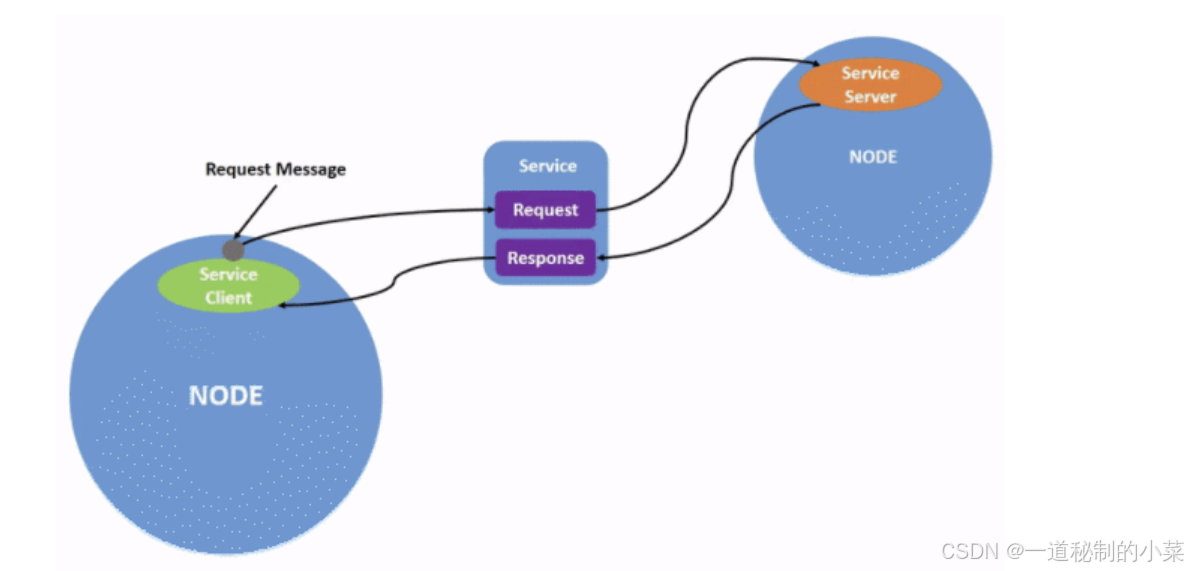
服务通信中,服务端与客户端是一对多的关系,也即,同一服务话题下,存在多个客户端,每个客户端都可以向服务端发送请求。

二、 AimRT 中的RPC通讯机制
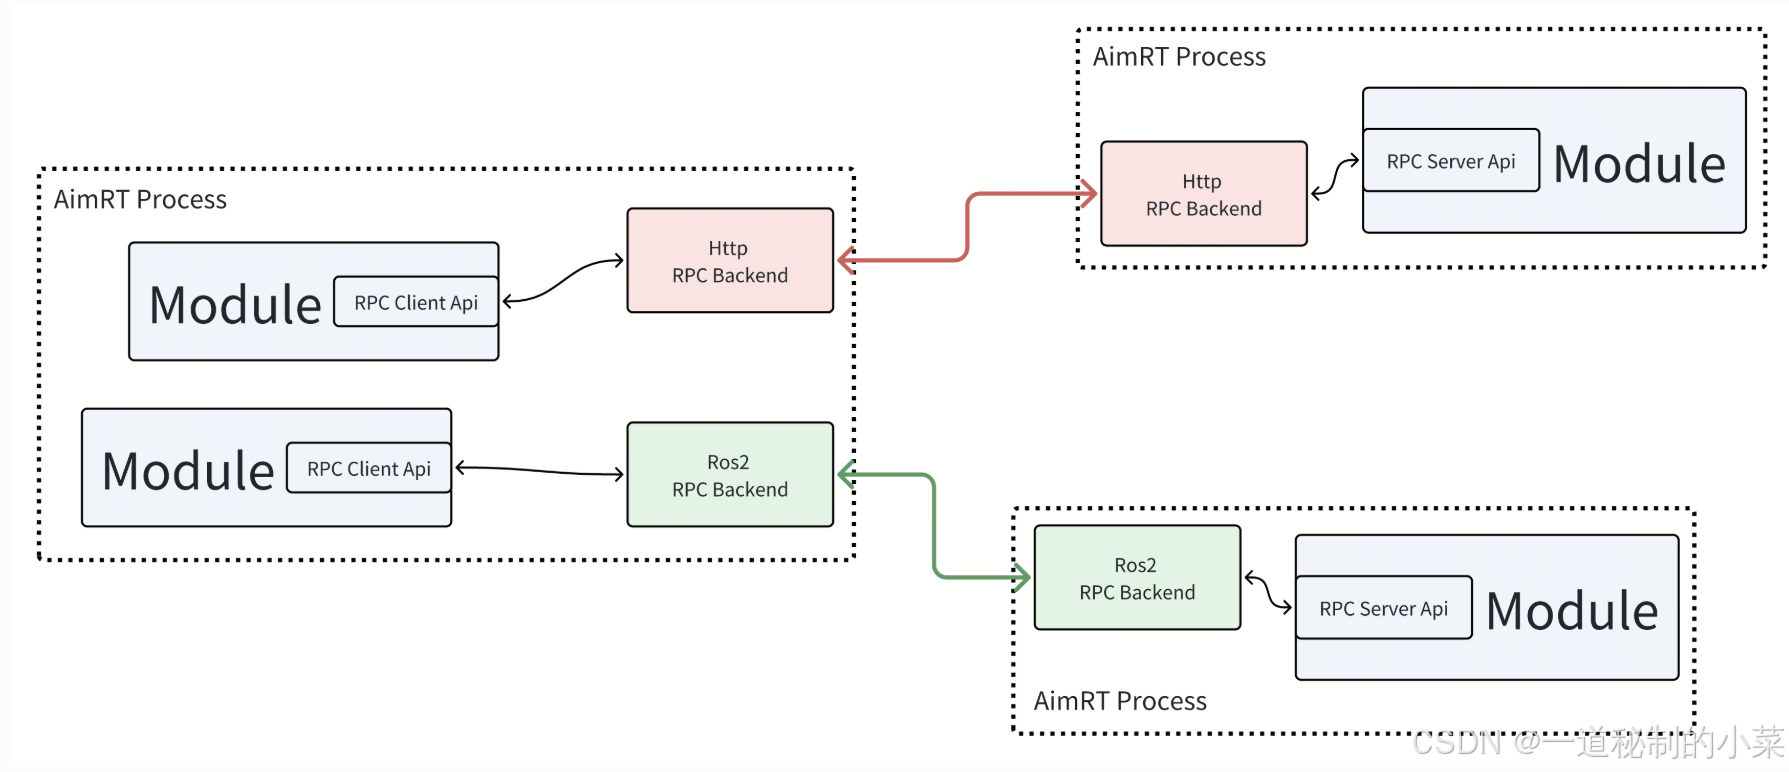
RPC也叫远程过程调用,基于请求-回复模型,由客户端Client和服务端Server组成,Module可以创建客户端句柄,发起特定的 RPC 请求,由其指定的、或由框架根据一定规则指定的服务端来接收请求并回复。其与ROS中的service通信中的服务器和客户端类似;
与Channel类似,其在接口层和后端层也实现了解耦,分为两部分;
在接口层主要使用Protocol支持的协议进行通信,例如protobuf / ROS2msg/srv;
在后端支持的协议有http、ros2,开发者可以自己在配置文件中设置;
关于接口层使用的protocol,详细可以看上一篇的介绍;
这里就不再过多介绍;
三、 基于Protobuf消息的客户端和服务器
这里关于protobuf的相关简单使用,大家可以参考我之前写的博客:
Protubuf入门 — 01基本语法与编译使用-CSDN博客
接下来我们演示一个简单的案例:
编写.proto文件
common.proto
syntax = "proto3";
package aimrt.protocols.example;
message ExampleFoo {
int32 code = 1;
string data = 2;
}
message ExampleBar {
int32 num = 1;
}
rpc.proto
syntax = "proto3";
import "common.proto";
package aimrt.protocols.example;
message GetFooDataReq {
string msg = 1;
}
message GetFooDataRsp {
uint64 code = 1;
string msg = 2;
aimrt.protocols.example.ExampleFoo data = 3;
}
service ExampleService {
rpc GetFooData(GetFooDataReq) returns (GetFooDataRsp);
}
其中:
- rpc.proto:包含了公共的common.proto,所以这里我们improt;
- package:这里会在对应的C++代码中,变成命名空间,如:aimrt::protocols::example;
- GetFooDataReq:这里定义了一个消息的请求结构(客户端发送的数据类型);
- GetFooDataRsp:这里定义了一个消息的回复的结构(服务器回复的数据类型);
- 接下来定义了一个服务方法:这里通过rpc架构,接收GetFooDataReq,回复GetFooDataRsp
.proto文件的编译(通信通信的框架下)
对于正常情况下.proto文件的编译,大家可以参考我的之前写的博客;
这里AimRT对于protobuf的编译提供了下面的编译指令,即我们可以在CMakeLists.txt进行相关文件的配置,需要注意的是,在实际使用时,需要先将其生成对应的C++代码,然后再生成C++对应的服务代码:
add_ros2_aimrt_rpc_gencode_target_for_one_file:为单个 srv 文件生成 RPC 服务 C++ 代码,参数如下:
-
TARGET_NAME:生成的 CMake Target 名称;
-
PACKAGE_NAME:ROS2 协议 PKG 的名称;
-
PROTO_FILE:协议文件的路径;
-
GENCODE_PATH:生成的桩代码存放路径;
-
DEP_PROTO_TARGETS:依赖的协议 CMake Target;
-
OPTIONS:传递给工具的其他参数;
例如下面所示的代码例子:
# 添加对 pb 消息的代码生成
add_protobuf_gencode_target_for_proto_path(
TARGET_NAME ${PROTO_NAME}_pb_gencode
PROTO_PATH ${CMAKE_CURRENT_SOURCE_DIR}
GENCODE_PATH ${CMAKE_CURRENT_BINARY_DIR})
# 添加对 RPC pb的代码生成
add_protobuf_aimrt_rpc_gencode_target_for_proto_files(
TARGET_NAME ${PROTO_NAME}_aimrt_rpc_gencode
PROTO_FILES ${CMAKE_CURRENT_SOURCE_DIR}/my_rpc.proto
GENCODE_PATH ${CMAKE_CURRENT_BINARY_DIR}
DEP_PROTO_TARGETS ${PROTO_NAME}_pb_gencode
)
- 我们使用前面用到的add_protobuf_gencode_target_for_proto_path宏,将当前目录中的所有普通的 proto 消息进行代码生成,生成的目标名为:${PROTO_NAME}_pb_gencode;
- 接着我们使用add_protobuf_aimrt_rpc_gencode_target_for_proto_files宏,将指定的 RPC proto消息进行生成,生成的target为${PROTO_NAME}_aimrt_rpc_gencode;
- 在PROTO_FILES参数指明当前包含rpc的proto的文件名;
- GENCODE_PATH指明当前生成代码的路径,其中 AimRT 会自动将这个路径添加到库的头文件搜索路径;
- 因为我们在RPC PB 中使用到了common.proto,所以需要给其添加普通pb消息的依DEP_PROTO_TARGETS ${PROTO_NAME}_pb_gencode;
服务器模块
其中,服务器module包含下面三个模块,这里我们依次对其进行讲解:
logger.h/logger.cc
#pragma once
#include "aimrt_module_cpp_interface/logger/logger.h"
namespace aimrt::examples::cpp::pb_rpc::normal_rpc_sync_server_module {
void SetLogger(aimrt::logger::LoggerRef);
aimrt::logger::LoggerRef GetLogger();
}
这里logger.h主要为服务器提供日志的设置,一共提供了两个函数:
- 通过SetLogger: 这里我们传入对应的日志句柄,可以将其内部的管理的模块的日志句柄进行赋值;
- 通过GetLogger:这里我们可以获取到我们之前设置的日志句柄;
service.h
#pragma once
#include "rpc.aimrt_rpc.pb.h"
namespace aimrt::examples::cpp::pb_rpc::normal_rpc_sync_server_module {
class ExampleServiceSyncServiceImpl : public aimrt::protocols::example::ExampleServiceSyncService {
public:
ExampleServiceSyncServiceImpl() = default;
~ExampleServiceSyncServiceImpl() override = default;
aimrt::rpc::Status GetFooData(
aimrt::rpc::ContextRef ctx,
const ::aimrt::protocols::example::GetFooDataReq& req,
::aimrt::protocols::example::GetFooDataRsp& rsp) override;
}
这里我们需要注意的是:
AimRT 将每个 Service 的桩代码封装为一个基类,在程序中,我们只需要继承该基类,并重写基类中的 RPC 方法即可。例如在 pb 中,定义的 RPC 服务名为MyService,因此 AimRT 为我们生成以下桩代码类:
- 异步服务端桩代码类名为: [服务名]CoServic;
- 同步服务端桩代码类名为:[服务名]SyncService;
例如上面的,这里在看我们定义的.proto文件:
这里我们声明了下面的命名空间:
package aimrt.protocols.example;
所以生成的C++源文件中会生成对应的命名空间:aimrt::protocols::example这个命名空间!
除此之外,主要有的是我们定义了下面这个service:
service ExampleService {
rpc GetFooData(GetFooDataReq) returns (GetFooDataRsp);
所以对应生成的服务会在 aimrt::protocols::example:ExampleService;
而AimRT会基于aimrt::protocols::example:ExampleService开发对应的异步/同步接口!
而这个异步/同步接口都是继承ServiceBase的!
用户如果要使用异步/同步的服务,只需要对其进行继承重写即可!
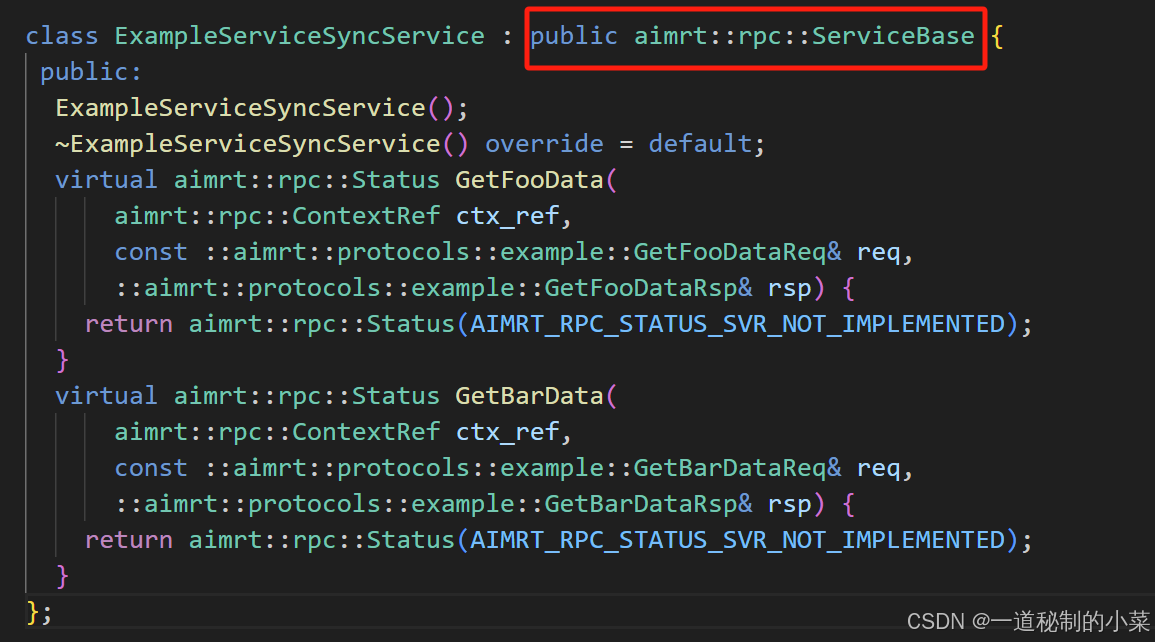
如上面所示,这里我们可以看到对其是基于继承基类模块的;
class ServiceBase {
public:
std::string_view RpcType() const;
void SetServiceName(std::string_view service_name);
std::string_view ServiceName() const;
// …
};
class XXXService : public aimrt::rpc::ServiceBase {
// …
}
详细的大家可以参考下面的文档:
Rpc — AimRT v0.10.0 documentation
因此再总结一下同步型服务接口的使用:
- 引用桩代码头文件,例如xxx.aimrt_rpc.pb.h或者xxx.aimrt_rpc.srv.h,其中有同步接口的 Service 基类XXXSyncService;
- 开发者实现一个 Impl 类,继承XXXSyncService,并实现其中的虚接口;
- 解析 Req,并填充 Rsp;
- 返回Status;
- 在Initialize阶段调用RpcHandleRef的RegisterService方法注册 RPC Service;
这是一个固定的模板!大家可以参考;
service.cc
#include "normal_rpc_sync_server_module/service.h"
#include "aimrt_module_protobuf_interface/util/protobuf_tools.h"
#include "normal_rpc_sync_server_module/global.h"
namespace aimrt::examples::cpp::pb_rpc::normal_rpc_sync_server_module {
aimrt::rpc::Status ExampleServiceSyncServiceImpl::GetFooData(
aimrt::rpc::ContextRef ctx,
const ::aimrt::protocols::example::GetFooDataReq& req,
::aimrt::protocols::example::GetFooDataRsp& rsp) {
rsp.set_msg("echo " + req.msg());
AIMRT_INFO("Server handle new rpc call. context: {}, req: {}, return rsp: {}",
ctx.ToString(), aimrt::Pb2CompactJson(req), aimrt::Pb2CompactJson(rsp));
return aimrt::rpc::Status();
}
}
实际上这里定义的这个函数就是服务端用来处理数据的回调函数!
这个函数包含3个参数,其中:
- ctx:表示向RPC的后端传递一些特定的配置信息;
- req:表示发送的proto类型的数据;
- rsp:表示回复相应的数据;
这里函数体内实际上就是对回复数据做处理:前面+上打印"echo";
返回值是rpc对应的状态(如果这里我们设置的有错误码,这里返回可以获取到对应的错误码,从而查询获取到对应的错误类型;)
service_module.h
#pragma once
#include <memory>
#include "aimrt_module_cpp_interface/module_base.h"
#include "normal_rpc_sync_server_module/service.h"
namespace aimrt::examples::cpp::pb_rpc::normal_rpc_sync_server_module {
class NormalRpcSyncServerModule : public aimrt::ModuleBase {
public:
NormalRpcSyncServerModule() = default;
~NormalRpcSyncServerModule() override = default;
ModuleInfo Info() const override {
return ModuleInfo{.name = "NormalRpcSyncServerModule"};
}
bool Initialize(aimrt::CoreRef core) override;
bool Start() override;
void Shutdown() override;
private:
aimrt::CoreRef core_;
std::shared_ptr<ExampleServiceSyncServiceImpl> service_ptr_;
std::string service_name_;
};
}
整体框架和之前的一致,这里采用共享指针的方式声明一个服务端;
service_module.cc
这里我们只对主模块进行讲解:
#include "normal_rpc_sync_server_module/normal_rpc_sync_server_module.h"
#include "normal_rpc_sync_server_module/global.h"
#include "yaml-cpp/yaml.h"
namespace aimrt::examples::cpp::pb_rpc::normal_rpc_sync_server_module {
bool NormalRpcSyncServerModule::Initialize(aimrt::CoreRef core) {
core_ = core;
SetLogger(core_.GetLogger());
try {
// Read cfg
std::string file_path = std::string(core_.GetConfigurator().GetConfigFilePath());
if (!file_path.empty()) {
YAML::Node cfg_node = YAML::LoadFile(file_path);
if (cfg_node["service_name"]) {
service_name_ = cfg_node["service_name"].as<std::string>();
}
}
// Create service
service_ptr_ = std::make_shared<ExampleServiceSyncServiceImpl>();
// Register service
bool ret = false;
if (service_name_.empty()) {
ret = core_.GetRpcHandle().RegisterService(service_ptr_.get());
} else {
ret = core_.GetRpcHandle().RegisterService(service_name_, service_ptr_.get());
}
AIMRT_CHECK_ERROR_THROW(ret, "Register service failed.");
AIMRT_INFO("Register service succeeded.");
} catch (const std::exception& e) {
AIMRT_ERROR("Init failed, {}", e.what());
return false;
}
AIMRT_INFO("Init succeeded.");
return true;
}
bool NormalRpcSyncServerModule::Start() { return true; }
void NormalRpcSyncServerModule::Shutdown() {}
}
上面的代码以同步通信为例子:
在初始化部分:
// Register service
bool ret = false;
if (service_name_.empty()) {
ret = core_.GetRpcHandle().RegisterService(service_ptr_.get());
} else {
ret = core_.GetRpcHandle().RegisterService(service_name_, service_ptr_.get());
}
这里注册服务器的逻辑是:
- 如果我们没有服务器的名字,那么此时就按照默认的名称进行注册;
- 如果我们设置了对应的名字,此时就按照自定义的名字进行注册;
接下来分别开启开始模块和结束模块;
客户端模块
client_module.h
#pragma once
#include <atomic>
#include <future>
#include <memory>
#include "aimrt_module_cpp_interface/module_base.h"
#include "rpc.aimrt_rpc.pb.h"
namespace aimrt::examples::cpp::pb_rpc::normal_rpc_sync_client_module {
class NormalRpcSyncClientModule : public aimrt::ModuleBase {
public:
NormalRpcSyncClientModule() = default;
~NormalRpcSyncClientModule() override = default;
ModuleInfo Info() const override {
return ModuleInfo{.name = "NormalRpcSyncClientModule"};
}
bool Initialize(aimrt::CoreRef core) override;
bool Start() override;
void Shutdown() override;
private:
auto GetLogger() { return core_.GetLogger(); }
void MainLoop();
private:
aimrt::CoreRef core_;
aimrt::executor::ExecutorRef executor_;
std::atomic_bool run_flag_ = false;
std::promise<void> stop_sig_;
double rpc_frq_ = 1.0;
std::string service_name_;
std::shared_ptr<aimrt::protocols::example::ExampleServiceSyncProxy> proxy_;
};
}
这里的客户端模块的框架实际上与发布者publisher的框架一样;
其实这里的service的主要原因是channel与rpc的通信机制不一样,因为channel收到消息后不用再返回给客户端,而service这里收到消息后需要对消息做处理,然后再返回给client,所以就会麻烦很多,因此发送消息后客户端是异步还是同步等?考虑的问题更多,就显得更加复杂;
接下来我们依次对上面的代码模块进行分析:
- 主要的模块(初始化、开始和结束)与我们之前进行的模块一样;
- 除此之外,还有一个executor,这里是用于发送者将任务投递到执行器,然后执行器可以发送对应的任务;
- run_flag:用来标识模块是否在运行;
- stop_sig_n:当发送任务循环结束时,此时会给发送对应的信号给关闭模块,shutdown收到后此时就对模块进行关闭;
- 除此之外,这里还定义了话题名、发布者和发布的频率;
client_module.cc
#include "normal_rpc_sync_client_module/normal_rpc_sync_client_module.h"
#include "aimrt_module_protobuf_interface/util/protobuf_tools.h"
#include "yaml-cpp/yaml.h"
namespace aimrt::examples::cpp::pb_rpc::normal_rpc_sync_client_module {
bool NormalRpcSyncClientModule::Initialize(aimrt::CoreRef core) {
core_ = core;
try {
// Read cfg
std::string file_path = std::string(core_.GetConfigurator().GetConfigFilePath());
if (!file_path.empty()) {
YAML::Node cfg_node = YAML::LoadFile(file_path);
rpc_frq_ = cfg_node["rpc_frq"].as<double>();
if (cfg_node["service_name"]) {
service_name_ = cfg_node["service_name"].as<std::string>();
}
}
// Get executor handle
executor_ = core_.GetExecutorManager().GetExecutor("work_thread_pool");
AIMRT_CHECK_ERROR_THROW(executor_, "Get executor 'work_thread_pool' failed.");
// Get rpc handle
auto rpc_handle = core_.GetRpcHandle();
AIMRT_CHECK_ERROR_THROW(rpc_handle, "Get rpc handle failed.");
// Register rpc client
bool ret = false;
if (service_name_.empty()) {
ret = aimrt::protocols::example::RegisterExampleServiceClientFunc(rpc_handle);
} else {
ret = aimrt::protocols::example::RegisterExampleServiceClientFunc(rpc_handle, service_name_);
}
AIMRT_CHECK_ERROR_THROW(ret, "Register client failed.");
// Create rpc proxy
proxy_ = std::make_shared<aimrt::protocols::example::ExampleServiceSyncProxy>(rpc_handle);
if (!service_name_.empty()) {
proxy_->SetServiceName(service_name_);
}
} catch (const std::exception& e) {
AIMRT_ERROR("Init failed, {}", e.what());
return false;
}
AIMRT_INFO("Init succeeded.");
return true;
}
bool NormalRpcSyncClientModule::Start() {
try {
run_flag_ = true;
executor_.Execute(std::bind(&NormalRpcSyncClientModule::MainLoop, this));
} catch (const std::exception& e) {
AIMRT_ERROR("Start failed, {}", e.what());
return false;
}
AIMRT_INFO("Start succeeded.");
return true;
}
void NormalRpcSyncClientModule::Shutdown() {
try {
if (run_flag_) {
run_flag_ = false;
stop_sig_.get_future().wait();
}
} catch (const std::exception& e) {
AIMRT_ERROR("Shutdown failed, {}", e.what());
return;
}
AIMRT_INFO("Shutdown succeeded.");
}
// Main loop
void NormalRpcSyncClientModule::MainLoop() {
try {
AIMRT_INFO("Start MainLoop.");
uint32_t count = 0;
while (run_flag_) {
// Sleep
std::this_thread::sleep_for(std::chrono::milliseconds(static_cast<uint32_t>(1000 / rpc_frq_)));
count++;
AIMRT_INFO("Loop count : {} ————————-", count);
// Create req and rsp
aimrt::protocols::example::GetFooDataReq req;
aimrt::protocols::example::GetFooDataRsp rsp;
req.set_msg("hello world foo, count " + std::to_string(count));
// Create ctx
auto ctx_ptr = proxy_->NewContextSharedPtr();
ctx_ptr->SetTimeout(std::chrono::seconds(3));
AIMRT_INFO("Client start new rpc call. req: {}", aimrt::Pb2CompactJson(req));
// Call rpc
auto status = proxy_->GetFooData(ctx_ptr, req, rsp);
// Check result
if (status.OK()) {
AIMRT_INFO("Client get rpc ret, status: {}, rsp: {}", status.ToString(),
aimrt::Pb2CompactJson(rsp));
} else {
AIMRT_WARN("Client get rpc error ret, status: {}", status.ToString());
}
}
AIMRT_INFO("Exit MainLoop.");
} catch (const std::exception& e) {
AIMRT_ERROR("Exit MainLoop with exception, {}", e.what());
}
stop_sig_.set_value();
}
}
接下来我们对上面的模块进行挨个分析:
#include "normal_rpc_sync_client_module/normal_rpc_sync_client_module.h"
#include "aimrt_module_protobuf_interface/util/protobuf_tools.h"
#include "yaml-cpp/yaml.h"
而当我们需要将二进制的protobuf文件转化为其他可读类型的数据时,此时就需要包含下面这个头文件:
#include "aimrt_module_protobuf_interface/util/protobuf_tools.h"
其他的头文件在 #include"normal_rpc_sync_client_module/normal_rpc_sync_client_module.h"包含的都有;
接下来我们再看初始化模块:
bool NormalRpcSyncClientModule::Initialize(aimrt::CoreRef core) {
core_ = core;
try {
// Read cfg
std::string file_path = std::string(core_.GetConfigurator().GetConfigFilePath());
if (!file_path.empty()) {
YAML::Node cfg_node = YAML::LoadFile(file_path);
rpc_frq_ = cfg_node["rpc_frq"].as<double>();
if (cfg_node["service_name"]) {
service_name_ = cfg_node["service_name"].as<std::string>();
}
}
// Get executor handle
executor_ = core_.GetExecutorManager().GetExecutor("work_thread_pool");
AIMRT_CHECK_ERROR_THROW(executor_, "Get executor 'work_thread_pool' failed.");
// Get rpc handle
auto rpc_handle = core_.GetRpcHandle();
AIMRT_CHECK_ERROR_THROW(rpc_handle, "Get rpc handle failed.");
// Register rpc client
bool ret = false;
if (service_name_.empty()) {
ret = aimrt::protocols::example::RegisterExampleServiceClientFunc(rpc_handle);
} else {
ret = aimrt::protocols::example::RegisterExampleServiceClientFunc(rpc_handle, service_name_);
}
AIMRT_CHECK_ERROR_THROW(ret, "Register client failed.");
// Create rpc proxy
proxy_ = std::make_shared<aimrt::protocols::example::ExampleServiceSyncProxy>(rpc_handle);
if (!service_name_.empty()) {
proxy_->SetServiceName(service_name_);
}
} catch (const std::exception& e) {
AIMRT_ERROR("Init failed, {}", e.what());
return false;
}
AIMRT_INFO("Init succeeded.");
return true;
}
在初始化模块中,依次进行:
- 读取配置文件中的内容,且如果配置文件中设置了话题名,我们就提取里面的话题名;
- 获取我们对应的执行器的句柄;
- 获得rpc通信的句柄;
- 注册rcp客户端;
// Register rpc client
bool ret = false;
if (service_name_.empty()) {
ret = aimrt::protocols::example::RegisterExampleServiceClientFunc(rpc_handle);
} else {
ret = aimrt::protocols::example::RegisterExampleServiceClientFunc(rpc_handle, service_name_);
}
这里注册的逻辑依然是:如果我们没有设置服务话题名,就按照默认的名字进行注册;否则按照我们自定义的名字进行注册;
除此之外,这里最主要的是创建了一个rpc的proxy;
问题:客户端当中我们如何传递信息给服务端?
在AimRT中,提供了四种类型的接口:
- 同步型接口:名称一般为XXXSyncProxy;
- 异步回调型接口:名称一般为XXXAsyncProxy;
- 异步 Future 型接口:名称一般为XXXFutureProxy;
- 无栈协程型接口:名称一般为XXXCoProxy;
其中,在头文件中,我们已经定义了一个共享指针来管理同步型的proxy接口:
std::shared_ptr<aimrt::protocols::example::ExampleServiceSyncProxy> proxy_;
这个接口会继承基类的一些共享接口:
class ProxyBase {
public:
std::string_view RpcType() const;
void SetServiceName(std::string_view service_name);
std::string_view ServiceName() const;
std::shared_ptr<Context> NewContextSharedPtr(ContextRef ctx_ref = ContextRef()) const;
void SetDefaultContextSharedPtr(const std::shared_ptr<Context>& ctx_ptr);
std::shared_ptr<Context> GetDefaultContextSharedPtr() const;
};
class XXXProxy : public aimrt::rpc::CoProxyBase {
public:
explicit XXXProxy(aimrt::rpc::RpcHandleRef rpc_handle_ref);
static bool RegisterClientFunc(aimrt::rpc::RpcHandleRef rpc_handle_ref);
static bool RegisterClientFunc(aimrt::rpc::RpcHandleRef rpc_handle_ref, std::string_view service_name);
// …
}
详细的讲解大姐可以参考下面的链接:
Rpc — AimRT v0.10.0 documentation
接下来再回到我们的初始化模块关于proxy的部分:
- 这里是相当于通过传入我们的rpc句柄,将proxy进行实例化;
- 然后如果我们这里定义了话题名就设置话题名,相当于进行了一些预备操作;
开始start模块:
bool NormalRpcSyncClientModule::Start() {
try {
run_flag_ = true;
executor_.Execute(std::bind(&NormalRpcSyncClientModule::MainLoop, this));
} catch (const std::exception& e) {
AIMRT_ERROR("Start failed, {}", e.what());
return false;
}
AIMRT_INFO("Start succeeded.");
return true;
}
开始模块的逻辑很简单:
- 这里还是将我们对应的运行状态改为true;
- 然后让执行器执行对应的MainLoop操作;(在MainLoop里面会进行一些数据的处理);
发送消息MainLoop模块:
// Main loop
void NormalRpcSyncClientModule::MainLoop() {
try {
AIMRT_INFO("Start MainLoop.");
uint32_t count = 0;
while (run_flag_) {
// Sleep
std::this_thread::sleep_for(std::chrono::milliseconds(static_cast<uint32_t>(1000 / rpc_frq_)));
count++;
AIMRT_INFO("Loop count : {} ————————-", count);
// Create req and rsp
aimrt::protocols::example::GetFooDataReq req;
aimrt::protocols::example::GetFooDataRsp rsp;
req.set_msg("hello world foo, count " + std::to_string(count));
// Create ctx
auto ctx_ptr = proxy_->NewContextSharedPtr();
ctx_ptr->SetTimeout(std::chrono::seconds(3));
AIMRT_INFO("Client start new rpc call. req: {}", aimrt::Pb2CompactJson(req));
// Call rpc
auto status = proxy_->GetFooData(ctx_ptr, req, rsp);
// Check result
if (status.OK()) {
AIMRT_INFO("Client get rpc ret, status: {}, rsp: {}", status.ToString(),
aimrt::Pb2CompactJson(rsp));
} else {
AIMRT_WARN("Client get rpc error ret, status: {}", status.ToString());
}
}
AIMRT_INFO("Exit MainLoop.");
} catch (const std::exception& e) {
AIMRT_ERROR("Exit MainLoop with exception, {}", e.what());
}
stop_sig_.set_value();
}
接下来我们挨个分析上面的代码逻辑结构:
- 首先,如果run_flag为true,说明代码module此时框架是start,所以我们需要发送任务;
- 接下来,设置任务的执行频率;
- 分别创建rep和rsp用来储存:发送的消息和接受的消息;
- 接下来我们设置消息内容:
req.set_msg("hello world foo, count " + std::to_string(count));
- 接下来我们创建对应的后端配置:
auto ctx_ptr = proxy_->NewContextSharedPtr();
ctx_ptr->SetTimeout(std::chrono::seconds(3));
AIMRT_INFO("Client start new rpc call. req: {}", aimrt::Pb2CompactJson(req));
- 在proxy的基类中,提供了管理context后端配置的共享指针;
- 设置 RPC 调用的超时时间,如果超市超过3s,此时框架会在超时后自动取消等待响应;
接下来这里我们就可以通过proxy调用对应的回调函数进行信息的发送:
// Call rpc
auto status = proxy_->GetFooData(ctx_ptr, req, rsp);
- 如果返回的start.OK()为true,说明此时获取rpc的过程中没有出现错误!所以接下来打印正常info信息;
- 否则就打印warm警告信息;
- 服务器回复客户端的消息会保存到req当中;
stop_sig_.set_value();
最后,当循环结束后,此时说明不会再进行消息的发送,因此向shutdown发送对应的信号;
结束shutdown模块:
void NormalRpcSyncClientModule::Shutdown() {
try {
if (run_flag_) {
run_flag_ = false;
stop_sig_.get_future().wait();
}
} catch (const std::exception& e) {
AIMRT_ERROR("Shutdown failed, {}", e.what());
return;
}
AIMRT_INFO("Shutdown succeeded.");
}
当信号发送后,此时shutdown会收到对应的信号,然后成功关闭!
CMake链接相关库
在上面我们已经进行了.proto文件的相关编译,因此,此时如果我们想要在自己的源文件中进行链接,很简单,例如下面的例子(对应上面我们编译的.proto文件):
target_link_libraries(my_lib PUBLIC example_rpc_aimrt_rpc_gencode)
此时即可成功链接对应的库;
四、 基于ROS2 srv消息的客户端和服务器
编写.msg文件
byte[] data
—
int64 code
其中,以—来分割 Req 和 Rsp 的定义。然后直接通过 ROS2 提供的 CMake 方法rosidl_generate_interfaces,为 Req 和 Rsp 消息生成 C++ 代码和 CMake Target,例如:
rosidl_generate_interfaces(
example_srv_gencode
"srv/example.srv"
)
之后就可以引用相关的 CMake Target 来使用生成的 Req 和 Rsp 的消息结构 C++ 代码;
但是实际上,经过上面的操作,我们对于生成的消息还是不能直接进行调用;
在生成了 Req 和 Rsp 消息结构的 C++ 代码后,我们还需要使用 AimRT 提供的 Python 脚本工具,生成服务定义部分的 C++ 桩代码,例如:
python3 ARGS ./ros2_py_gen_aimrt_cpp_rpc.py –pkg_name=example_pkg –srv_file=./example.srv –output_path=./
此时即会生成对应的example.aimrt_rpc.srv.h和example.aimrt_rpc.srv.cc文件;
但是实际上,不需要这么麻烦的自己进行编译,AimRT内部也给我们提供了内置的CMake编译指令:
-
add_ros2_aimrt_rpc_gencode_target_for_one_file:为单个 srv 文件生成 RPC 服务 C++ 代码,参数如下:
-
TARGET_NAME:生成的 CMake Target 名称;
-
PACKAGE_NAME:ROS2 协议 PKG 的名称;
-
PROTO_FILE:协议文件的路径;
-
GENCODE_PATH:生成的桩代码存放路径;
-
DEP_PROTO_TARGETS:依赖的协议 CMake Target;
-
OPTIONS:传递给工具的其他参数;
-
例如下面这个例子:
# Generate C++ code for Req and Rsp message in `.srv` file
rosidl_generate_interfaces(
example_srv_gencode
"srv/example.srv"
)
# Generate RPC service C++ code for the example '.srv' file. It is necessary to rely on the CMake Target related to ROS2 messages, which is defined in '${ROS2_EXAMPLE_CMAKE_TARGETS}'
add_ros2_aimrt_rpc_gencode_target_for_one_file(
TARGET_NAME example_ros2_rpc_aimrt_rpc_gencode
PACKAGE_NAME example_pkg
PROTO_FILE ${CMAKE_CURRENT_SOURCE_DIR}/srv/example.srv
GENCODE_PATH ${CMAKE_CURRENT_BINARY_DIR}
DEP_PROTO_TARGETS
rclcpp::rclcpp
${ROS2_EXAMPLE_CMAKE_TARGETS})
- rosidl_generate_interfaces:负责将消息结构体部分生成对应的C++代码;
- add_ros2_aimrt_rpc_gencode_target_for_one_file:再将对应的C++代码生成C++的服务代码;
- 二者缺一不可;
其他的关于服务器和客户端的时候,与protobuf完全相同,不同的是将对应的消息类型改为ROS即可,因此这里我们不再进行过多的解释;
截止到这里我们对AimRT的框架已经明白了不少,接下来有机会会发布关于AImRT中的rpc后端的相关介绍;


评论前必须登录!
注册