 网硕互联帮助中心

🏆 本文收录于 《滚雪球学 Spring Boot 3.x》 专栏,专注 Spring Boot 3.x 系统学习与实战进阶,内容持续更新中。
本专栏致力于打造高质量、体系化的 Spring Boot 3.x 学习路线,从零基础入门到进阶实战,帮助你快速掌握核心知识与企业级开发经验。 📌 想快速定位学习内容,可查看:【Spring Boot 3 教程导航帖】
🎉 当前专栏限时优惠中:一次订阅,终身阅读,后续更新章节全部免费解锁 👉 立即订阅 👈️ 🎁 想系统打通 Spring Boot 各主流版本?还可以查看: 👉 《Spring Boot 2.x 实战》 👉 《Spring Boot 3.x 实战》 👉 《Spring Boot 4.x 实战》
🚀 推荐合集:《Spring Boot 全栈实战合集》,一站式覆盖 Spring Boot 2.x、3.x、4.x 核心特性、项目实战与架构进阶内容。
演示环境说明:
- 开发工具:IDEA 2021.3
- JDK版本: JDK 17(推荐使用 JDK 17 或更高版本,因为 Spring Boot 3.x 系列要求 Java 17,Spring Boot 3.5.4 基于 Spring Framework 6.x 和 Jakarta EE 9,它们都要求至少 JDK 17。)
- Spring Boot版本:3.5.4(于25年7月24日发布)
- Maven版本:3.8.2 (或更高)
- Gradle:(如果使用 Gradle 构建工具的话):推荐使用 Gradle 7.5 或更高版本,确保与 JDK 17 兼容。
- 操作系统:Windows 11
全文目录:
-
- 1. 为什么 Spring Boot 3 项目里仍然值得深入学习 Redis 高级结构?
- 2. 本文实战项目说明:做一个“用户行为与附近门店服务”
- 3. 环境准备:Spring Boot 3.x + Spring Data Redis + Docker Redis
-
- 3.1 项目版本建议
- 3.2 使用 Docker 启动 Redis
- 3.3 Maven 依赖
- 3.4 配置文件
- 3.5 启动类
- 4. Redis Bitmap:用一串 bit 解决签到、活跃、留存问题
-
- 4.1 Bitmap 到底是什么
- 4.2 Bitmap 的内存优势
- 5. Bitmap 实战一:用户每日签到系统
-
- 5.1 Key 设计
- 5.2 DTO 设计
- 5.3 签到 Service
- 5.4 代码解析
- 5.5 Controller
- 5.6 接口测试
- 6. Bitmap 实战二:统计每日活跃用户与多日连续活跃
-
- 6.1 Key 设计
- 6.2 活跃统计 Service
- 6.3 活跃接口 Controller
- 6.4 为什么这段代码有工程意义
- 7. HyperLogLog:不追求百分百精确,但追求极低成本的 UV 估算
-
- 7.1 UV 统计为什么难
- 7.2 HyperLogLog 核心命令
- 7.3 HyperLogLog 适合与不适合的场景
- 8. HyperLogLog 实战:文章访问 UV、活动 UV、全站 UV 合并
-
- 8.1 Key 设计
- 8.2 DTO
- 8.3 HyperLogLog Service
- 8.4 Controller
- 8.5 接口测试
- 8.6 HyperLogLog 的工程提醒
- 9. Geo:把经纬度放进 Redis,做附近门店与距离计算
-
- 9.1 Redis Geo 的本质
- 9.2 Geo 查询模型
- 9.3 门店 DTO
- 9.4 Geo Service
- 9.5 Geo Controller
- 9.6 接口测试
- 10. 三者组合:活动页 UV + 到店用户 + 附近推荐的业务闭环
-
- 10.1 组合业务 Service
- 10.2 组合业务 Controller
- 11. 工程化细节:Key 设计、过期策略、序列化、异常处理、测试
-
- 11.1 Key 设计要有层次
- 11.2 过期策略
- 11.3 序列化选择
- 11.4 参数校验
- 11.5 统一异常处理
- 12. 测试:让案例代码真正可信
-
- 12.1 签到测试
- 12.2 HyperLogLog 测试
- 12.3 Geo 测试
- 13. 常见坑与排查思路
-
- 13.1 Bitmap 的 offset 过大导致内存飙升
- 13.2 BITOP 临时 Key 未删除
- 13.3 HyperLogLog 被误用于精确业务
- 13.4 Geo 经纬度写反
- 13.5 Geo 只适合简单附近查询
- 13.6 RedisTemplate 序列化混乱
- 14. 延伸:Bitmap、HyperLogLog、Geo 与数据库如何配合
-
- 14.1 签到场景
- 14.2 UV 场景
- 14.3 Geo 场景
- 15. 一份更贴近生产的 Key 工具类
- 16. 从零基础到能落地:学习路线建议
- 17. 本文完整接口清单
- 18. 总结:不要迷信数据结构,要学会为场景选择成本最小的解法
- 🧧 学习福利 · 限时开放 🧧
- 🫵 Who am I?
1. 为什么 Spring Boot 3 项目里仍然值得深入学习 Redis 高级结构?
很多刚接触 Spring Boot 的同学,最早使用 Redis 的方式通常是这样的:
- 登录验证码放 Redis;
- 用户 Token 放 Redis;
- 热点对象缓存放 Redis;
- 分布式锁也放 Redis;
- 排行榜用 Sorted Set。
这些当然都很重要,但只停留在这些用法上,会让你对 Redis 的理解停在“更快的 Map”这个层面。Redis 真正厉害的地方,在于它不仅仅提供 Key-Value,还把很多高频业务问题抽象成了极低成本的数据结构操作。
Bitmap、HyperLogLog、Geo 就是很典型的三个代表:
- Bitmap 适合解决“是否发生过”的问题,例如某用户某天是否签到、某用户是否活跃、某个权限位是否打开。
- HyperLogLog 适合解决“有多少个不同对象”的问题,例如页面 UV、活动参与独立用户数、独立 IP 数。
- Geo 适合解决“某个位置附近有什么”的问题,例如附近门店、附近司机、附近充电桩、附近设备。
如果你是初学者,可能会觉得这些数据结构离业务很远。实际上,恰恰相反。它们就是工程师把复杂业务变简单的工具。我第一次在生产系统里用 Bitmap 做连续签到时,最明显的感受是:很多原本要建表、写 SQL、做聚合的功能,突然变成了几个 Redis 命令。那种感觉不是炫技,而是系统压力真的下来了,代码也变清爽了。
Spring Boot 3.x 的技术栈已经全面进入 Jakarta EE 命名空间时代,最低运行环境也通常要求 Java 17 及以上。在这个基础上,Spring Data Redis 为我们屏蔽了连接、序列化、资源释放等大量细节,让业务代码可以更专注于“怎么设计 Key、怎么表达业务语义”。
本文会以一个完整的 Spring Boot 3.x 示例项目为主线,围绕以下三个业务目标展开:
2. 本文实战项目说明:做一个“用户行为与附近门店服务”
我们假设正在开发一个本地生活类应用,业务方提出了几个需求:
传统做法当然可以全部落数据库。比如签到表、访问日志表、门店表、用户行为表都建起来,然后每天跑任务统计。但如果访问量上来,统计类查询会越来越重,表越来越大,离线任务越来越慢。
Redis 的这三类结构可以让我们把部分“高频写入、高频读取、弱事务、统计导向”的能力放到内存层里。
先看整体模型图,仅供参考:
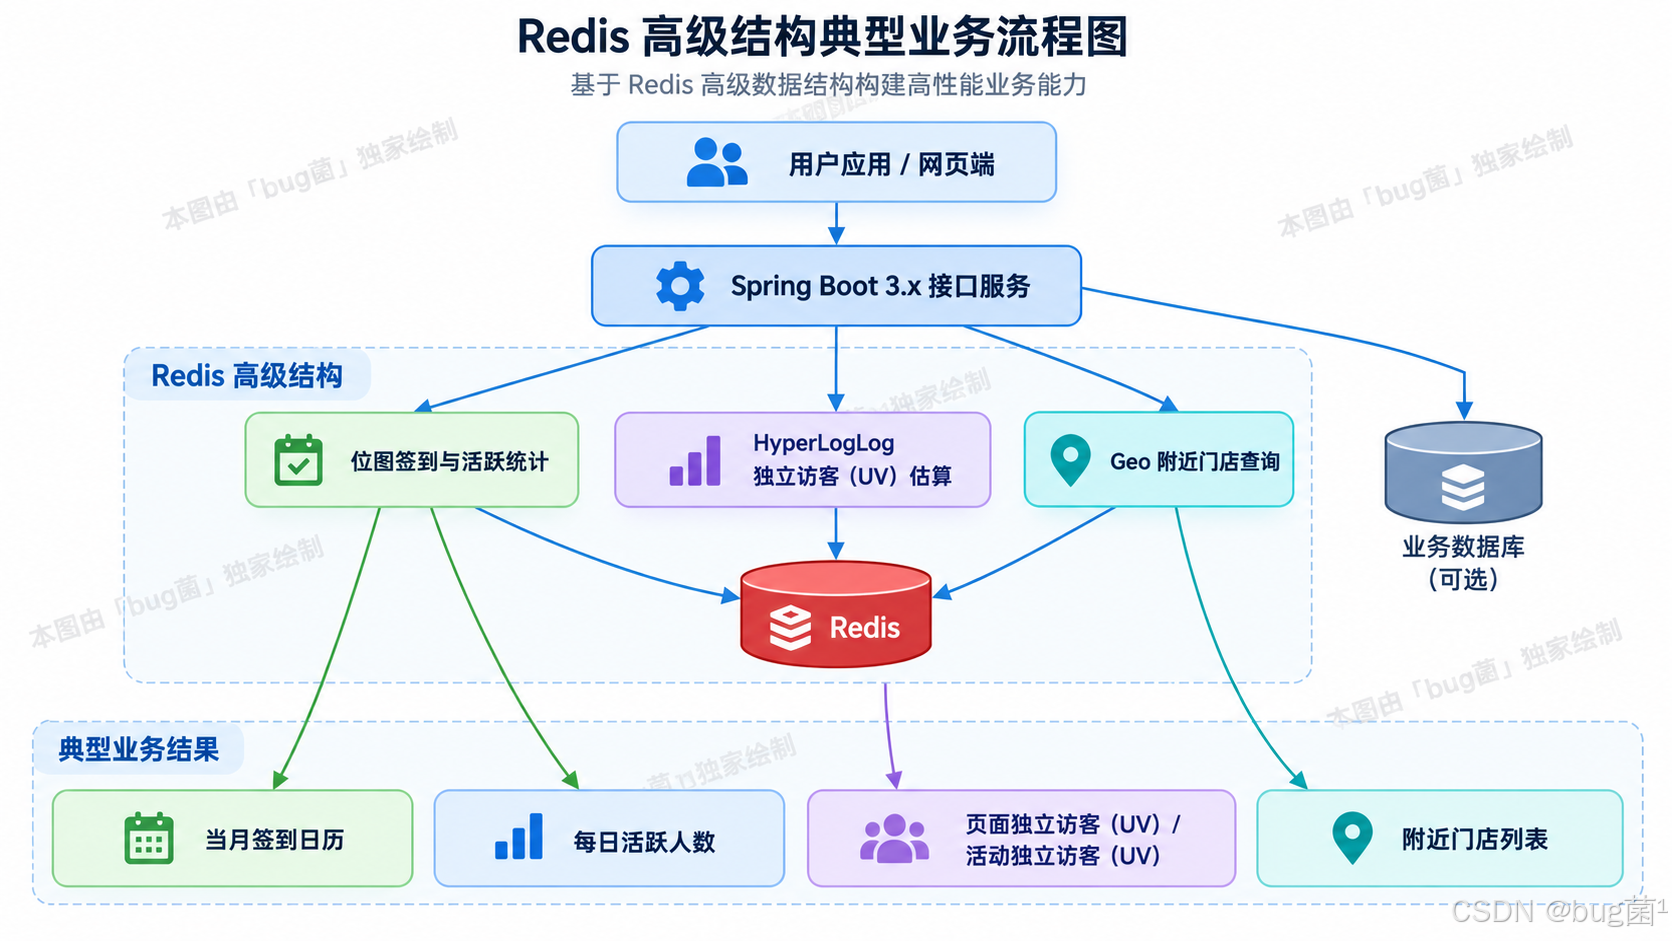
这张图要表达一个很朴素但非常重要的思想:Redis 不是数据库的替代品,而是针对某些业务读写模式的高效补充。
数据库更擅长保存完整事实、支持复杂查询、保证事务一致性;Redis 更擅长处理高频、简单、可被结构化表达的访问模式。把它们各自放在舒服的位置上,系统就不会别扭。
3. 环境准备:Spring Boot 3.x + Spring Data Redis + Docker Redis
3.1 项目版本建议
本文代码基于以下环境编写:
- JDK 17+
- Spring Boot 3.x
- Spring Data Redis
- Maven
- Redis 7.x
- Docker,可选但推荐
Spring Boot 3.x 项目中建议优先使用 spring-boot-starter-data-redis,它会自动整合 Spring Data Redis 和默认 Redis 客户端能力。我们主要使用 StringRedisTemplate,原因很直接:本文操作的 Bitmap、HyperLogLog、Geo 本质上都非常适合用字符串 Key 和字符串成员来表达。
3.2 使用 Docker 启动 Redis
# 启动一个本地 Redis 容器
# -p 6379:6379 表示把容器内的 6379 映射到本机 6379
# –name redis-sb3-demo 给容器起一个方便识别的名字
docker run -d \\
–name redis-sb3-demo \\
-p 6379:6379 \\
redis:7
# 查看 Redis 是否正常运行
docker ps
# 进入 Redis CLI 做简单验证
docker exec -it redis-sb3-demo redis-cli ping
如果返回:
PONG
说明 Redis 已经可以连接。
3.3 Maven 依赖
下面是完整的 pom.xml 示例。为了让初学者复制后能直接跑,我没有省略基础配置。
<?xml version="1.0" encoding="UTF-8"?>
<project xmlns="http://maven.apache.org/POM/4.0.0"
xmlns:xsi="http://www.w3.org/2001/XMLSchema-instance"
xsi:schemaLocation="http://maven.apache.org/POM/4.0.0 https://maven.apache.org/xsd/maven-4.0.0.xsd">
<modelVersion>4.0.0</modelVersion>
<parent>
<groupId>org.springframework.boot</groupId>
<artifactId>spring-boot-starter-parent</artifactId>
<version>3.3.5</version>
<relativePath/>
</parent>
<groupId>com.example</groupId>
<artifactId>redis-advanced-demo</artifactId>
<version>0.0.1-SNAPSHOT</version>
<name>redis-advanced-demo</name>
<description>Spring Boot 3.x Redis Bitmap HyperLogLog Geo Demo</description>
<properties>
<java.version>17</java.version>
</properties>
<dependencies>
<!– Web 接口支持,方便通过 HTTP 调用案例 –>
<dependency>
<groupId>org.springframework.boot</groupId>
<artifactId>spring-boot-starter-web</artifactId>
</dependency>
<!– Spring Data Redis,本文核心依赖 –>
<dependency>
<groupId>org.springframework.boot</groupId>
<artifactId>spring-boot-starter-data-redis</artifactId>
</dependency>
<!– 参数校验,Spring Boot 3.x 使用 jakarta.validation 包 –>
<dependency>
<groupId>org.springframework.boot</groupId>
<artifactId>spring-boot-starter-validation</artifactId>
</dependency>
<!– Lombok 可减少样板代码,不喜欢 Lombok 的读者可自行改成手写 getter/setter –>
<dependency>
<groupId>org.projectlombok</groupId>
<artifactId>lombok</artifactId>
<optional>true</optional>
</dependency>
<!– 测试依赖 –>
<dependency>
<groupId>org.springframework.boot</groupId>
<artifactId>spring-boot-starter-test</artifactId>
<scope>test</scope>
</dependency>
</dependencies>
<build>
<plugins>
<plugin>
<groupId>org.springframework.boot</groupId>
<artifactId>spring-boot-maven-plugin</artifactId>
</plugin>
</plugins>
</build>
</project>
3.4 配置文件
application.yml:
server:
port: 8080
spring:
application:
name: redis–advanced–demo
data:
redis:
host: localhost
port: 6379
database: 0
timeout: 3s
Spring Boot 3.x 中 Redis 配置位于 spring.data.redis 下。新手经常会把老版本里的 spring.redis 复制过来,导致配置不生效,这一点要特别注意。
3.5 启动类
package com.example.redisadvanced;
import org.springframework.boot.SpringApplication;
import org.springframework.boot.autoconfigure.SpringBootApplication;
/**
* Redis 高级结构实战启动类。
*/
@SpringBootApplication
public class RedisAdvancedDemoApplication {
public static void main(String[] args) {
SpringApplication.run(RedisAdvancedDemoApplication.class, args);
}
}
4. Redis Bitmap:用一串 bit 解决签到、活跃、留存问题
4.1 Bitmap 到底是什么
Redis Bitmap 不是一种独立的数据类型,而是基于 String 类型提供的一组位操作能力。你可以把一个 Redis 字符串想象成一排二进制位,每一位都可以是 0 或 1。
例如:
用户 ID: 1001 在 2026-05-01 活跃 -> 把某个 bit 设置为 1
用户 ID: 1002 在 2026-05-01 未活跃 -> 对应 bit 仍然为 0
如果用户 ID 是连续递增数字,就可以把用户 ID 当作 offset。这个设计非常适合做大规模布尔状态统计。
Bitmap 的核心命令包括:
| SETBIT key offset value | 设置某一位为 0 或 1 |
| GETBIT key offset | 获取某一位的值 |
| BITCOUNT key | 统计值为 1 的 bit 数量 |
| BITOP AND/OR/XOR/NOT destKey key… | 对多个 Bitmap 做位运算 |
| BITFIELD key … | 批量读写更复杂的位字段 |
我们先画一个最简单的签到模型:
示意图绘制如下,仅供参考:
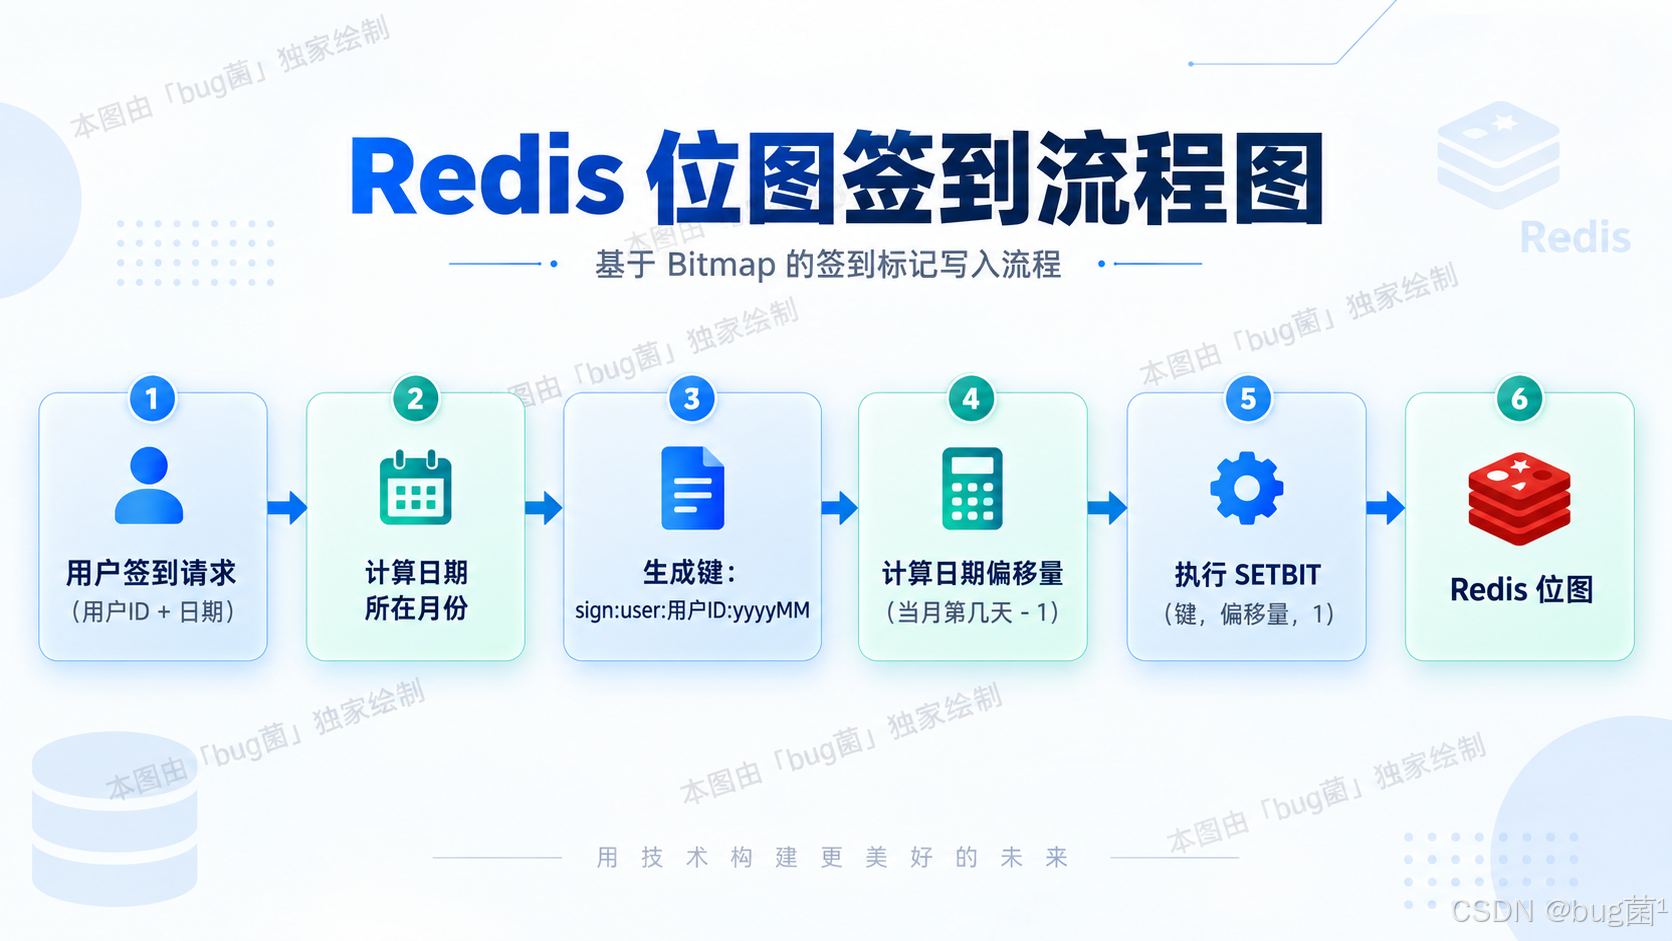
为什么 offset 要用 dayOfMonth – 1?因为 Redis bit 偏移从 0 开始。如果 1 号签到,就设置第 0 位;2 号签到,就设置第 1 位。
4.2 Bitmap 的内存优势
假设我们要记录 1 亿用户某天是否活跃。如果用数据库表记录,哪怕每条记录只存 user_id、date、status,也会有大量行数据和索引成本。如果用 Bitmap,只需要 1 亿个 bit。
计算一下:
100,000,000 bit / 8 = 12,500,000 byte ≈ 11.92 MB
这就是 Bitmap 的魅力:它把大量“是/否”问题压缩到非常低的内存成本里。
当然,Bitmap 不是银弹。它依赖 offset 设计。如果 userId 极度稀疏,比如最大 userId 已经到 900 亿,但真实用户只有 100 万,那么直接用 userId 做 offset 就非常浪费。工程里要根据 ID 分布决定是否适合 Bitmap。
5. Bitmap 实战一:用户每日签到系统
5.1 Key 设计
签到业务的 Key 可以这样设计:
sign:user:{userId}:{yyyyMM}
例如:
sign:user:1001:202605
这个 Key 表示用户 1001 在 2026 年 5 月的签到 Bitmap。
每个月最多 31 天,所以每个用户每月最多只需要 31 个 bit。这个成本几乎可以忽略不计。
5.2 DTO 设计
package com.example.redisadvanced.dto;
import java.time.LocalDate;
import java.util.List;
/**
* 用户签到结果。
*
* @param userId 用户 ID
* @param date 签到日期
* @param signedToday 今天是否已签到
* @param monthSignDays 当月已签到天数
* @param signedDays 当月已签到日期列表
*/
public record SignResult(
Long userId,
LocalDate date,
Boolean signedToday,
Long monthSignDays,
List<Integer> signedDays
) {
}
5.3 签到 Service
package com.example.redisadvanced.service;
import com.example.redisadvanced.dto.SignResult;
import lombok.RequiredArgsConstructor;
import org.springframework.data.redis.core.StringRedisTemplate;
import org.springframework.stereotype.Service;
import java.time.LocalDate;
import java.time.format.DateTimeFormatter;
import java.util.ArrayList;
import java.util.List;
import java.util.Objects;
/**
* 用户签到服务。
*
* 使用 Redis Bitmap 保存用户每月签到情况。
*/
@Service
@RequiredArgsConstructor
public class UserSignService {
private static final DateTimeFormatter MONTH_FORMATTER = DateTimeFormatter.ofPattern("yyyyMM");
private final StringRedisTemplate stringRedisTemplate;
/**
* 用户签到。
*
* @param userId 用户 ID
* @param date 签到日期
* @return 签到结果
*/
public SignResult sign(Long userId, LocalDate date) {
String key = buildSignKey(userId, date);
int offset = date.getDayOfMonth() – 1;
// SETBIT 会返回旧值:true 表示之前已经是 1,false 表示之前是 0。
Boolean oldValue = stringRedisTemplate.opsForValue().setBit(key, offset, true);
// 统计当月签到天数,也就是 Bitmap 中 1 的数量。
Long monthSignDays = stringRedisTemplate.execute(connection ->
connection.stringCommands().bitCount(key.getBytes())
);
Boolean signedToday = Boolean.TRUE.equals(oldValue) || Boolean.TRUE.equals(
stringRedisTemplate.opsForValue().getBit(key, offset)
);
return new SignResult(
userId,
date,
signedToday,
monthSignDays == null ? 0L : monthSignDays,
listSignedDays(userId, date)
);
}
/**
* 判断用户某天是否签到。
*/
public boolean isSigned(Long userId, LocalDate date) {
String key = buildSignKey(userId, date);
int offset = date.getDayOfMonth() – 1;
return Boolean.TRUE.equals(stringRedisTemplate.opsForValue().getBit(key, offset));
}
/**
* 查询用户某月已签到的日期。
*/
public List<Integer> listSignedDays(Long userId, LocalDate anyDayInMonth) {
String key = buildSignKey(userId, anyDayInMonth);
int monthLength = anyDayInMonth.lengthOfMonth();
List<Integer> signedDays = new ArrayList<>();
for (int i = 0; i < monthLength; i++) {
Boolean signed = stringRedisTemplate.opsForValue().getBit(key, i);
if (Boolean.TRUE.equals(signed)) {
signedDays.add(i + 1);
}
}
return signedDays;
}
/**
* 统计用户某月签到天数。
*/
public long countMonthlySigns(Long userId, LocalDate anyDayInMonth) {
String key = buildSignKey(userId, anyDayInMonth);
Long count = stringRedisTemplate.execute(connection ->
connection.stringCommands().bitCount(key.getBytes())
);
return Objects.requireNonNullElse(count, 0L);
}
private String buildSignKey(Long userId, LocalDate date) {
return "sign:user:" + userId + ":" + MONTH_FORMATTER.format(date);
}
}
5.4 代码解析
这段代码有几个值得仔细看:
第一,setBit(key, offset, true) 对应 Redis 的 SETBIT key offset 1。在签到场景中,签到就是把对应日期的位置设为 1。
第二,setBit 返回的是旧值。这个细节很有用,因为可以判断用户是不是重复签到。如果旧值已经是 true,说明用户之前签过。
第三,BITCOUNT 在 Spring Data Redis 的高级模板里不是每个场景都有特别顺手的封装,所以这里通过 execute 拿到底层连接执行。初学者不要害怕 execute,它是 Spring Data Redis 给我们预留的“下探到底层命令”的通道。
第四,查询当月签到日期时,我们逐位 GETBIT。一个月最多 31 次查询,成本很低。如果想进一步优化,也可以一次性取出整个字符串再在 Java 里解析 bit,不过那会增加理解成本,不适合初学阶段。
5.5 Controller
package com.example.redisadvanced.controller;
import com.example.redisadvanced.dto.SignResult;
import com.example.redisadvanced.service.UserSignService;
import jakarta.validation.constraints.NotNull;
import lombok.RequiredArgsConstructor;
import org.springframework.format.annotation.DateTimeFormat;
import org.springframework.validation.annotation.Validated;
import org.springframework.web.bind.annotation.GetMapping;
import org.springframework.web.bind.annotation.PathVariable;
import org.springframework.web.bind.annotation.PostMapping;
import org.springframework.web.bind.annotation.RequestMapping;
import org.springframework.web.bind.annotation.RequestParam;
import org.springframework.web.bind.annotation.RestController;
import java.time.LocalDate;
import java.util.List;
/**
* 用户签到接口。
*/
@Validated
@RestController
@RequestMapping("/api/sign")
@RequiredArgsConstructor
public class UserSignController {
private final UserSignService userSignService;
/**
* 用户签到。
*/
@PostMapping("/{userId}")
public SignResult sign(
@PathVariable Long userId,
@RequestParam(required = false)
@DateTimeFormat(iso = DateTimeFormat.ISO.DATE) LocalDate date
) {
LocalDate targetDate = date == null ? LocalDate.now() : date;
return userSignService.sign(userId, targetDate);
}
/**
* 查询某天是否签到。
*/
@GetMapping("/{userId}/status")
public boolean isSigned(
@PathVariable Long userId,
@RequestParam @NotNull
@DateTimeFormat(iso = DateTimeFormat.ISO.DATE) LocalDate date
) {
return userSignService.isSigned(userId, date);
}
/**
* 查询某月签到日期列表。
*/
@GetMapping("/{userId}/days")
public List<Integer> listSignedDays(
@PathVariable Long userId,
@RequestParam @NotNull
@DateTimeFormat(iso = DateTimeFormat.ISO.DATE) LocalDate month
) {
return userSignService.listSignedDays(userId, month);
}
}
5.6 接口测试
# 用户 1001 在 2026-05-01 签到
curl -X POST "http://localhost:8080/api/sign/1001?date=2026-05-01"
# 用户 1001 在 2026-05-03 签到
curl -X POST "http://localhost:8080/api/sign/1001?date=2026-05-03"
# 查询 2026-05-01 是否签到
curl "http://localhost:8080/api/sign/1001/status?date=2026-05-01"
# 查询 2026 年 5 月签到日期
curl "http://localhost:8080/api/sign/1001/days?month=2026-05-01"
你会得到类似结果:
{
"userId": 1001,
"date": "2026-05-03",
"signedToday": true,
"monthSignDays": 2,
"signedDays": [1, 3]
}
这就是 Bitmap 的直观价值:一个月签到日历不需要一张签到明细表也能表示出来。
6. Bitmap 实战二:统计每日活跃用户与多日连续活跃
签到是“一个用户一个月一串 bit”。活跃统计则可以换一个角度:一日一个 Bitmap,每个用户占一个 bit。
6.1 Key 设计
active:daily:{yyyyMMdd}
例如:
active:daily:20260501
用户 1001 在这天活跃,就设置:
SETBIT active:daily:20260501 1001 1
这样某天活跃人数就是:
BITCOUNT active:daily:20260501
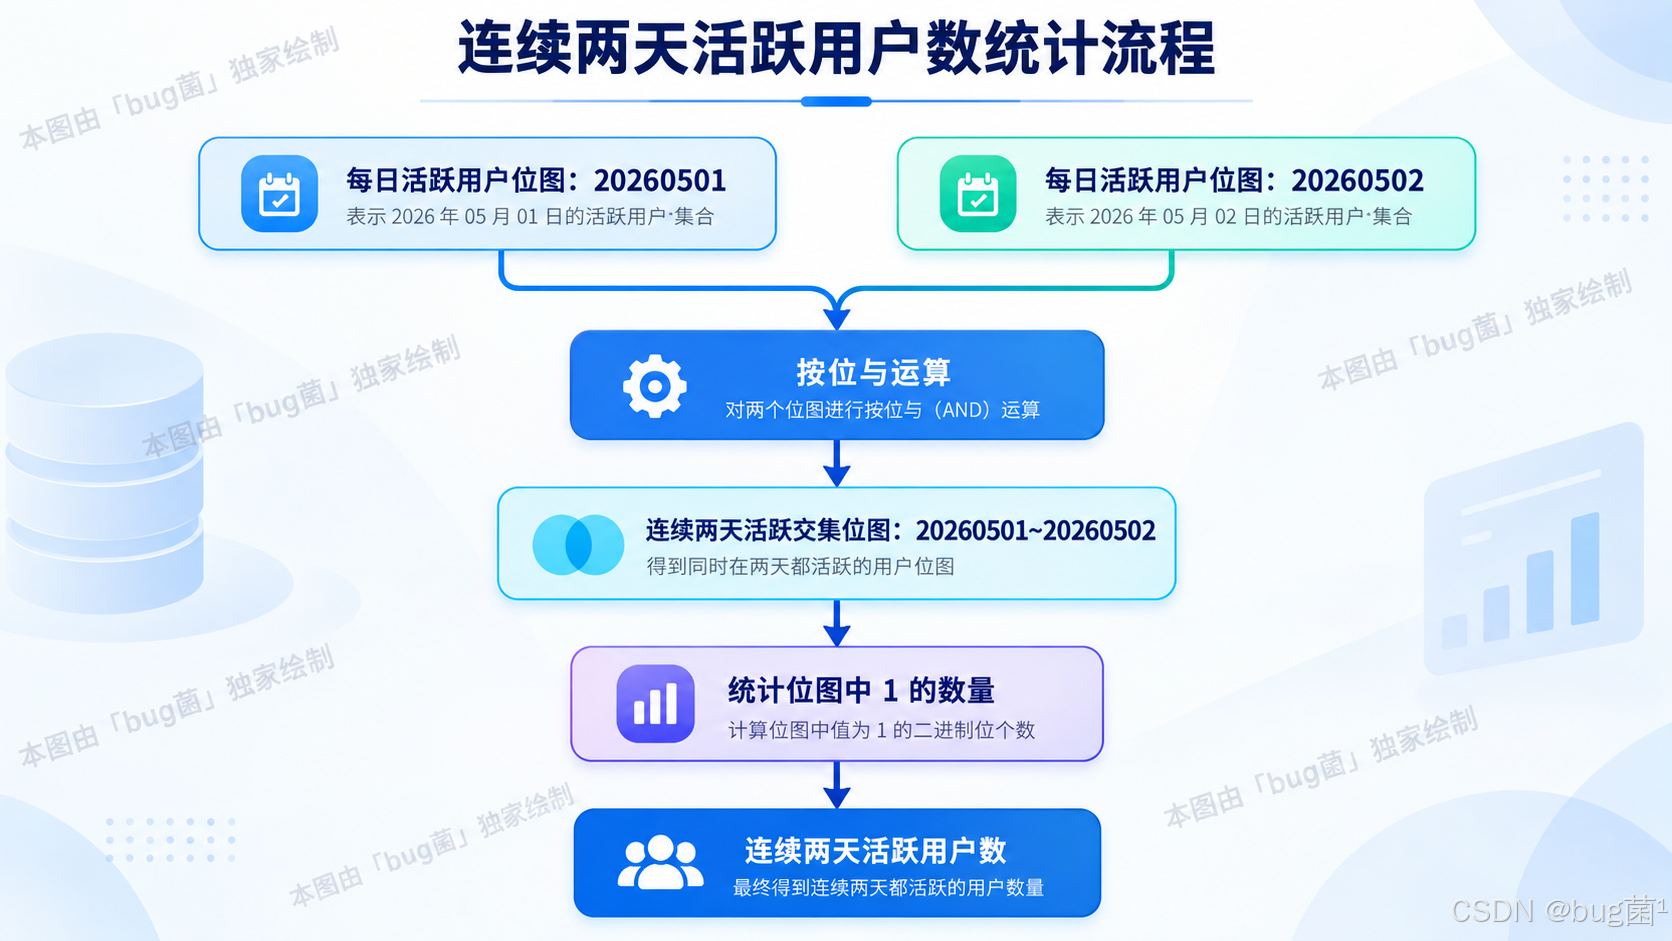
如果要统计 5 月 1 日和 5 月 2 日都活跃的用户,可以对两个 Bitmap 做 AND 运算;如果要统计两天任意一天活跃的用户,可以做 OR 运算。
示意图绘制如下,仅供参考:
6.2 活跃统计 Service
package com.example.redisadvanced.service;
import lombok.RequiredArgsConstructor;
import org.springframework.data.redis.connection.RedisStringCommands;
import org.springframework.data.redis.core.StringRedisTemplate;
import org.springframework.stereotype.Service;
import java.nio.charset.StandardCharsets;
import java.time.LocalDate;
import java.time.format.DateTimeFormatter;
import java.util.List;
import java.util.Objects;
/**
* 用户活跃统计服务。
*
* 使用每日 Bitmap 记录用户是否活跃。
*/
@Service
@RequiredArgsConstructor
public class UserActiveService {
private static final DateTimeFormatter DAY_FORMATTER = DateTimeFormatter.ofPattern("yyyyMMdd");
private final StringRedisTemplate stringRedisTemplate;
/**
* 记录用户某日活跃。
*/
public void markActive(Long userId, LocalDate date) {
String key = buildDailyActiveKey(date);
// 用 userId 作为 offset。真实项目要评估 userId 是否过于稀疏。
stringRedisTemplate.opsForValue().setBit(key, userId, true);
}
/**
* 判断用户某日是否活跃。
*/
public boolean isActive(Long userId, LocalDate date) {
String key = buildDailyActiveKey(date);
return Boolean.TRUE.equals(stringRedisTemplate.opsForValue().getBit(key, userId));
}
/**
* 统计某日活跃用户数。
*/
public long countDailyActive(LocalDate date) {
String key = buildDailyActiveKey(date);
Long count = stringRedisTemplate.execute(connection ->
connection.stringCommands().bitCount(key.getBytes(StandardCharsets.UTF_8))
);
return Objects.requireNonNullElse(count, 0L);
}
/**
* 统计多日都活跃的用户数。
*/
public long countAllDaysActive(List<LocalDate> dates) {
if (dates == null || dates.isEmpty()) {
return 0L;
}
String destKey = "active:tmp:and:" + System.currentTimeMillis();
byte[][] sourceKeys = dates.stream()
.map(this::buildDailyActiveKey)
.map(key -> key.getBytes(StandardCharsets.UTF_8))
.toArray(byte[][]::new);
Long result = stringRedisTemplate.execute(connection -> {
// BITOP AND 计算多个日期共同活跃的用户集合。
connection.stringCommands().bitOp(
RedisStringCommands.BitOperation.AND,
destKey.getBytes(StandardCharsets.UTF_8),
sourceKeys
);
Long count = connection.stringCommands().bitCount(destKey.getBytes(StandardCharsets.UTF_8));
connection.keyCommands().del(destKey.getBytes(StandardCharsets.UTF_8));
return count;
});
return Objects.requireNonNullElse(result, 0L);
}
/**
* 统计多日任意一天活跃的用户数。
*/
public long countAnyDayActive(List<LocalDate> dates) {
if (dates == null || dates.isEmpty()) {
return 0L;
}
String destKey = "active:tmp:or:" + System.currentTimeMillis();
byte[][] sourceKeys = dates.stream()
.map(this::buildDailyActiveKey)
.map(key -> key.getBytes(StandardCharsets.UTF_8))
.toArray(byte[][]::new);
Long result = stringRedisTemplate.execute(connection -> {
// BITOP OR 计算多个日期的活跃用户并集。
connection.stringCommands().bitOp(
RedisStringCommands.BitOperation.OR,
destKey.getBytes(StandardCharsets.UTF_8),
sourceKeys
);
Long count = connection.stringCommands().bitCount(destKey.getBytes(StandardCharsets.UTF_8));
connection.keyCommands().del(destKey.getBytes(StandardCharsets.UTF_8));
return count;
});
return Objects.requireNonNullElse(result, 0L);
}
private String buildDailyActiveKey(LocalDate date) {
return "active:daily:" + DAY_FORMATTER.format(date);
}
}
6.3 活跃接口 Controller
package com.example.redisadvanced.controller;
import com.example.redisadvanced.service.UserActiveService;
import lombok.RequiredArgsConstructor;
import org.springframework.format.annotation.DateTimeFormat;
import org.springframework.web.bind.annotation.GetMapping;
import org.springframework.web.bind.annotation.PathVariable;
import org.springframework.web.bind.annotation.PostMapping;
import org.springframework.web.bind.annotation.RequestMapping;
import org.springframework.web.bind.annotation.RequestParam;
import org.springframework.web.bind.annotation.RestController;
import java.time.LocalDate;
import java.util.List;
/**
* 用户活跃统计接口。
*/
@RestController
@RequestMapping("/api/active")
@RequiredArgsConstructor
public class UserActiveController {
private final UserActiveService userActiveService;
/**
* 记录用户活跃。
*/
@PostMapping("/{userId}")
public String markActive(
@PathVariable Long userId,
@RequestParam(required = false)
@DateTimeFormat(iso = DateTimeFormat.ISO.DATE) LocalDate date
) {
userActiveService.markActive(userId, date == null ? LocalDate.now() : date);
return "OK";
}
/**
* 查询某天活跃人数。
*/
@GetMapping("/daily-count")
public long countDailyActive(
@RequestParam @DateTimeFormat(iso = DateTimeFormat.ISO.DATE) LocalDate date
) {
return userActiveService.countDailyActive(date);
}
/**
* 查询多个日期都活跃的人数。
*/
@GetMapping("/all-days-count")
public long countAllDaysActive(
@RequestParam List<LocalDate> dates
) {
return userActiveService.countAllDaysActive(dates);
}
/**
* 查询多个日期任意一天活跃的人数。
*/
@GetMapping("/any-day-count")
public long countAnyDayActive(
@RequestParam List<LocalDate> dates
) {
return userActiveService.countAnyDayActive(dates);
}
}
6.4 为什么这段代码有工程意义
很多运营统计问题,看起来像 SQL 问题,本质却是集合问题。
- 某天活跃人数:集合大小。
- 连续两天活跃:集合交集大小。
- 一周内至少活跃一天:集合并集大小。
如果用数据库,可能是 COUNT(DISTINCT user_id)、GROUP BY、临时表、JOIN。如果数据量很大,这些操作会变重。Bitmap 的优势在于,集合运算被压缩成了位运算,机器执行起来非常快。
但也要冷静:Bitmap 只能告诉你“有多少”,或者“某个 offset 是否存在”。如果你需要把所有活跃用户 ID 拉出来,再做复杂画像分析,Bitmap 就不一定合适。数据结构的选择永远要跟问题一起看。
7. HyperLogLog:不追求百分百精确,但追求极低成本的 UV 估算
7.1 UV 统计为什么难
PV 很简单。用户访问一次,计数器加一就行。
UV 难在“去重”。同一个用户访问 100 次,只能算 1 个独立用户。传统做法可以使用 Set:
SADD page:uv:1001:20260501 userA
SADD page:uv:1001:20260501 userB
SCARD page:uv:1001:20260501
这个方案精确,但当用户量很大时,Set 会保存每个用户 ID,内存成本会越来越高。
HyperLogLog 的思路是:我不保存完整成员,我只保存用于估算基数的概率统计信息。它不适合告诉你“有哪些用户访问了”,但很适合告诉你“大约有多少不同用户访问了”。
这句话非常关键:HyperLogLog 不是用来存明细的,它是用来估算基数的。
7.2 HyperLogLog 核心命令
常用命令只有三个:
| PFADD key element… | 添加元素到 HyperLogLog |
| PFCOUNT key… | 估算一个或多个 HyperLogLog 的基数 |
| PFMERGE destKey sourceKey… | 合并多个 HyperLogLog |
模型图如下:
示意图绘制如下,仅供参考:

7.3 HyperLogLog 适合与不适合的场景
适合:
- 页面 UV;
- 活动独立参与人数;
- 独立 IP 数;
- 独立设备数;
- 大盘趋势统计。
不适合:
- 财务结算;
- 权益发放;
- 抽奖资格判断;
- 必须知道具体用户列表的场景;
- 不能接受误差的审计类场景。
我个人对 HyperLogLog 的态度是:它不是“粗糙”,而是“知道自己不需要那么精确”。工程里最贵的不是误差,而是不知道哪里可以允许误差,最后把所有场景都做成重型系统。
8. HyperLogLog 实战:文章访问 UV、活动 UV、全站 UV 合并
8.1 Key 设计
文章每日 UV:
hll:article:uv:{articleId}:{yyyyMMdd}
活动每日 UV:
hll:activity:uv:{activityId}:{yyyyMMdd}
全站每日 UV 可以通过多个页面的 HyperLogLog 合并得到:
hll:site:uv:{yyyyMMdd}
8.2 DTO
package com.example.redisadvanced.dto;
import java.time.LocalDate;
/**
* UV 统计结果。
*/
public record UvResult(
String bizType,
String bizId,
LocalDate date,
Long uv
) {
}
8.3 HyperLogLog Service
package com.example.redisadvanced.service;
import com.example.redisadvanced.dto.UvResult;
import lombok.RequiredArgsConstructor;
import org.springframework.data.redis.core.HyperLogLogOperations;
import org.springframework.data.redis.core.StringRedisTemplate;
import org.springframework.stereotype.Service;
import java.time.LocalDate;
import java.time.format.DateTimeFormatter;
import java.util.List;
import java.util.Objects;
/**
* HyperLogLog UV 统计服务。
*/
@Service
@RequiredArgsConstructor
public class UvStatisticService {
private static final DateTimeFormatter DAY_FORMATTER = DateTimeFormatter.ofPattern("yyyyMMdd");
private final StringRedisTemplate stringRedisTemplate;
/**
* 记录文章访问 UV。
*/
public void recordArticleVisit(Long articleId, Long userId, LocalDate date) {
String key = buildArticleUvKey(articleId, date);
ops().add(key, String.valueOf(userId));
}
/**
* 查询文章 UV。
*/
public UvResult countArticleUv(Long articleId, LocalDate date) {
String key = buildArticleUvKey(articleId, date);
Long uv = ops().size(key);
return new UvResult("article", String.valueOf(articleId), date, Objects.requireNonNullElse(uv, 0L));
}
/**
* 记录活动页访问 UV。
*/
public void recordActivityVisit(Long activityId, Long userId, LocalDate date) {
String key = buildActivityUvKey(activityId, date);
ops().add(key, String.valueOf(userId));
}
/**
* 查询活动页 UV。
*/
public UvResult countActivityUv(Long activityId, LocalDate date) {
String key = buildActivityUvKey(activityId, date);
Long uv = ops().size(key);
return new UvResult("activity", String.valueOf(activityId), date, Objects.requireNonNullElse(uv, 0L));
}
/**
* 合并多个文章的 UV,得到某天内容大盘 UV。
*/
public long mergeArticleUv(LocalDate date, List<Long> articleIds) {
if (articleIds == null || articleIds.isEmpty()) {
return 0L;
}
String destKey = "hll:article:uv:merged:" + DAY_FORMATTER.format(date) + ":" + System.currentTimeMillis();
String[] sourceKeys = articleIds.stream()
.map(articleId -> buildArticleUvKey(articleId, date))
.toArray(String[]::new);
ops().union(destKey, sourceKeys);
Long uv = ops().size(destKey);
stringRedisTemplate.delete(destKey);
return Objects.requireNonNullElse(uv, 0L);
}
/**
* 合并活动 UV 和文章 UV,模拟全站 UV 统计。
*/
public long mergeSiteUv(LocalDate date, List<Long> articleIds, List<Long> activityIds) {
String destKey = "hll:site:uv:" + DAY_FORMATTER.format(date);
List<String> articleKeys = articleIds == null ? List.of() : articleIds.stream()
.map(articleId -> buildArticleUvKey(articleId, date))
.toList();
List<String> activityKeys = activityIds == null ? List.of() : activityIds.stream()
.map(activityId -> buildActivityUvKey(activityId, date))
.toList();
String[] sourceKeys = java.util.stream.Stream.concat(articleKeys.stream(), activityKeys.stream())
.toArray(String[]::new);
if (sourceKeys.length == 0) {
return 0L;
}
ops().union(destKey, sourceKeys);
Long uv = ops().size(destKey);
return Objects.requireNonNullElse(uv, 0L);
}
private HyperLogLogOperations<String, String> ops() {
return stringRedisTemplate.opsForHyperLogLog();
}
private String buildArticleUvKey(Long articleId, LocalDate date) {
return "hll:article:uv:" + articleId + ":" + DAY_FORMATTER.format(date);
}
private String buildActivityUvKey(Long activityId, LocalDate date) {
return "hll:activity:uv:" + activityId + ":" + DAY_FORMATTER.format(date);
}
}
8.4 Controller
package com.example.redisadvanced.controller;
import com.example.redisadvanced.dto.UvResult;
import com.example.redisadvanced.service.UvStatisticService;
import lombok.RequiredArgsConstructor;
import org.springframework.format.annotation.DateTimeFormat;
import org.springframework.web.bind.annotation.GetMapping;
import org.springframework.web.bind.annotation.PathVariable;
import org.springframework.web.bind.annotation.PostMapping;
import org.springframework.web.bind.annotation.RequestMapping;
import org.springframework.web.bind.annotation.RequestParam;
import org.springframework.web.bind.annotation.RestController;
import java.time.LocalDate;
import java.util.List;
/**
* UV 统计接口。
*/
@RestController
@RequestMapping("/api/uv")
@RequiredArgsConstructor
public class UvStatisticController {
private final UvStatisticService uvStatisticService;
/**
* 记录文章访问。
*/
@PostMapping("/article/{articleId}/visit")
public String recordArticleVisit(
@PathVariable Long articleId,
@RequestParam Long userId,
@RequestParam(required = false)
@DateTimeFormat(iso = DateTimeFormat.ISO.DATE) LocalDate date
) {
uvStatisticService.recordArticleVisit(articleId, userId, date == null ? LocalDate.now() : date);
return "OK";
}
/**
* 查询文章 UV。
*/
@GetMapping("/article/{articleId}")
public UvResult countArticleUv(
@PathVariable Long articleId,
@RequestParam @DateTimeFormat(iso = DateTimeFormat.ISO.DATE) LocalDate date
) {
return uvStatisticService.countArticleUv(articleId, date);
}
/**
* 记录活动访问。
*/
@PostMapping("/activity/{activityId}/visit")
public String recordActivityVisit(
@PathVariable Long activityId,
@RequestParam Long userId,
@RequestParam(required = false)
@DateTimeFormat(iso = DateTimeFormat.ISO.DATE) LocalDate date
) {
uvStatisticService.recordActivityVisit(activityId, userId, date == null ? LocalDate.now() : date);
return "OK";
}
/**
* 查询活动 UV。
*/
@GetMapping("/activity/{activityId}")
public UvResult countActivityUv(
@PathVariable Long activityId,
@RequestParam @DateTimeFormat(iso = DateTimeFormat.ISO.DATE) LocalDate date
) {
return uvStatisticService.countActivityUv(activityId, date);
}
/**
* 合并多个文章 UV。
*/
@GetMapping("/article/merged")
public long mergeArticleUv(
@RequestParam @DateTimeFormat(iso = DateTimeFormat.ISO.DATE) LocalDate date,
@RequestParam List<Long> articleIds
) {
return uvStatisticService.mergeArticleUv(date, articleIds);
}
/**
* 合并文章和活动,得到全站 UV。
*/
@GetMapping("/site")
public long mergeSiteUv(
@RequestParam @DateTimeFormat(iso = DateTimeFormat.ISO.DATE) LocalDate date,
@RequestParam(defaultValue = "") List<Long> articleIds,
@RequestParam(defaultValue = "") List<Long> activityIds
) {
return uvStatisticService.mergeSiteUv(date, articleIds, activityIds);
}
}
8.5 接口测试
# 用户 1001、1002、1003 访问文章 10
curl -X POST "http://localhost:8080/api/uv/article/10/visit?userId=1001&date=2026-05-01"
curl -X POST "http://localhost:8080/api/uv/article/10/visit?userId=1002&date=2026-05-01"
curl -X POST "http://localhost:8080/api/uv/article/10/visit?userId=1003&date=2026-05-01"
# 用户 1001 重复访问,不应该明显增加 UV
curl -X POST "http://localhost:8080/api/uv/article/10/visit?userId=1001&date=2026-05-01"
# 查询文章 UV
curl "http://localhost:8080/api/uv/article/10?date=2026-05-01"
返回类似:
{
"bizType": "article",
"bizId": "10",
"date": "2026-05-01",
"uv": 3
}
小数据下你可能看到的结果和精确值一致,但不要因此误会 HyperLogLog 是精确集合。它的定位始终是估算。
8.6 HyperLogLog 的工程提醒
第一,不要用 HyperLogLog 做用户是否参与过活动的判断。它不能告诉你某个用户是否在集合里。
第二,不要把 HyperLogLog 的 UV 用于强权益结算。比如“访问人数超过 10000 就发奖”,如果这个数字影响资金或权益,建议用数据库、Set 或离线数仓做精确校验。
第三,HyperLogLog 很适合做趋势图。运营很多时候关心的是“今天比昨天涨了多少”“这个活动是不是比上个活动更吸引人”,这类场景允许小误差,却非常重视低成本与实时性。
9. Geo:把经纬度放进 Redis,做附近门店与距离计算
9.1 Redis Geo 的本质
Redis Geo 用于保存地理坐标,并支持按半径或矩形范围检索附近成员。它非常适合简单附近查询,例如附近门店、附近司机、附近仓库、附近设备。
Geo 的常用命令包括:
| GEOADD | 添加经纬度和成员 |
| GEOPOS | 查询成员坐标 |
| GEODIST | 计算两个成员距离 |
| GEOSEARCH | 按经纬度或成员查询附近对象 |
| GEOHASH | 返回成员 Geohash 字符串 |
Redis Geo 的成员通常保存在一个 key 里:
geo:store:city:shanghai
每个成员可以是门店 ID:
GEOADD geo:store:city:shanghai 121.4737 31.2304 store:1001
注意,经纬度顺序是“经度 longitude 在前,纬度 latitude 在后”。这个顺序非常容易写反。写反以后,数据不会一定报错,但查询结果会非常离谱。
9.2 Geo 查询模型
示意图绘制如下,仅供参考:
9.3 门店 DTO
package com.example.redisadvanced.dto;
/**
* 门店位置请求。
*/
public record StoreLocationRequest(
String storeId,
String storeName,
Double longitude,
Double latitude,
String cityCode
) {
}
package com.example.redisadvanced.dto;
/**
* 附近门店响应。
*/
public record NearbyStoreResponse(
String storeId,
String storeName,
Double longitude,
Double latitude,
Double distanceKm
) {
}
9.4 Geo Service
package com.example.redisadvanced.service;
import com.example.redisadvanced.dto.NearbyStoreResponse;
import com.example.redisadvanced.dto.StoreLocationRequest;
import lombok.RequiredArgsConstructor;
import org.springframework.data.geo.Circle;
import org.springframework.data.geo.Distance;
import org.springframework.data.geo.GeoResult;
import org.springframework.data.geo.Metrics;
import org.springframework.data.geo.Point;
import org.springframework.data.redis.connection.RedisGeoCommands;
import org.springframework.data.redis.core.StringRedisTemplate;
import org.springframework.stereotype.Service;
import java.util.ArrayList;
import java.util.List;
/**
* 门店 Geo 服务。
*/
@Service
@RequiredArgsConstructor
public class StoreGeoService {
private final StringRedisTemplate stringRedisTemplate;
/**
* 添加或更新门店位置。
*/
public void saveStoreLocation(StoreLocationRequest request) {
String key = buildStoreGeoKey(request.cityCode());
Point point = new Point(request.longitude(), request.latitude());
// Redis Geo 成员值只保存 storeId。门店名称等详情通常应该放数据库或缓存 Hash。
stringRedisTemplate.opsForGeo().add(key, point, request.storeId());
// 为了演示方便,这里额外用 String 保存门店名称。
// 真实项目可以改为 Hash、数据库或缓存对象。
stringRedisTemplate.opsForValue().set(buildStoreNameKey(request.storeId()), request.storeName());
}
/**
* 查询指定经纬度附近的门店。
*/
public List<NearbyStoreResponse> searchNearbyStores(
String cityCode,
Double longitude,
Double latitude,
Double radiusKm,
Integer limit
) {
String key = buildStoreGeoKey(cityCode);
Point center = new Point(longitude, latitude);
Distance radius = new Distance(radiusKm, Metrics.KILOMETERS);
Circle circle = new Circle(center, radius);
RedisGeoCommands.GeoRadiusCommandArgs args = RedisGeoCommands.GeoRadiusCommandArgs.newGeoRadiusArgs()
.includeDistance()
.includeCoordinates()
.sortAscending()
.limit(limit == null ? 10 : limit);
var results = stringRedisTemplate.opsForGeo().radius(key, circle, args);
List<NearbyStoreResponse> stores = new ArrayList<>();
if (results == null) {
return stores;
}
for (GeoResult<RedisGeoCommands.GeoLocation<String>> result : results) {
String storeId = result.getContent().getName();
Point point = result.getContent().getPoint();
Distance distance = result.getDistance();
String storeName = stringRedisTemplate.opsForValue().get(buildStoreNameKey(storeId));
stores.add(new NearbyStoreResponse(
storeId,
storeName,
point == null ? null : point.getX(),
point == null ? null : point.getY(),
distance == null ? null : distance.getValue()
));
}
return stores;
}
/**
* 计算同一城市内两个门店之间的距离。
*/
public Double distanceBetweenStores(String cityCode, String storeId1, String storeId2) {
String key = buildStoreGeoKey(cityCode);
Distance distance = stringRedisTemplate.opsForGeo().distance(key, storeId1, storeId2, Metrics.KILOMETERS);
return distance == null ? null : distance.getValue();
}
private String buildStoreGeoKey(String cityCode) {
return "geo:store:city:" + cityCode;
}
private String buildStoreNameKey(String storeId) {
return "store:name:" + storeId;
}
}
9.5 Geo Controller
package com.example.redisadvanced.controller;
import com.example.redisadvanced.dto.NearbyStoreResponse;
import com.example.redisadvanced.dto.StoreLocationRequest;
import com.example.redisadvanced.service.StoreGeoService;
import jakarta.validation.Valid;
import lombok.RequiredArgsConstructor;
import org.springframework.web.bind.annotation.GetMapping;
import org.springframework.web.bind.annotation.PostMapping;
import org.springframework.web.bind.annotation.RequestBody;
import org.springframework.web.bind.annotation.RequestMapping;
import org.springframework.web.bind.annotation.RequestParam;
import org.springframework.web.bind.annotation.RestController;
import java.util.List;
/**
* 门店位置接口。
*/
@RestController
@RequestMapping("/api/stores")
@RequiredArgsConstructor
public class StoreGeoController {
private final StoreGeoService storeGeoService;
/**
* 添加或更新门店位置。
*/
@PostMapping("/location")
public String saveStoreLocation(@RequestBody @Valid StoreLocationRequest request) {
storeGeoService.saveStoreLocation(request);
return "OK";
}
/**
* 查询附近门店。
*/
@GetMapping("/nearby")
public List<NearbyStoreResponse> searchNearbyStores(
@RequestParam String cityCode,
@RequestParam Double longitude,
@RequestParam Double latitude,
@RequestParam(defaultValue = "3") Double radiusKm,
@RequestParam(defaultValue = "10") Integer limit
) {
return storeGeoService.searchNearbyStores(cityCode, longitude, latitude, radiusKm, limit);
}
/**
* 计算两个门店之间的距离。
*/
@GetMapping("/distance")
public Double distanceBetweenStores(
@RequestParam String cityCode,
@RequestParam String storeId1,
@RequestParam String storeId2
) {
return storeGeoService.distanceBetweenStores(cityCode, storeId1, storeId2);
}
}
9.6 接口测试
# 添加上海附近的几个门店示例
curl -X POST "http://localhost:8080/api/stores/location" \\
-H "Content-Type: application/json" \\
-d '{"storeId":"1001","storeName":"人民广场店","longitude":121.475190,"latitude":31.228833,"cityCode":"shanghai"}'
curl -X POST "http://localhost:8080/api/stores/location" \\
-H "Content-Type: application/json" \\
-d '{"storeId":"1002","storeName":"南京东路店","longitude":121.490317,"latitude":31.240525,"cityCode":"shanghai"}'
curl -X POST "http://localhost:8080/api/stores/location" \\
-H "Content-Type: application/json" \\
-d '{"storeId":"1003","storeName":"静安寺店","longitude":121.446388,"latitude":31.223702,"cityCode":"shanghai"}'
# 查询人民广场附近 5 公里内门店
curl "http://localhost:8080/api/stores/nearby?cityCode=shanghai&longitude=121.475190&latitude=31.228833&radiusKm=5&limit=10"
# 计算两个门店之间距离
curl "http://localhost:8080/api/stores/distance?cityCode=shanghai&storeId1=1001&storeId2=1002"
返回示例:
[
{
"storeId": "1001",
"storeName": "人民广场店",
"longitude": 121.47518992424011,
"latitude": 31.22883226305965,
"distanceKm": 0.0001
},
{
"storeId": "1002",
"storeName": "南京东路店",
"longitude": 121.49031549692154,
"latitude": 31.240524235173423,
"distanceKm": 1.94
}
]
Redis 返回的坐标可能和原始坐标有细微差别,这是 Geo 编码带来的正常现象。不要拿 Redis Geo 返回值做高精度测绘,它适合业务附近查询,不适合厘米级地理计算。
10. 三者组合:活动页 UV + 到店用户 + 附近推荐的业务闭环
前面的案例分别讲了 Bitmap、HyperLogLog、Geo。真实项目里,它们往往不是孤立存在的。
假设现在有一个“附近门店优惠券”活动:
模型图如下:
示意图绘制如下,仅供参考:
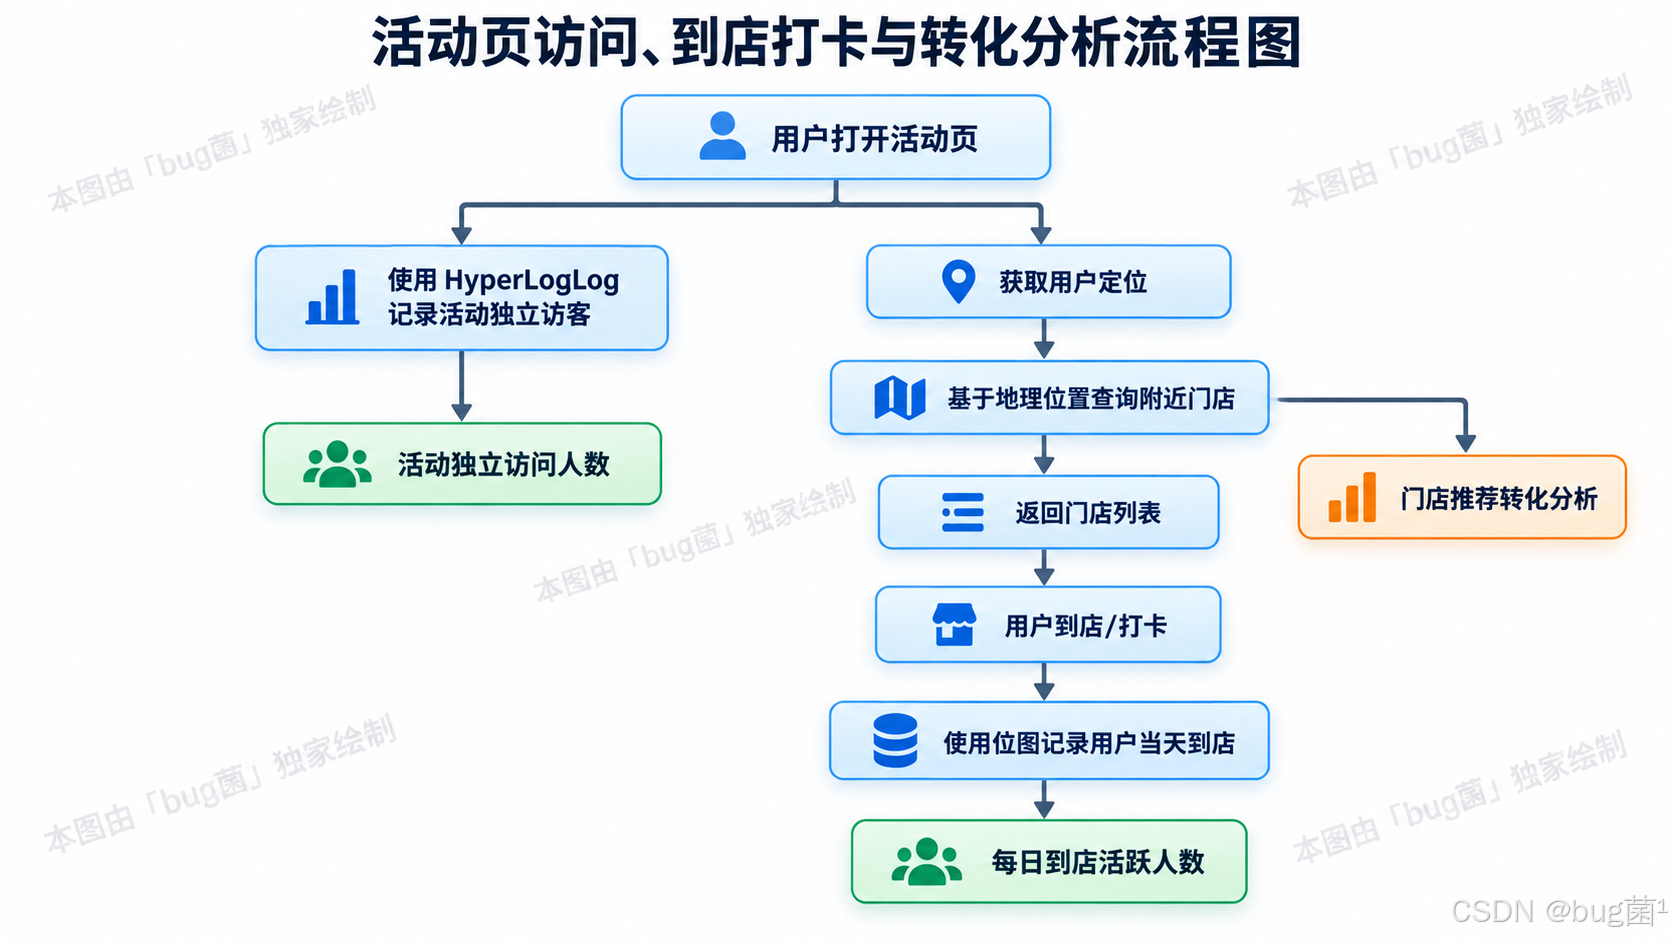
这个组合很有意思:
- HyperLogLog 回答“有多少不同用户看过活动”;
- Geo 回答“用户附近有哪些门店”;
- Bitmap 回答“哪些用户当天发生过某个布尔行为”。
它们都不负责保存完整业务事实。完整订单、核销记录、用户权益仍然应该落数据库。但它们可以承担高频统计、实时查询和运营观察的工作。
10.1 组合业务 Service
package com.example.redisadvanced.service;
import com.example.redisadvanced.dto.NearbyStoreResponse;
import lombok.RequiredArgsConstructor;
import org.springframework.stereotype.Service;
import java.time.LocalDate;
import java.util.List;
/**
* 活动场景组合服务。
*/
@Service
@RequiredArgsConstructor
public class ActivityScenarioService {
private final UvStatisticService uvStatisticService;
private final StoreGeoService storeGeoService;
private final UserActiveService userActiveService;
/**
* 用户打开活动页,并查询附近门店。
*/
public List<NearbyStoreResponse> visitActivityAndSearchStores(
Long activityId,
Long userId,
String cityCode,
Double longitude,
Double latitude
) {
LocalDate today = LocalDate.now();
// 记录活动 UV。重复用户不会明显增加估算基数。
uvStatisticService.recordActivityVisit(activityId, userId, today);
// 查询附近 3 公里内门店。
return storeGeoService.searchNearbyStores(cityCode, longitude, latitude, 3D, 10);
}
/**
* 用户到店后记录当天到店活跃。
*/
public void markArrivedStore(Long userId) {
userActiveService.markActive(userId, LocalDate.now());
}
}
10.2 组合业务 Controller
package com.example.redisadvanced.controller;
import com.example.redisadvanced.dto.NearbyStoreResponse;
import com.example.redisadvanced.service.ActivityScenarioService;
import lombok.RequiredArgsConstructor;
import org.springframework.web.bind.annotation.GetMapping;
import org.springframework.web.bind.annotation.PostMapping;
import org.springframework.web.bind.annotation.RequestMapping;
import org.springframework.web.bind.annotation.RequestParam;
import org.springframework.web.bind.annotation.RestController;
import java.util.List;
/**
* 活动组合场景接口。
*/
@RestController
@RequestMapping("/api/scenario")
@RequiredArgsConstructor
public class ActivityScenarioController {
private final ActivityScenarioService activityScenarioService;
/**
* 用户访问活动,并查询附近门店。
*/
@GetMapping("/activity/nearby-stores")
public List<NearbyStoreResponse> visitActivityAndSearchStores(
@RequestParam Long activityId,
@RequestParam Long userId,
@RequestParam String cityCode,
@RequestParam Double longitude,
@RequestParam Double latitude
) {
return activityScenarioService.visitActivityAndSearchStores(
activityId,
userId,
cityCode,
longitude,
latitude
);
}
/**
* 用户到店打卡。
*/
@PostMapping("/store/arrived")
public String markArrivedStore(@RequestParam Long userId) {
activityScenarioService.markArrivedStore(userId);
return "OK";
}
}
这段组合代码并不复杂,但它体现了架构设计中的一个原则:不要让单个数据结构承担它不擅长的职责。HyperLogLog 不查附近,Geo 不做 UV,Bitmap 不保存门店详情。各自只做自己擅长的一小块,组合起来反而很稳定。
11. 工程化细节:Key 设计、过期策略、序列化、异常处理、测试
11.1 Key 设计要有层次
建议采用这样的风格:
业务域:对象类型:指标或动作:标识:时间
例如:
sign:user:1001:202605
active:daily:20260501
hll:article:uv:10:20260501
geo:store:city:shanghai
好的 Key 设计至少要满足:
我不太喜欢在项目里看到 user:1、data:2、temp:key 这类 Key。短是短,但半年后排查问题时非常痛苦。技术债很多时候不是复杂代码造成的,而是当初偷懒少写了几个有意义的单词。
11.2 过期策略
签到数据可能要长期保留,也可能只保留一年;活跃统计可能保留 90 天;UV 统计可能保留 180 天;Geo 门店位置通常不过期,除非门店下线。
可以抽象一个 Key TTL 工具:
package com.example.redisadvanced.util;
import java.time.Duration;
/**
* Redis Key 过期时间约定。
*/
public final class RedisTtlPolicy {
private RedisTtlPolicy() {
}
/** 用户活跃统计保留 90 天。 */
public static final Duration ACTIVE_DAILY_TTL = Duration.ofDays(90);
/** UV 统计保留 180 天。 */
public static final Duration UV_DAILY_TTL = Duration.ofDays(180);
/** 临时 Key 最多保留 5 分钟,避免异常时残留。 */
public static final Duration TEMP_KEY_TTL = Duration.ofMinutes(5);
}
实际写入时可以调用:
stringRedisTemplate.expire(key, RedisTtlPolicy.UV_DAILY_TTL);
这里有一个细节:不要每次请求都无脑刷新 TTL。比如 UV 每次访问都 expire,高并发下会多出很多额外命令。可以在首次创建 Key 时设置 TTL,或者通过异步任务补偿 TTL。
11.3 序列化选择
本文大量使用 StringRedisTemplate,原因是 Key、Value、成员都以字符串表达,直观、可读、好排查。
如果你使用 RedisTemplate<Object, Object> 并默认 Java 序列化,Redis CLI 中会看到一堆不可读字符,排查问题很难。而且 Java 原生序列化在安全与跨语言兼容方面也并不讨喜。业务项目里,除非明确知道自己在做什么,否则更建议使用 String 或 JSON 序列化。
11.4 参数校验
Geo 场景中,经纬度一定要校验。示例 DTO 可以这样增强:
package com.example.redisadvanced.dto;
import jakarta.validation.constraints.DecimalMax;
import jakarta.validation.constraints.DecimalMin;
import jakarta.validation.constraints.NotBlank;
import jakarta.validation.constraints.NotNull;
/**
* 带校验的门店位置请求。
*/
public record ValidStoreLocationRequest(
@NotBlank(message = "门店 ID 不能为空")
String storeId,
@NotBlank(message = "门店名称不能为空")
String storeName,
@NotNull(message = "经度不能为空")
@DecimalMin(value = "-180.0", message = "经度不能小于 -180")
@DecimalMax(value = "180.0", message = "经度不能大于 180")
Double longitude,
@NotNull(message = "纬度不能为空")
@DecimalMin(value = "-85.05112878", message = "纬度超出 Redis Geo 支持范围")
@DecimalMax(value = "85.05112878", message = "纬度超出 Redis Geo 支持范围")
Double latitude,
@NotBlank(message = "城市编码不能为空")
String cityCode
) {
}
Redis Geo 对纬度范围有限制,特别靠近两极的区域并不适合直接索引。多数本地生活业务不会踩到这个边界,但写校验时要知道它存在。
11.5 统一异常处理
package com.example.redisadvanced.exception;
import org.springframework.http.HttpStatus;
import org.springframework.web.bind.MethodArgumentNotValidException;
import org.springframework.web.bind.annotation.ExceptionHandler;
import org.springframework.web.bind.annotation.ResponseStatus;
import org.springframework.web.bind.annotation.RestControllerAdvice;
import java.util.HashMap;
import java.util.Map;
/**
* 全局异常处理。
*/
@RestControllerAdvice
public class GlobalExceptionHandler {
/**
* 处理参数校验异常。
*/
@ExceptionHandler(MethodArgumentNotValidException.class)
@ResponseStatus(HttpStatus.BAD_REQUEST)
public Map<String, Object> handleValidationException(MethodArgumentNotValidException ex) {
Map<String, Object> result = new HashMap<>();
result.put("code", 400);
result.put("message", "参数校验失败");
result.put("detail", ex.getBindingResult().getFieldErrors().stream()
.map(error -> error.getField() + ": " + error.getDefaultMessage())
.toList());
return result;
}
/**
* 处理其他异常。
*/
@ExceptionHandler(Exception.class)
@ResponseStatus(HttpStatus.INTERNAL_SERVER_ERROR)
public Map<String, Object> handleException(Exception ex) {
Map<String, Object> result = new HashMap<>();
result.put("code", 500);
result.put("message", "系统异常,请稍后重试");
result.put("detail", ex.getMessage());
return result;
}
}
异常处理不是本文重点,但它是技术文章里容易被忽略的“完整性”。一个案例能跑通,不等于它像工程。真正的工程代码,需要考虑输入错误、Redis 连接异常、临时 Key 清理、参数边界。
12. 测试:让案例代码真正可信
技术文章最怕“看起来对,运行就错”。下面给出几个基础测试,帮助验证核心逻辑。
12.1 签到测试
package com.example.redisadvanced.service;
import org.junit.jupiter.api.Test;
import org.springframework.beans.factory.annotation.Autowired;
import org.springframework.boot.test.context.SpringBootTest;
import java.time.LocalDate;
import static org.assertj.core.api.Assertions.assertThat;
/**
* 用户签到测试。
*
* 运行前请确保本地 Redis 已启动。
*/
@SpringBootTest
class UserSignServiceTest {
@Autowired
private UserSignService userSignService;
@Test
void shouldSignAndQuerySignedDays() {
Long userId = 9001L;
LocalDate day1 = LocalDate.of(2026, 5, 1);
LocalDate day3 = LocalDate.of(2026, 5, 3);
userSignService.sign(userId, day1);
userSignService.sign(userId, day3);
assertThat(userSignService.isSigned(userId, day1)).isTrue();
assertThat(userSignService.isSigned(userId, LocalDate.of(2026, 5, 2))).isFalse();
assertThat(userSignService.listSignedDays(userId, day1)).contains(1, 3);
}
}
12.2 HyperLogLog 测试
package com.example.redisadvanced.service;
import com.example.redisadvanced.dto.UvResult;
import org.junit.jupiter.api.Test;
import org.springframework.beans.factory.annotation.Autowired;
import org.springframework.boot.test.context.SpringBootTest;
import java.time.LocalDate;
import static org.assertj.core.api.Assertions.assertThat;
/**
* UV 统计测试。
*/
@SpringBootTest
class UvStatisticServiceTest {
@Autowired
private UvStatisticService uvStatisticService;
@Test
void shouldCountArticleUv() {
Long articleId = 7001L;
LocalDate date = LocalDate.of(2026, 5, 1);
uvStatisticService.recordArticleVisit(articleId, 1L, date);
uvStatisticService.recordArticleVisit(articleId, 2L, date);
uvStatisticService.recordArticleVisit(articleId, 3L, date);
uvStatisticService.recordArticleVisit(articleId, 1L, date);
UvResult result = uvStatisticService.countArticleUv(articleId, date);
// 小样本下通常等于 3,但 HyperLogLog 本质是估算。
assertThat(result.uv()).isGreaterThanOrEqualTo(3L);
}
}
这里故意没有把断言写死成 isEqualTo(3),因为 HyperLogLog 本质是估算结构。虽然小样本通常准确,但测试应该表达数据结构的真实语义。
12.3 Geo 测试
package com.example.redisadvanced.service;
import com.example.redisadvanced.dto.NearbyStoreResponse;
import com.example.redisadvanced.dto.StoreLocationRequest;
import org.junit.jupiter.api.Test;
import org.springframework.beans.factory.annotation.Autowired;
import org.springframework.boot.test.context.SpringBootTest;
import java.util.List;
import static org.assertj.core.api.Assertions.assertThat;
/**
* 门店 Geo 测试。
*/
@SpringBootTest
class StoreGeoServiceTest {
@Autowired
private StoreGeoService storeGeoService;
@Test
void shouldSearchNearbyStores() {
storeGeoService.saveStoreLocation(new StoreLocationRequest(
"t1001",
"测试人民广场店",
121.475190,
31.228833,
"test-shanghai"
));
storeGeoService.saveStoreLocation(new StoreLocationRequest(
"t1002",
"测试南京东路店",
121.490317,
31.240525,
"test-shanghai"
));
List<NearbyStoreResponse> stores = storeGeoService.searchNearbyStores(
"test-shanghai",
121.475190,
31.228833,
5D,
10
);
assertThat(stores).isNotEmpty();
assertThat(stores.stream().map(NearbyStoreResponse::storeId)).contains("t1001");
}
}
13. 常见坑与排查思路
13.1 Bitmap 的 offset 过大导致内存飙升
Bitmap 会根据最大 offset 扩展字符串。如果你直接拿非常大的稀疏 ID 做 offset,很容易浪费内存。
例如用户 ID 是雪花算法生成的 64 位数字,直接做 offset 基本不可接受。解决方案包括:
13.2 BITOP 临时 Key 未删除
多 Bitmap 运算常常需要一个目标 Key。如果目标 Key 用完不删,会慢慢产生垃圾数据。建议:
- 使用明确的临时 Key 前缀,例如 tmp:;
- 设置较短 TTL;
- 正常流程执行完立即删除;
- 定期扫描清理异常残留。
13.3 HyperLogLog 被误用于精确业务
如果某个业务要求“一个用户只能领一次券”,不要用 HyperLogLog 判断。应该用 Set、数据库唯一索引,或者 Redis SETNX 一类的方式。
HyperLogLog 的价值是省内存,不是保存明细。
13.4 Geo 经纬度写反
这是 Geo 最常见的坑。Redis 使用顺序是:
longitude latitude member
中文里常说“经纬度”,正好也是经度在前、纬度在后。可很多地图 SDK 或接口字段会写成 lat/lng,复制时很容易反过来。
13.5 Geo 只适合简单附近查询
如果你需要复杂空间检索,比如多边形围栏、行政区划边界、轨迹匹配、空间关系计算,Redis Geo 就不是最合适的工具。可以考虑 PostGIS、Elasticsearch Geo、专业 GIS 服务或地图厂商能力。
13.6 RedisTemplate 序列化混乱
同一个 Key 如果有的地方用 StringRedisTemplate 写,有的地方用 JDK 序列化 RedisTemplate 写,排查会非常麻烦。团队里最好统一约定:
- 简单字符串、计数、Bitmap、HLL、Geo:优先 StringRedisTemplate;
- 对象缓存:明确 JSON 序列化策略;
- 不要默认混用多种序列化方式。
14. 延伸:Bitmap、HyperLogLog、Geo 与数据库如何配合
一套稳健系统里,Redis 往往不是最终事实来源,而是实时能力层。
14.1 签到场景
如果签到涉及积分、奖励、补签卡,建议数据库也保存签到流水。Bitmap 用于快速查询当月日历与统计,数据库用于审计和补偿。
推荐架构,仅供参考:
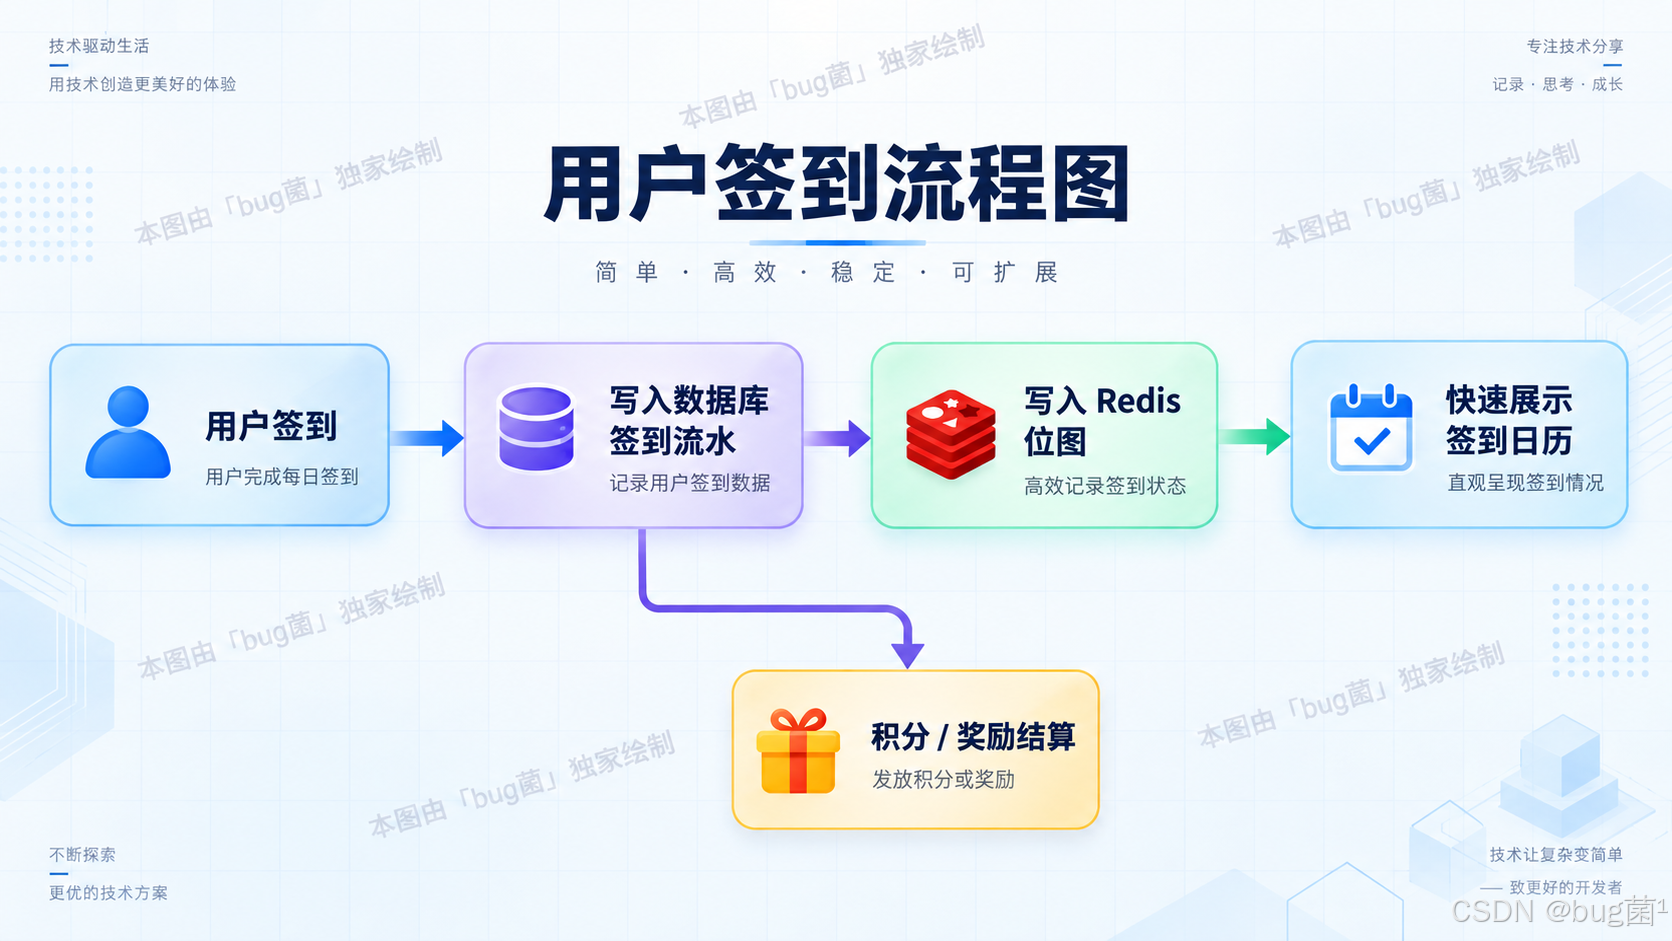
如果 Redis 写失败但数据库成功,可以通过异步任务从数据库补偿 Bitmap。
14.2 UV 场景
如果 UV 只是运营看板,HyperLogLog 足够。如果 UV 影响结算或风控,就需要日志或数据库保存明细,再由离线任务算精确结果。
14.3 Geo 场景
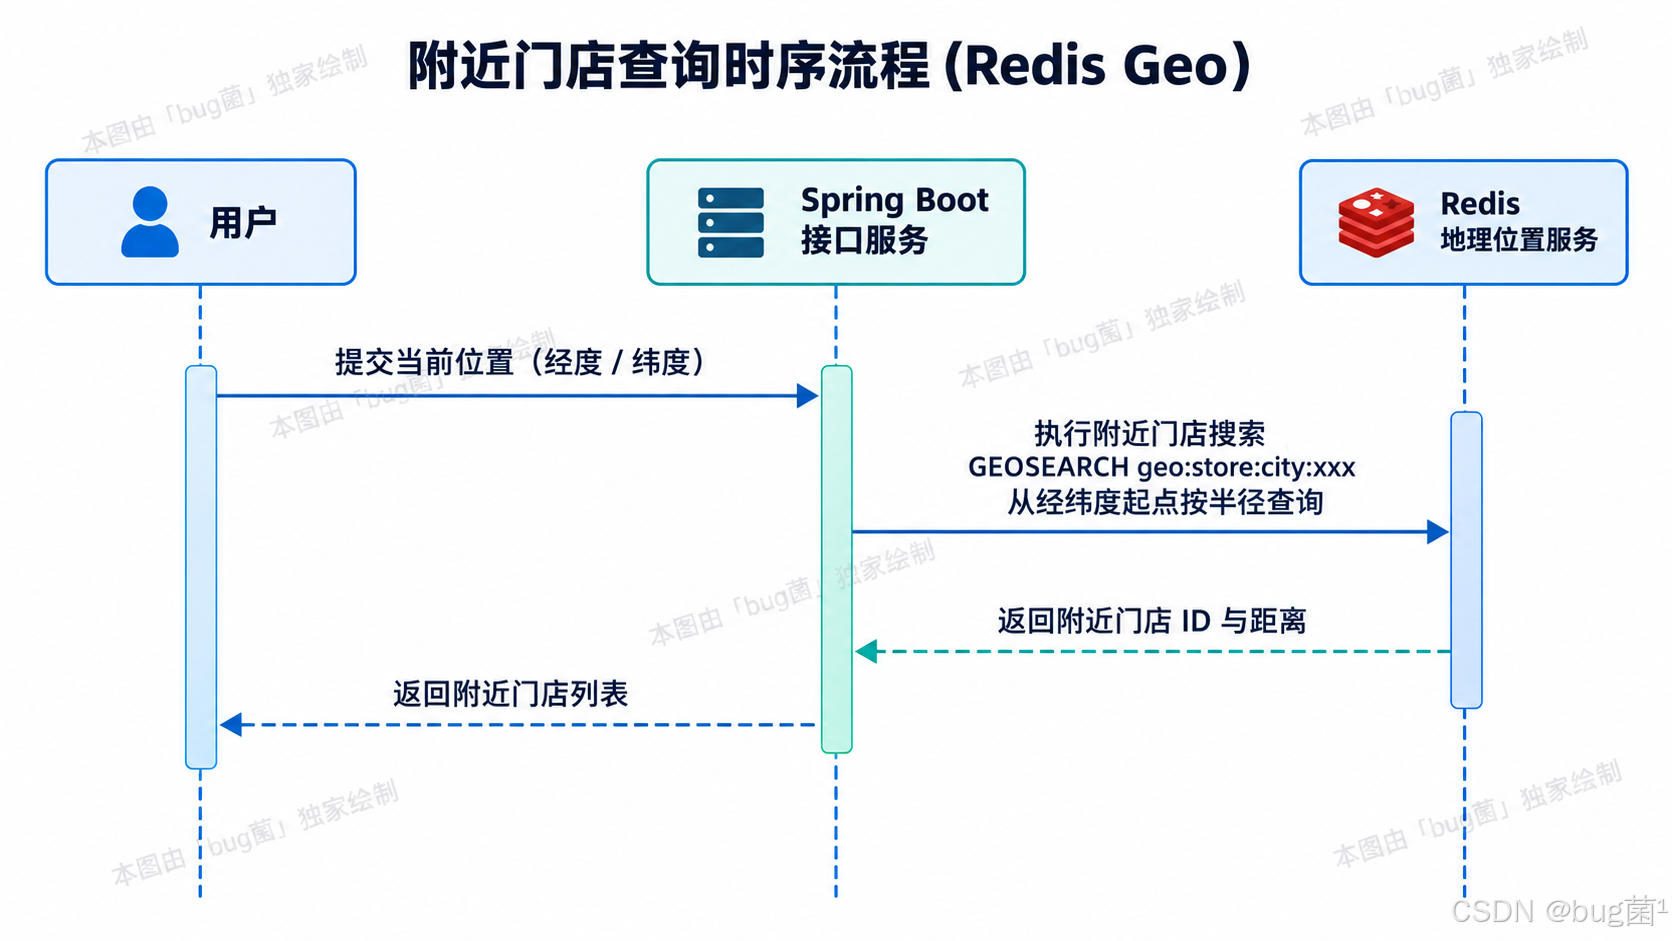
门店主数据最好仍然在数据库中维护,Redis Geo 保存位置索引。查询附近门店时,先从 Redis 拿到门店 ID,再回数据库或缓存补充门店详情。
推荐架构,仅供参考:
15. 一份更贴近生产的 Key 工具类
为了避免 Key 到处拼接,可以写一个工具类集中管理。
package com.example.redisadvanced.util;
import java.time.LocalDate;
import java.time.format.DateTimeFormatter;
/**
* Redis Key 构建工具。
*
* 统一管理 Key 的好处:
* 1. 避免字符串散落在业务代码中;
* 2. 方便排查 Redis 数据;
* 3. 后续调整 Key 命名时只改一个地方。
*/
public final class RedisKeys {
private static final DateTimeFormatter MONTH_FORMATTER = DateTimeFormatter.ofPattern("yyyyMM");
private static final DateTimeFormatter DAY_FORMATTER = DateTimeFormatter.ofPattern("yyyyMMdd");
private RedisKeys() {
}
public static String userSignKey(Long userId, LocalDate date) {
return "sign:user:" + userId + ":" + MONTH_FORMATTER.format(date);
}
public static String dailyActiveKey(LocalDate date) {
return "active:daily:" + DAY_FORMATTER.format(date);
}
public static String articleUvKey(Long articleId, LocalDate date) {
return "hll:article:uv:" + articleId + ":" + DAY_FORMATTER.format(date);
}
public static String activityUvKey(Long activityId, LocalDate date) {
return "hll:activity:uv:" + activityId + ":" + DAY_FORMATTER.format(date);
}
public static String storeGeoKey(String cityCode) {
return "geo:store:city:" + cityCode;
}
public static String storeNameKey(String storeId) {
return "store:name:" + storeId;
}
public static String tempKey(String biz, String operator) {
return "tmp:" + biz + ":" + operator + ":" + System.currentTimeMillis();
}
}
有些团队觉得工具类麻烦,直接拼字符串更快。但项目一大,Key 失控是非常痛苦的事情。Redis 里不像数据库那样有表结构,Key 命名就是你的“隐形表结构”。
16. 从零基础到能落地:学习路线建议
对于刚学 Spring Boot 3.x 的读者,不建议一开始就纠结 Redis 内部编码、跳表、压缩列表、渐进式 rehash。这些当然重要,但顺序应该是:
Bitmap、HyperLogLog、Geo 的学习也是这样。你先把本文案例跑起来,再去 Redis CLI 手动敲命令,再观察 Redis 里的 Key,最后再思考它们的内存和性能边界。学习技术最忌讳的是一口吃成胖子。真正稳的成长,是今天多理解一个场景,明天多踩少一个坑。
17. 本文完整接口清单
为了方便读者对照,本文项目包含以下接口:
| 签到 | POST | /api/sign/{userId} | 用户签到 |
| 签到 | GET | /api/sign/{userId}/status | 查询某天是否签到 |
| 签到 | GET | /api/sign/{userId}/days | 查询某月签到日期 |
| 活跃 | POST | /api/active/{userId} | 标记用户活跃 |
| 活跃 | GET | /api/active/daily-count | 查询日活 |
| 活跃 | GET | /api/active/all-days-count | 查询多日都活跃 |
| 活跃 | GET | /api/active/any-day-count | 查询多日任意活跃 |
| UV | POST | /api/uv/article/{articleId}/visit | 记录文章访问 |
| UV | GET | /api/uv/article/{articleId} | 查询文章 UV |
| UV | POST | /api/uv/activity/{activityId}/visit | 记录活动访问 |
| UV | GET | /api/uv/activity/{activityId} | 查询活动 UV |
| UV | GET | /api/uv/article/merged | 合并文章 UV |
| UV | GET | /api/uv/site | 合并全站 UV |
| Geo | POST | /api/stores/location | 保存门店位置 |
| Geo | GET | /api/stores/nearby | 查询附近门店 |
| Geo | GET | /api/stores/distance | 查询门店距离 |
| 组合 | GET | /api/scenario/activity/nearby-stores | 活动访问并查附近门店 |
| 组合 | POST | /api/scenario/store/arrived | 用户到店打卡 |
18. 总结:不要迷信数据结构,要学会为场景选择成本最小的解法
这一篇我们围绕 Spring Boot 3.x 和 Redis,系统地实践了 Bitmap、HyperLogLog、Geo 三个高级能力。
Bitmap 的核心价值是把大量布尔状态压缩成 bit,适合签到、活跃、留存、权限位等场景。它的关键词是“是否发生”。
HyperLogLog 的核心价值是用极低内存估算基数,适合 UV、独立 IP、独立设备、活动独立参与人数等场景。它的关键词是“大约多少个不同对象”。
Geo 的核心价值是保存经纬度并进行附近查询,适合附近门店、附近司机、附近设备等场景。它的关键词是“附近有什么”。
真正写业务时,不要为了用 Redis 而用 Redis,也不要因为数据库能做就全部压给数据库。一个成熟工程师要做的,是理解每个工具的边界,然后把问题拆到最合适的位置。
我一直觉得,学习后端技术最有成就感的时刻,不是背出了多少概念,而是某天面对一个需求,你突然意识到:“这个问题可以不用那么重。”
Bitmap、HyperLogLog、Geo 正是这样的工具。它们不喧哗,却很锋利。学会它们,你会发现 Redis 不只是缓存,而是一个能把很多业务问题变轻的工程武器。
愿你在写 Spring Boot 3 项目的时候,不只是把功能做出来,也能把系统做得更干净、更稳、更有余地。
…
ok,同学们,本节课就上到这儿,下课~
🧧 学习福利 · 限时开放 🧧
当然,无论你是计算机专业在读学生,还是对编程充满兴趣的入门者,都强烈建议系统学习SpringBoot全体系专栏:👉 「滚雪球学 Spring Boot」;涵盖SpringBoot所有教学内容。
该专栏以“循序渐进 + 实战驱动”为核心理念,从基础到进阶到就业到架构师逐层展开,帮助你快速建立完整的 Spring Boot 技术体系,带你玩转SpringBoot框架。
📌 学习承诺: 通过该专栏,你将能够:
- 快速掌握 Spring Boot 核心开发能力
- 构建完整的后端项目认知体系
- 实现从“入门”到“独立开发”的跃迁
就像“滚雪球”一样,知识不断积累、能力持续放大,实现指数级成长 🚀
最后,如果这篇文章对你有所帮助,帮忙给作者来个一键三连,关注、点赞、收藏,您的支持就是我坚持写作最大的动力。
同时欢迎大家关注技术号:「猿圈奇妙屋」 ,以便学习更多同类型的技术文章,免费白嫖最新BAT互联网公司面试题、4000G PDF编程电子书、简历模板、技术文章Markdown文档等海量资料。
ps:本文涉及所有源代码,均已上传至Gitee开源,供同学们直接对照学习 Gitee传送门,同时,原创开源不易,欢迎给个star🌟,想体验下被🌟的感jio,非常感谢❗
🫵 Who am I?
我是 bug菌,一名深耕 Java 后端领域数十年的一线研发老兵,曾担任独角兽企业后端技术经理、研发架构师等职位,长期专注于 Java 后端、分布式架构、微服务治理、高并发系统、工程效能与研发管理等方向。
目前活跃于多个主流技术社区,包括:
CSDN|稀土掘金|InfoQ|51CTO|华为云开发者社区|阿里云开发者社区|腾讯云开发者社区|开源中国|博客园|墨天轮 等平台。
曾获得:
- CSDN 博客之星 Top30
- 华为云多年度十佳博主 & 卓越贡献奖
- 掘金多年度人气作者 Top40
- CSDN、掘金、InfoQ、51CTO 等平台签约作者 / 优质作者
截至目前,全网技术内容累计影响读者众多,全网粉丝已超过 30w+。
如果你也关注 Java 后端、架构设计、技术成长、职场进阶与研发管理,欢迎关注我的技术内容合集入口:👉 点击查看 👈️
硬核技术号 「猿圈奇妙屋」 期待你的加入。
这里不仅分享技术干货,也记录一线研发人的成长、踩坑、思考与进阶路径。
愿我们一起打怪升级,在技术路上持续进阶。

– End –




评论前必须登录!
注册