 网硕互联帮助中心
🔥keyipatience:个人主页
🎬作者简介:C/C++后端开发学习者
🌟专栏传送门:《c++》《linux》《c++高阶数据结构》《c++数据结构与算法》
⭐️patience is key in life

图
图的基础知识
1.图 G=(V,E),由两部分组成
- V(顶点集):一堆点,不能为空
- E(边集):点和点之间的连线,代表点之间的关系
2.无向图 vs 有向图
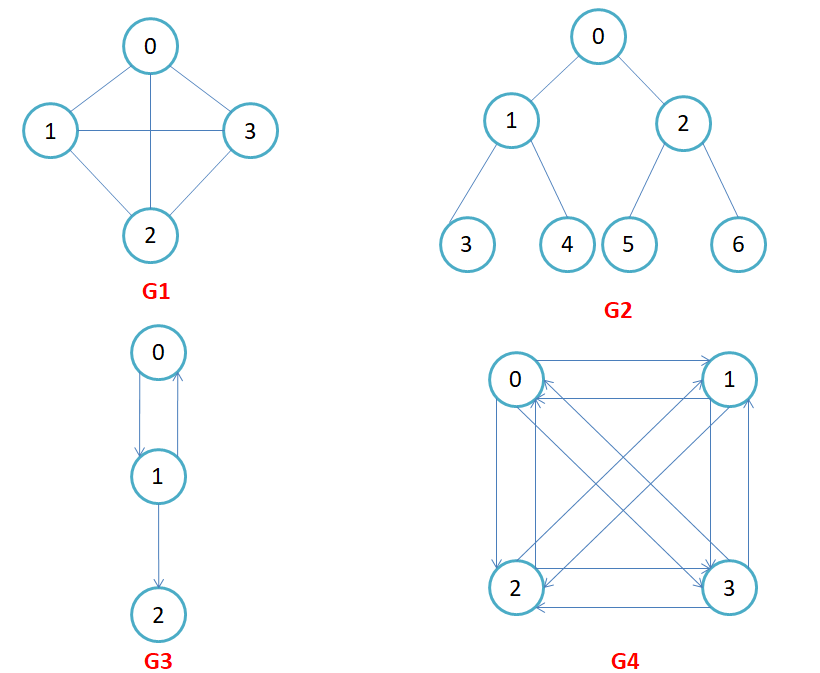
- 无向图(G1、G2):边不带箭头,(x,y) 和 (y,x) 是同一条边,双向互通。
- 有向图(G3、G4):边带箭头,<x,y> 和 <y,x> 是两条不一样的边,方向不能反过来。
3.完全图
- 无向完全图:n 个点,任意两点之间都有一条边,总边数公式n(n-1)/2;–(G1)
- 有向完全图:n 个点,任意两点之间互相有一对反向的边,总边数公式n(n-1);–(G2)
4.邻接顶点
- 无向图:有边直接相连的两个点,互为邻接点。
- 有向图:边<u,v>,u 指向 v → u 邻接到 v,v 邻接自 u。
5.顶点的度
- 无向图:度 deg(v) = 和这个点相连的边的数量。
- 有向图:
- 出度 outdeg:从这个点出发的边数量
- 入度 indeg:指向这个点的边数量
- 总度:入度+出度
握手定理:图中所有顶点度数之和 = 边数 × 2
6.路径 & 路径长度
- 路径:从起点顺着边走到终点,经过的顶点序列。
- 不带权图:路径长度 = 这条路上边的条数
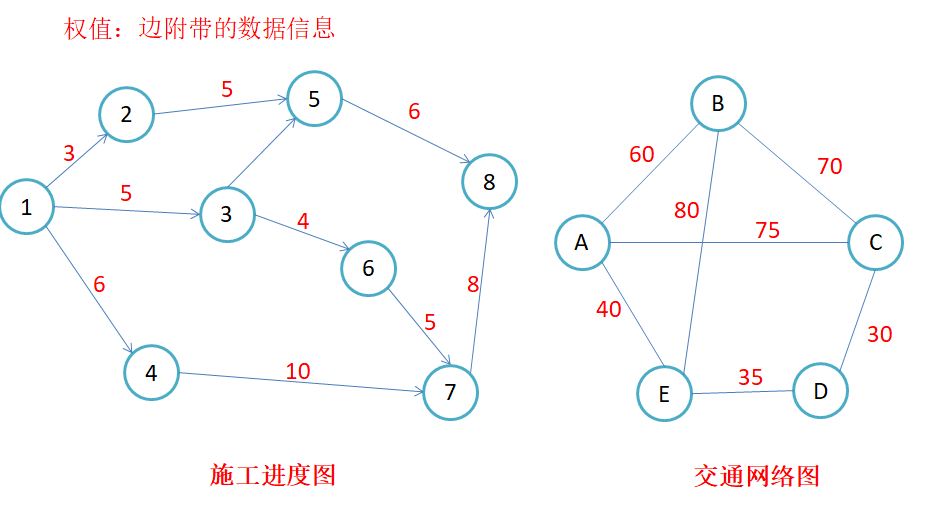
- 带权图:边上有数字(权值),路径长度 = 路上所有边权值相加
- 权值:边附带的信息,可以代表距离、时间、成本。
例子:图里的交通网络图,边上数字就是路程;施工进度图,数字代表工期。
7.简单路径 & 回路(环)
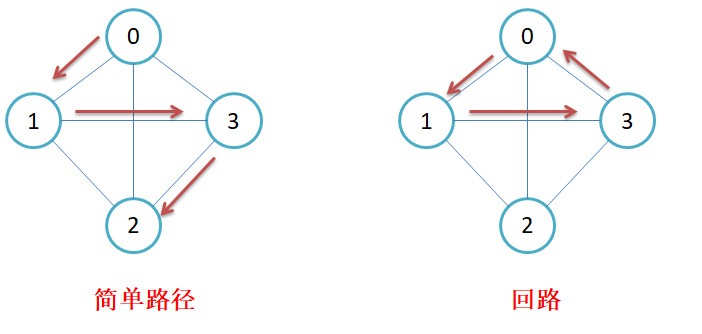
- 简单路径:路径里所有顶点都不重复
- 回路(环):路径起点和终点是同一个点。
8.子图
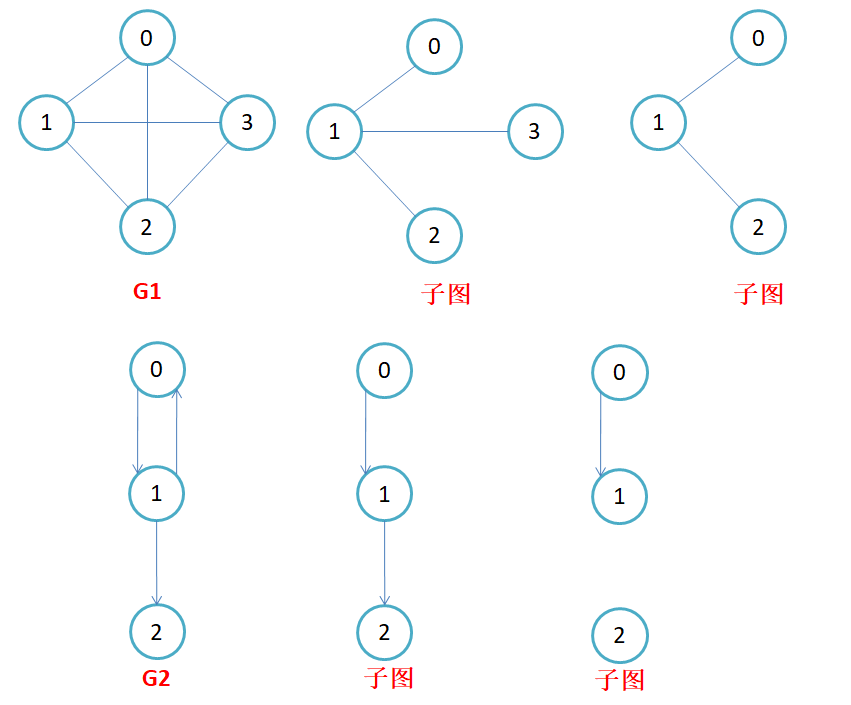
原图G=(V,E),新图G1=(V1,E1)只要满足:V1是原图顶点的子集,E1是原图边的子集,G1就是G的子图。
可以少点、少边;但不能出现原图没有的点或者边。
9.连通图(无向图) & 强连通图(有向图)
- 无向连通图:任意两个顶点之间都能找到路径走通。
- 强连通图(有向图):任意一对点(u、v),既能从u走到v,也能从v走回u,双向互通。
10.生成树
- 必须包含原图全部 n 个顶点(点一个不能少!)
- 边是原图里的边,但只保留最少数量,保证所有点连通即可
- 边数:n 个顶点 → n−1 条边
2就是1的生成树
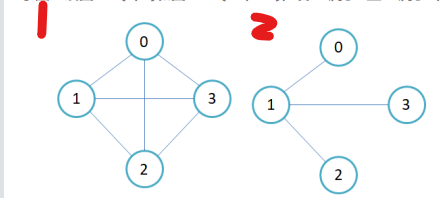
最小生成树 (MST):所有生成树里,边权总和最小的那一棵。
邻接矩阵
核心思想:用二维数组(矩阵)存顶点之间有没有边 矩阵 edge[i][j] 代表顶点 i 到顶点 j 的连接情况。
邻接矩阵类型
1.无向图 G1
(1)无向图邻接矩阵一定对称:edge[i][j] = edge[j][i]
(2)edge[i][j]=1:i 和 j 之间有边;等于 0:没有边
2.有向图 G2
矩阵不一定对称,边有方向! edge[A][B]=1 代表 A→B;edge[B][A]=1 代表 B→A,二者相互独立。
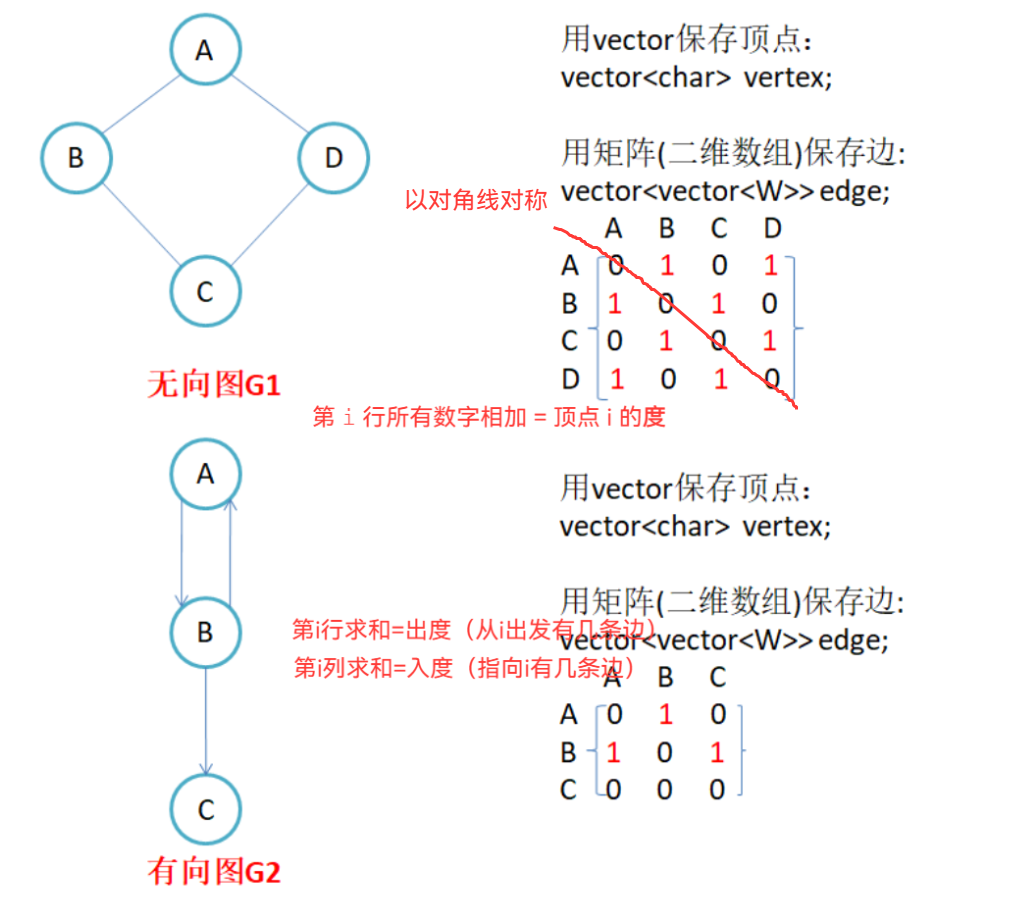
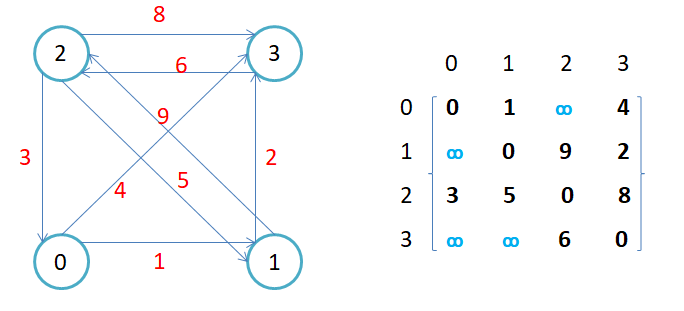
3.带权图
- 两点连通:矩阵填权值
- 两点不连通:填无穷大∞
- 自己到自己:填 0
一步步实现邻接矩阵
1.模板参数
template<class V,class W,W MAX_W,bool Direction=false>
(1)V:顶点的数据类型(顶点存什么,比如string/char)
(2)W:边的权重类型(int、double)
(3)MAX_W:代表不存在边的权重值(无穷大)
(4)Direction=false:默认无向图;传 true 就是有向图
邻接矩阵核心:_matrix[i][j] 代表顶点 i → 顶点 j 的边权重;等于 MAX_W 代表没有这条边
2.私有成员
vector<V>_vertexs; // 保存所有顶点
vector <vector<W>>_matrix; // 邻接矩阵,二维数组
map<V,int>_indexmap; // 顶点 -> 下标 的映射:比如顶点'A'映射到0号下标
3.构造函数
Graph(const V* vertexs, int n)
{
_vertexs.assign(vertexs, vertexs + n);
for (int i = 0; i < n; i++)
{
_indexmap[_vertexs[i]] = i;
}
_matrix.assign(n, vector<W>(n, MAX_W));
}
(1)把传入顶点数组放到_vertexs
(2)循环建立顶点名 → 数组下标map
好处:用户传顶点(比如'a'),不用自己记数字下标,类内部自动转成矩阵索引
(3)创建n*n的二维矩阵,全部初始化为MAX_W(默认无边)
4.GetVertexIndex
int GetVertexIndex(const V& v)
{
auto ret = _indexmap.find(v);
if (ret == _indexmap.end())return -1;
else return ret->second;
}
输入顶点,返回它在矩阵里的下标;找不到返回 – 1。
4._AddEdge
void _AddEdge(int srci, int dsti,const W&w)
{
_matrix[srci][dsti] = w;
if (Direction == false)_matrix[dsti][srci] = w;//无向图要建立2条
}
(1)srci起点下标,dsti终点下标
(2)有向图:只设置matrix[srci][dsti]=w,单向边
(3)无向图(默认):同时设置matrix[dsti][srci]=w,双向边
5.AddEdge
void AddEdge(const V& src, const V& dst, const W& w)
{
int srci = GetVertexIndex(src);
int dsti = GetVertexIndex(dst);
_AddEdge(srci, dsti, w);
}
对外使用:直接传顶点名字,不用管下标,内部自动转下标调用_AddEdge。 示例:g.AddEdge('A','B',5)
6.Print
void Print()
{
//3 部分打印:
// 1. 打印顶点和下标映射关系
for (int i = 0; i < _vertexs.size(); i++)
{
cout << _vertexs[i] << "-" << i << " ";
}
cout << endl;
cout << endl;
cout << " ";//空二格
for (int i = 0; i < _vertexs.size(); ++i)
{
cout << i << " ";
}
cout << endl;
// 2. 打印邻接矩阵
for (int i = 0; i < _matrix.size(); ++i) {
cout << i << " ";
for (int j = 0; j < _matrix[i].size(); ++j) {
if (_matrix[i][j] != MAX_W)
cout << _matrix[i][j] << " ";
else
cout << "#" << " ";
}
cout << endl;
}
cout << endl << endl;
// 3. 打印所有的边,注意:打印边的循环 i<j:如果是有向图时,有向边会漏掉,不能直接复用,需要去掉
for (size_t i = 0; i < _matrix.size(); ++i) {
for (size_t j = 0; j < _matrix[i].size(); ++j) {
if (i < j && _matrix[i][j] != MAX_W) {
cout << _vertexs[i] << "-" << _vertexs[j] << ":" << _matrix[i][j] << endl;
}
}
}
}
完整代码:
template<class V,class W,W MAX_W,bool Direction=false>
class Graph
{
public:
Graph(){}
Graph(const V* vertexs, int n)
{
_vertexs.assign(vertexs, vertexs + n);//assign(初始迭代器,结束迭代器)
for (int i = 0; i < n; i++)
{
_indexmap[_vertexs[i]] = i;//建立映射
}
_matrix.assign(n, vector<W>(n, MAX_W));
}
int GetVertexIndex(const V& v)
{
auto ret = _indexmap.find(v);
if (ret == _indexmap.end())return -1;
else return ret->second;
}
void _AddEdge(int srci, int dsti,const W&w)
{
_matrix[srci][dsti] = w;
if (Direction == false)_matrix[dsti][srci] = w;//无向图要建立2条
}
void AddEdge(const V& src, const V& dst, const W& w)
{
int srci = GetVertexIndex(src);
int dsti = GetVertexIndex(dst);
_matrix[srci][dsti] = w;
if (Direction == false)_matrix[dsti][srci] = w;//无向图要建立2条
}
void Print()
{
//3部分打印:
// 1. 打印顶点和下标映射关系
for (int i = 0; i < _vertexs.size(); i++)
{
cout << _vertexs[i] << "-" << i << " ";
}
cout << endl;
cout << endl;
cout << " ";//空二格
for (int i = 0; i < _vertexs.size(); ++i)
{
cout << i << " ";
}
cout << endl;
// 2. 打印邻接矩阵
for (int i = 0; i < _matrix.size(); ++i) {
cout << i << " ";
for (int j = 0; j < _matrix[i].size(); ++j) {
if (_matrix[i][j] != MAX_W)
cout << _matrix[i][j] << " ";
else
cout << "#" << " ";
}
cout << endl;
}
cout << endl << endl;
// 3. 打印所有的边,注意:打印边的循环 i<j:如果是有向图时,有向边会漏掉,不能直接复用,需要去掉
for (size_t i = 0; i < _matrix.size(); ++i) {
for (size_t j = 0; j < _matrix[i].size(); ++j) {
if (i < j && _matrix[i][j] != MAX_W) {
cout << _vertexs[i] << "-" << _vertexs[j] << ":" << _matrix[i][j] << endl;
}
}
}
}
private:
vector<V>_vertexs;
vector <vector<W>>_matrix;
map<V,int>_indexmap;
};
测试用例:
void TestGraph()
{
Graph<char, int, INT_MAX, true> g("0123", 4);
g.AddEdge('0', '1', 1);
g.AddEdge('0', '3', 4);
g.AddEdge('1', '3', 2);
g.AddEdge('1', '2', 9);
g.AddEdge('2', '3', 8);
g.AddEdge('2', '1', 5);
g.AddEdge('2', '0', 3);
g.AddEdge('3', '2', 6);
g.Print();
}
结果: 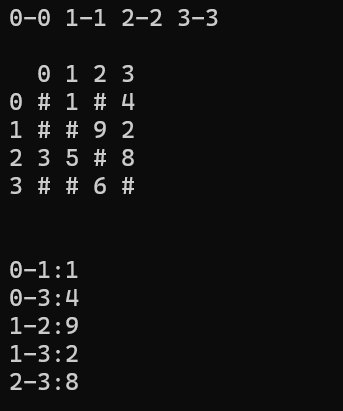
邻接表(链表版邻接表)
邻接表:使用数组表示顶点的集合,使用链表表示边的关系。
邻接表类型
1. 无向图邻接表存储
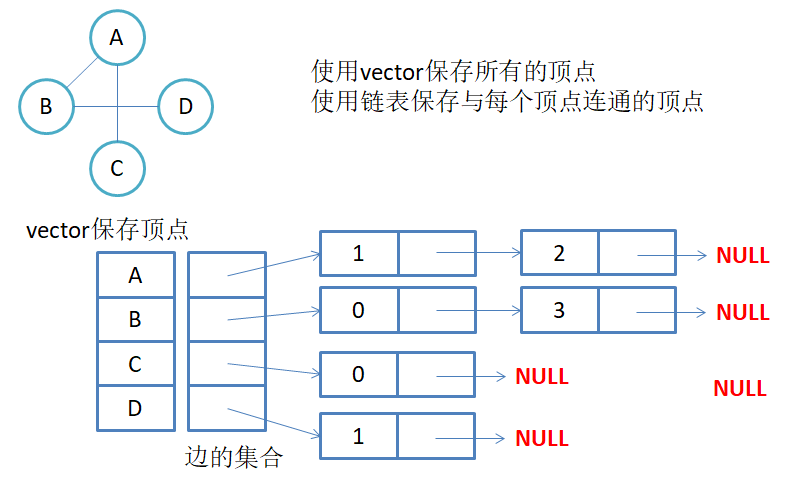
2.有向图邻接表存储
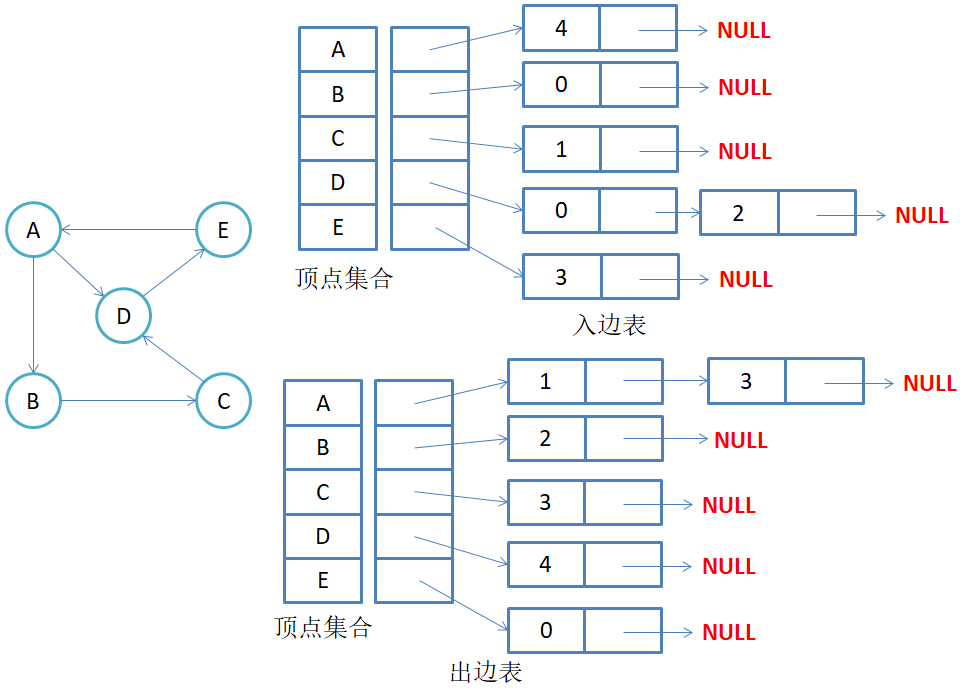
实际我们实现的时候不用分别实现入边表和出边表2个表,普通邻接表只存【出边】,一条就够;不需要额外再单独开一张表专门存入边。并且绝大多数算法(DFS、BFS、Dijkstra、拓扑排序)只需要遍历一个点所有往外走的边,只需要出边表,只用_linktable就足够。
一步步实现邻接表:
1.Edge 边结构体(单链表节点)
template<class W>
struct Edge
{
int _dsti; // 目标顶点的下标(重点!不是顶点值,是在_vertexs里的索引)
W _w; // 边权
Edge<W>* next; // 指向下一条边的指针,邻接表是单链表
Edge<W>(const int dsti=-1,const W&w=W())
:_dsti(dsti)
,_w(w)
,next(nullptr)
{ }
};
2. Graph 类成员变量(private)
vector<V> _vertexs; // 顶点数组
map<V, int> _indexmap; // key:顶点值V,value:顶点下标i,顶点和下标映射
vector<Edge*> _linktable; // 邻接表!数组,每个元素是边链表头指针
eg: 顶点:A(0), B(1), C(2) _linktable[0] 是顶点 A 的边链表头,存 A 所有出去的边 _linktable[1] 是顶点 B 的边链表头
3.构造函数
Graph(const V* vertexs, int n)
{
_vertexs.assign(vertexs, vertexs + n);
for (int i = 0; i < n; i++)
{
_indexmap[_vertexs[i]] = i; // 顶点值映射到下标
}
_linktable.assign(n, nullptr); // n个顶点,n条空链表,初始都是nullptr
}
4.GetVertexIndex
int GetVertexIndex(const V& v)
{
auto ret = _indexmap.find(v);
if (ret == _indexmap.end())return -1;
else return ret->second;
}
5.AddEdge 添加边(核心!区分有向 / 无向)
void AddEdge(const V& src, const V& dst, const W&w)
{
int srci = GetVertexIndex(src); //源顶点下标
int dsti = GetVertexIndex(dst); //目标顶点下标
// 头插法:新建边,插到srci对应的链表头部
Edge* newedge = new Edge(dsti,w);
newedge->next = _linktable[srci];
_linktable[srci] = newedge;
// Direction=false 无向图:双向都要加边
if (Direction == false)
{
Edge* newedge2 = new Edge(srci, w);
newedge2->next = _linktable[dsti];
_linktable[dsti] = newedge2;
}
}
6.Print
void Print()
{
// 第一部分:打印【顶点编号和名字】
for (size_t i = 0; i < _vertexs.size(); ++i)
{
cout << "[" << i << "]" << "->" << _vertexs[i] << endl;
}
cout << endl;
// 第二部分:遍历邻接表 _linktables
for (size_t i = 0; i < _linktable.size(); ++i)
{
// 打印起点:顶点名字[下标]
cout << _vertexs[i] << "[" << i << "]" << "->";
// cur拿到这个顶点对应的边链表头指针
Edge* cur = _linktable[i];
while (cur)
{
// cur->_dsti:目标顶点下标
// _vertexs[cur->_dsti]:目标顶点名字
cout << _vertexs[cur->_dsti] << "[" << cur->_dsti << "]" << cur->_w << "->";
cur = cur->_next;
}
cout << "nullptr" << endl;
}
}
完整代码:
namespace LinkTable
{
template<class W>
struct Edge
{
//不需要srci
int _dsti;
W _w;
Edge<W>* next;
Edge<W>(const int dsti = -1,const W& w=W())
:_dsti(dsti)
, _w(w)
, next(nullptr)
{
}
};
template<class V, class W, bool Direction = false>
class Graph
{
public:
typedef Edge<W> Edge;
Graph(const V* vertexs, int n)
{
_vertexs.assign(vertexs, vertexs + n);//assign(初始迭代器,结束迭代器)
for (int i = 0; i < n; i++)
{
_indexmap[_vertexs[i]] = i;//建立映射
}
_linktable.assign(n, nullptr);
}
int GetVertexIndex(const V& v)
{
auto ret = _indexmap.find(v);
if (ret == _indexmap.end())return -1;
else return ret->second;
}
void AddEdge(const V& src, const V& dst, const W& w)
{
int srci = GetVertexIndex(src); //源顶点下标
int dsti = GetVertexIndex(dst); //目标顶点下标
// 头插法:新建边,插到srci对应的链表头部
Edge* newedge = new Edge(dsti, w);
newedge->next = _linktable[srci];
_linktable[srci] = newedge;
// Direction=false 无向图:双向都要加边
if (Direction == false)
{
Edge* newedge2 = new Edge(srci, w);
newedge2->next = _linktable[dsti];
_linktable[dsti] = newedge2;
}
}
void Print()
{
// 第一部分:打印【顶点编号和名字】
for (size_t i = 0; i < _vertexs.size(); ++i)
{
cout << "[" << i << "]" << "->" << _vertexs[i] << endl;
}
cout << endl;
// 第二部分:遍历邻接表 _linktable
for (size_t i = 0; i < _linktable.size(); ++i)
{
// 打印起点:顶点名字[下标]
cout << _vertexs[i] << "[" << i << "]" << "->";
// cur拿到这个顶点对应的边链表头指针
Edge* cur = _linktable[i];
while (cur)
{
// cur->_dsti:目标顶点下标
// _vertexs[cur->_dsti]:目标顶点名字
cout << _vertexs[cur->_dsti] <<"[" << cur->_dsti << "]" << cur->_w << "->";
cur = cur->next;
}
cout << "nullptr" << endl;
}
}
private:
vector<V>_vertexs;
map<V, int>_indexmap;
vector<Edge*>_linktable;
};
测试例子:
void TestGraph()
{
string a[] = { "张三", "李四", "王五", "赵六" };
Graph<string, int> g1(a, 4);
g1.AddEdge("张三", "李四", 100);
g1.AddEdge("张三", "王五", 200);
g1.AddEdge("王五", "赵六", 30);
g1.Print();
}
结果:
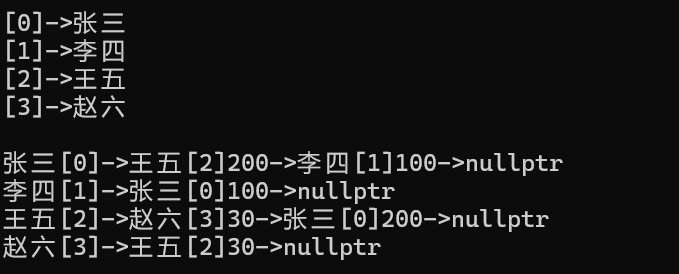
具体过程:
下标:0 张三,1 李四,2 王五,3 赵六
0.最开始
_linktable[0]: null
_linktable[1]: null
_linktable[2]: null
_linktable[3]: null
1.AddEdge (张三,李四,100)
- 给 0 号(张三)链表:加 E1 (目标 1,权重 100)
- 给 1 号(李四)链表:加 E2 (目标 0,权重 100)
_linktable[0]: E1(1,100) → null
_linktable[1]: E2(0,100) → null
_linktable[2]: null
_linktable[3]: null
2.AddEdge (张三,王五,200)
- 给 0 号(张三)链表,头插E3 (目标 2,权重 200),E3 连在 E1 前面
- 给 2 号(王五)链表:加 E4 (目标 0,权重 200)
_linktable[0]: E3(2,200) → E1(1,100) → null
_linktable[1]: E2(0,100) → null
_linktable[2]: E4(0,200) → null
_linktable[3]: null
3.AddEdge (王五,赵六,30)
- 给 2 号(王五)链表,头插E5 (目标 3,权重 30),E5 连在 E4 前面
- 给 3 号(赵六)链表:加 E6 (目标 2,权重 30)
最终
_linktable[0]: E3(2,200) → E1(1,100) → null
_linktable[1]: E2(0,100) → null
_linktable[2]: E5(3,30) → E4(0,200) → null
_linktable[3]: E6(2,30) → null
邻接矩阵和邻接表对比:
- 邻接矩阵:查边超快,遍历邻点慢;稠密图用,顶点一多空间爆炸。
- 邻接表:遍历邻点超快,查两点之间边慢;稀疏图用,节省大量内存。
边少 = 稀疏,边满 = 稠密。
eg:
n=1000 个顶点
- 邻接矩阵:要开 1000×1000 = 100 万空间,就算只有 10 条边,也要占用这么多内存
- 邻接表:只存这 10 条边,内存开销很小
| 存储结构 | 二维数组 matrix[i][j]matrix[i][j]存 i→j 边权;MAX_W 代表无边 | vector<Edge*>链表数组,每个数组元素就是一个链表 |
| 空间复杂度 | O(n2)只和顶点数有关,和边无关 | O(n+E)顶点 + 实际边,边越少越省空间 |
| 适合图 | 稠密图(边很多) | 稀疏图(边很少) |
| 查询 i,j 两点有没有边 | 直接matrix[i][j],O(1) | 需要遍历 i 的邻接链表,最坏O(n) |
| 遍历一个顶点的所有邻边 | 要循环全部 n 个点,O(n) | 直接遍历链表,出边数量,很快 |
| 新增边 | O(1),直接赋值 | O(1),尾插节点 |
| 删除边 | O(1),直接赋值 MAX_W | 需要遍历链表找到该边,慢 |
DFS和BFS(以邻接矩阵实现)
BFS:
void BFS(const V& v)
{
cout << "BFS:";
int srci = GetVertexIndex(v);
if (srci == -1)
{
cout << "顶点不存在" << endl;
return;
}
vector<bool>vis(_vertexs.size(), false);
queue<int>q;//存下标
q.push(srci);
vis[srci] = true;
while (q.size())
{
int front = q.front();
q.pop();
cout << _vertexs[front] << " ";
for (int i = 0; i < _vertexs.size(); i++)//把和相邻的全部找出来
{
if (_matrix[front][i]!=MAX_W && !vis[i])
{
q.push(i);
vis[i] = true;
}
}
}
cout << endl;
}
DFS:
void DFS(const V&v)
{
cout << "DFS:";
int srci = GetVertexIndex(v);
if (srci == -1)
{
cout << "顶点不存在" << endl;
return;
}
vector<bool>vis(_vertexs.size(),false);
_dfs(srci, vis);
}
void _dfs(int srci, vector<bool>& vis)//引用vis相当于全局
{
cout << _vertexs[srci] << " ";
vis[srci] = true;
for (int i = 0; i< _vertexs.size(); i++)
{
if (_matrix[srci][i] != MAX_W && !vis[i])
{
_dfs(i, vis);
}
}
}





评论前必须登录!
注册