 网硕互联帮助中心
变异测试
变异测试,也叫突变测试,Mutation Testing,一种提升测试充分性和发现代码缺陷的技术;核心思路是动态修改生产代码,观察测试是否失败。
一个好的UT测试,目标方法中任何改动都会引起原测试Case的察觉而测试失败。
突变测试就是通过一些变异操作(如算术和逻辑变化,替换操作符等)来改变源程序的运行来捕捉错误。
所谓的变异,是基于良好定义的变异操作,这些操作模拟典型应用错误(如使用错误的操作符或变量名字),或强制产生有效地测试(如使得每个表达式都等于0)。目的是帮助测试者发现有效地测试,或定位测试数据的弱点,或是在执行中很少(或从不)使用的代码的弱点。
代码中的每次修改称为变异体(mutant),产生的程序修改版本称为变异(mutation)。
- 如果变异导致测试失败,称为被杀死(killed)
- 如果变异未影响测试行为,称为存活(survived)
上面的解释还是有点抽象,看一个回文判断方法的具体示例:
public boolean isPalindrome(String inputString) {
if (inputString.length() == 0) {
return true;
} else {
char firstChar = inputString.charAt(0);
char lastChar = inputString.charAt(inputString.length() – 1);
String mid = inputString.substring(1, inputString.length() – 1);
return (firstChar == lastChar) && isPalindrome(mid);
}
}
重点关注在if条件判断上,突变测试可通过改变条件,突变代码就变成:
if (inputString.length() != 0) {
return true;
}
该变化就称为一个突变异种,为了使测试杀死这个突变,测试输入数据必须对突变和原始程序引起不同的程序状态,测试用例需要捕捉到这种结果。
PITest
官网,先进的Java变异测试开源(GitHub,K Star, Fork)工具,用于评估测试用例的质量,官方文档。
默认激活的变异器包括:
- EXPERIMENTAL_ARGUMENT_PROPAGATION
- FALSE_RETURNS
- TRUE_RETURNS
- CONDITIONALS_BOUNDARY
- CONSTRUCTOR_CALLS
- EMPTY_RETURNS
- INCREMENTS
- INLINE_CONSTS
- INVERT_NEGS
- MATH
- NEGATE_CONDITIONALS
- NON_VOID_METHOD_CALLS
- NULL_RETURNS
- PRIMITIVE_RETURNS
- REMOVE_CONDITIONALS_EQUAL_IF
- REMOVE_CONDITIONALS_EQUAL_ELSE
- REMOVE_CONDITIONALS_ORDER_IF
- REMOVE_CONDITIONALS_ORDER_ELSE
- VOID_METHOD_CALLS
- EXPERIMENTAL_BIG_DECIMAL
- EXPERIMENTAL_BIG_INTEGER
- EXPERIMENTAL_MEMBER_VARIABLE
- EXPERIMENTAL_NAKED_RECEIVER
- REMOVE_INCREMENTS
- EXPERIMENTAL_SWITCH
通过杀死存活变异体来提升得分。
配置项:
pitest-maven
通过引入官方提供的Maven依赖,可轻松指定PITest的版本并运行变异测试。
<plugin>
<groupId>org.pitest</groupId>
<artifactId>pitest-maven</artifactId>
<version>1.20.2</version>
<dependencies>
<dependency>
<groupId>org.pitest</groupId>
<artifactId>pitest-junit5-plugin</artifactId>
<version>1.2.3</version>
</dependency>
</dependencies>
<configuration>
<!– 指定需要变异的类 –>
<targetClasses>
<param>com.example.*</param>
</targetClasses>
<targetTests>
<param>org.aws.vsr.*</param>
</targetTests>
<mutationThreshold>80</mutationThreshold>
</configuration>
</plugin>
配置成功后,IDEA的Maven侧边栏就会出现如下插件目标: 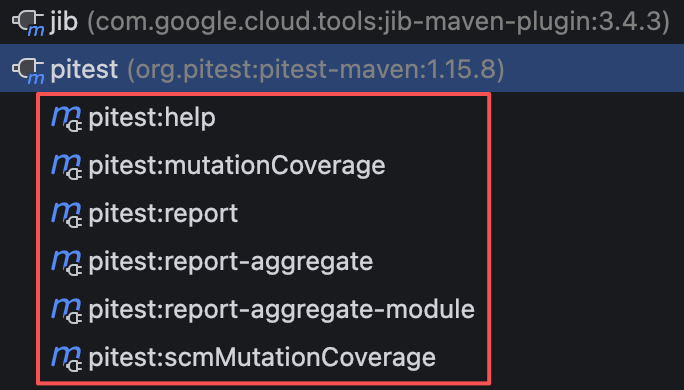 直接双击即可执行变异测试,双击实际上还是执行命令,如/bin/sh ./mvnw -Didea.version=2026.1.5 -Dmaven.ext.class.path=/Applications/IntelliJ IDEA.app/Contents/plugins/maven/lib/intellij.maven.rt/maven-event-listener.jar -Djansi.passthrough=true -Dstyle.color=always -Dmaven.repo.local=/Users/tssh/.m2/repository org.pitest:pitest-maven:1.20.2:mutationCoverage -f pom.xml。
关键输出:
[INFO] Available mutators : EXPERIMENTAL_ARGUMENT_PROPAGATION,FALSE_RETURNS,TRUE_RETURNS,CONDITIONALS_BOUNDARY,CONSTRUCTOR_CALLS,EMPTY_RETURNS,INCREMENTS,INLINE_CONSTS,INVERT_NEGS,MATH,NEGATE_CONDITIONALS,NON_VOID_METHOD_CALLS,NULL_RETURNS,PRIMITIVE_RETURNS,REMOVE_CONDITIONALS_EQUAL_IF,REMOVE_CONDITIONALS_EQUAL_ELSE,REMOVE_CONDITIONALS_ORDER_IF,REMOVE_CONDITIONALS_ORDER_ELSE,VOID_METHOD_CALLS,EXPERIMENTAL_BIG_DECIMAL,EXPERIMENTAL_BIG_INTEGER,EXPERIMENTAL_MEMBER_VARIABLE,EXPERIMENTAL_NAKED_RECEIVER,REMOVE_INCREMENTS,EXPERIMENTAL_SWITCH
PIT >> INFO : Created 19 mutation test units in pre scan
PIT >> INFO : Sending 25 test classes to minion
PIT >> INFO : Sent tests to minion
PIT >> INFO : Calculated coverage in 1 seconds.
PIT >> INFO : Created 11 mutation test units
> org.pitest.mutationtest.engine.gregor.mutators.VoidMethodCallMutator
>> Generated 10 Killed 0 (0%)
> KILLED 0 SURVIVED 0 TIMED_OUT 0 NON_VIABLE 0
> MEMORY_ERROR 0 NOT_STARTED 0 STARTED 0 RUN_ERROR 0
> NO_COVERAGE 10
– Timings
> pre-scan for mutations : < 1 second
> scan classpath : < 1 second
> coverage and dependency analysis : 1 seconds
> build mutation tests : < 1 second
> run mutation analysis : < 1 second
> Total: 1 seconds
– Statistics
>> Line Coverage (for mutated classes only): 0/258 (0%)
>> 25 tests examined
>> Generated 74 mutations Killed 0 (0%)
>> Mutations with no coverage 74. Test strength 100%
>> Ran 0 tests (0 tests per mutation)
Enhanced functionality available at https://www.arcmutate.com
Build messages
Project uses Spring, but the Arcmutate Spring plugin is not present. (https://docs.arcmutate.com/docs/spring.html)
[INFO] BUILD FAILURE
喜欢CLI工作方式,也能运行以下命令执行变异测试并生成报告:mvn org.pitest:pitest-maven:mutationCoverage,会在target/pit-reports目录下生成HTML格式的变异测试报告。
执行结束后,会在target目录下生成测试报告 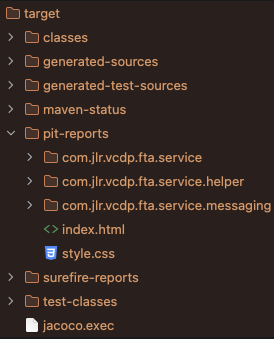 双击index.html查看报告:
 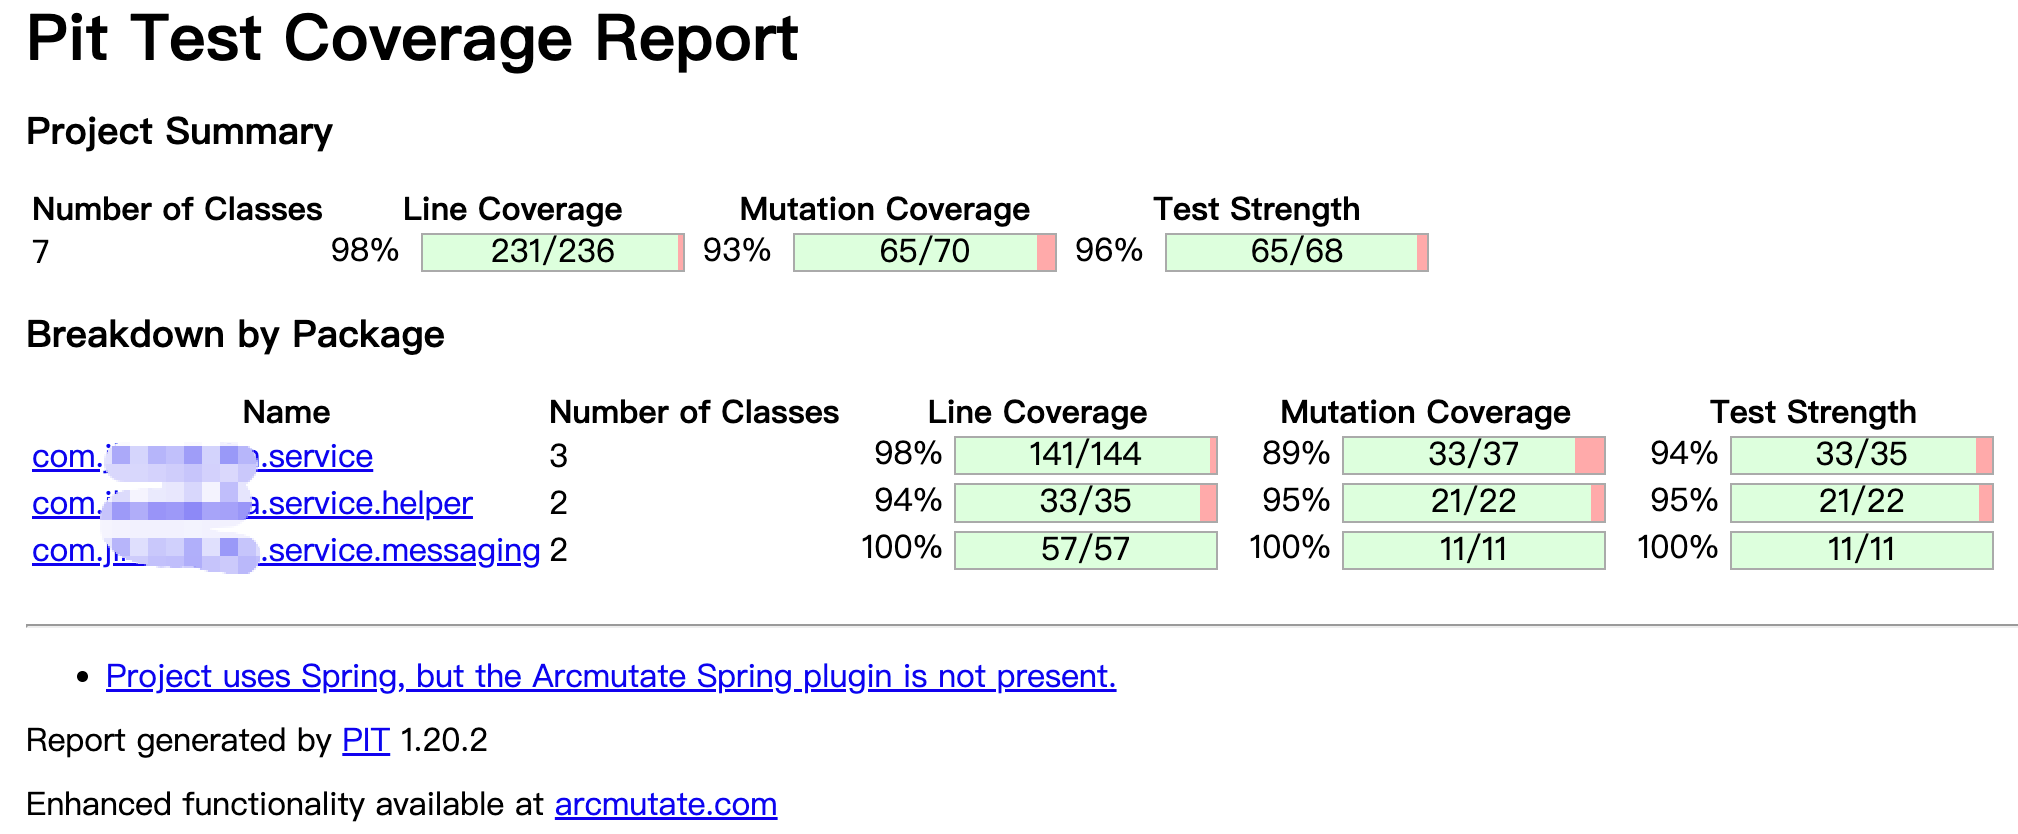 可看到的指标:行覆盖率、变异覆盖率、测试强度。浅绿色表示覆盖但无变异体,深绿色表示成功杀死变异体,红色表示存活的变异体。
蓝色链接可点击进去查看具体某个class类文件的测试详情。  可看到被杀死的变异体数量等信息。
注意事项
- 确保使用PITest版本与JDK版本兼容
- 对于JUnit5项目,需额外添加以下依赖:
<plugin>
<groupId>org.pitest</groupId>
<artifactId>pitest-maven</artifactId>
<version>1.15.8</version>
<dependencies>
<dependency>
<groupId>org.pitest</groupId>
<artifactId>pitest-junit5-plugin</artifactId>
<version>1.2.1</version>
</dependency>
</dependencies>
<configuration>
</configuration>
</plugin>
变异测试可能很吃资源,需要合理配置提升效率。使用targetClasses标签指定要变异的类列表,因为实际项目中不可能对所有类做变异测试,太耗时耗资源。
建议明确指定测试中使用的变异器,减少计算资源消耗:
<mutators>
<mutator>CONSTRUCTOR_CALLS</mutator>
</mutators>
还提供多种自定义测试策略的选项,如通过maxMutationsPerClass限制每类最大变异体数量。
Gradle
在build.gradle中添加依赖
dependencies {
testCompile group: 'com.github.hcoles', name: 'pitest', version: '${pitest.version}'
}
pitest.properties或pit.config.xml配置文件






评论前必须登录!
注册