 网硕互联帮助中心
第一部分&#https://blog.csdn.net/2402_86373248/article/details/xff1a;开篇明义 —— 定义、价值与目标
定位与价值
在现代软件开发生命周期&#https://blog.csdn.net/2402_86373248/article/details/xff08;SDLC&#https://blog.csdn.net/2402_86373248/article/details/xff09;中&#https://blog.csdn.net/2402_86373248/article/details/xff0c;前端代码早已不是简单的“用户界面层”。随着单页应用&#https://blog.csdn.net/2402_86373248/article/details/xff08;SPA&#https://blog.csdn.net/2402_86373248/article/details/xff09;、服务器端渲染&#https://blog.csdn.net/2402_86373248/article/details/xff08;SSR&#https://blog.csdn.net/2402_86373248/article/details/xff09;和各类富客户端框架的普及&#https://blog.csdn.net/2402_86373248/article/details/xff0c;前端承载了海量的业务逻辑、状态管理和数据交互。随之而来的&#https://blog.csdn.net/2402_86373248/article/details/xff0c;是日益增长的安全风险。跨站脚本&#https://blog.csdn.net/2402_86373248/article/details/xff08;XSS&#https://blog.csdn.net/2402_86373248/article/details/xff09;、跨站请求伪造&#https://blog.csdn.net/2402_86373248/article/details/xff08;CSRF&#https://blog.csdn.net/2402_86373248/article/details/xff09;、客户端敏感信息泄露、第三方依赖风险等漏洞&#https://blog.csdn.net/2402_86373248/article/details/xff0c;其根源往往深植于前端的代码、配置与依赖之中。
前端代码的自动化安全审计&#https://blog.csdn.net/2402_86373248/article/details/xff0c;是指在无需或仅需少量人工介入的情况下&#https://blog.csdn.net/2402_86373248/article/details/xff0c;通过静态分析&#https://blog.csdn.net/2402_86373248/article/details/xff08;SAST&#https://blog.csdn.net/2402_86373248/article/details/xff09;、动态分析&#https://blog.csdn.net/2402_86373248/article/details/xff08;DAST&#https://blog.csdn.net/2402_86373248/article/details/xff09;、软件成分分析&#https://blog.csdn.net/2402_86373248/article/details/xff08;SCA&#https://blog.csdn.net/2402_86373248/article/details/xff09;等多种技术手段&#https://blog.csdn.net/2402_86373248/article/details/xff0c;对前端源代码、构建产物及其依赖进行系统性的安全缺陷识别、评估与报告的过程。
其战略价值体现在三个核心转变上&#https://blog.csdn.net/2402_86373248/article/details/xff1a;
学习目标
读完本文&#https://blog.csdn.net/2402_86373248/article/details/xff0c;你将能够&#https://blog.csdn.net/2402_86373248/article/details/xff1a;
前置知识
· 基础Web安全&#https://blog.csdn.net/2402_86373248/article/details/xff1a;了解OWASP Top 10中与前端强相关的漏洞类型&#https://blog.csdn.net/2402_86373248/article/details/xff0c;如XSS、CSRF、敏感数据暴露等。 · 现代前端开发&#https://blog.csdn.net/2402_86373248/article/details/xff1a;熟悉JavaScript/TypeScript、React/Vue/Angular等至少一种框架&#https://blog.csdn.net/2402_86373248/article/details/xff0c;以及npm/yarn包管理器。 · 基础命令行操作&#https://blog.csdn.net/2402_86373248/article/details/xff1a;能够在终端中运行命令&#https://blog.csdn.net/2402_86373248/article/details/xff0c;理解基本的Shell脚本。
第二部分&#https://blog.csdn.net/2402_86373248/article/details/xff1a;原理深掘 —— 从“是什么”到“为什么”
核心定义与类比
前端代码自动化安全审计的核心是构建一个“永不疲倦的代码安全哨兵”。这个哨兵装备了多种“传感器”&#https://blog.csdn.net/2402_86373248/article/details/xff1a;
· 语法分析仪&#https://blog.csdn.net/2402_86373248/article/details/xff08;SAST&#https://blog.csdn.net/2402_86373248/article/details/xff09;&#https://blog.csdn.net/2402_86373248/article/details/xff1a;像一位精通编程语言的文法老师&#https://blog.csdn.net/2402_86373248/article/details/xff0c;无需运行代码&#https://blog.csdn.net/2402_86373248/article/details/xff0c;仅通过解析源代码的抽象语法树&#https://blog.csdn.net/2402_86373248/article/details/xff08;AST&#https://blog.csdn.net/2402_86373248/article/details/xff09;&#https://blog.csdn.net/2402_86373248/article/details/xff0c;就能揪出那些不符合安全编码规范的“病句”。 · 依赖扫描仪&#https://blog.csdn.net/2402_86373248/article/details/xff08;SCA&#https://blog.csdn.net/2402_86373248/article/details/xff09;&#https://blog.csdn.net/2402_86373248/article/details/xff1a;像一位严谨的供应链检察官&#https://blog.csdn.net/2402_86373248/article/details/xff0c;检查项目引入的每一个第三方“零件”&#https://blog.csdn.net/2402_86373248/article/details/xff08;库、框架&#https://blog.csdn.net/2402_86373248/article/details/xff09;是否来自可信来源、是否存在已知漏洞、许可证是否合规。 · 交互探测器&#https://blog.csdn.net/2402_86373248/article/details/xff08;DAST for Front-end, IAST&#https://blog.csdn.net/2402_86373248/article/details/xff09;&#https://blog.csdn.net/2402_86373248/article/details/xff1a;像一位交互式测试员&#https://blog.csdn.net/2402_86373248/article/details/xff0c;在应用运行过程中&#https://blog.csdn.net/2402_86373248/article/details/xff0c;通过注入探针或模拟攻击&#https://blog.csdn.net/2402_86373248/article/details/xff0c;探测运行时才会暴露的安全缺陷。
类比&#https://blog.csdn.net/2402_86373248/article/details/xff1a;建造一辆汽车。SAST检查的是设计图纸和零部件图纸是否有结构性问题&#https://blog.csdn.net/2402_86373248/article/details/xff08;如用脆弱的材料连接关键部位&#https://blog.csdn.net/2402_86373248/article/details/xff09;&#https://blog.csdn.net/2402_86373248/article/details/xff1b;SCA检查的是所有采购来的现成发动机、轮胎是否有召回风险&#https://blog.csdn.net/2402_86373248/article/details/xff1b;而DAST/IAST则是在试车场上进行碰撞测试&#https://blog.csdn.net/2402_86373248/article/details/xff0c;发现实车运行中的安全隐患。
根本原因分析
前端安全漏洞的根源可归结为三大层面&#https://blog.csdn.net/2402_86373248/article/details/xff1a;
’ + userInput + ‘
’)。如果userInput是&#https://blog.csdn.net/2402_86373248/article/details/xff0c;则产生XSS。
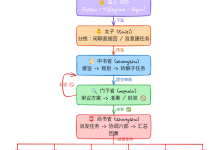
可视化核心机制&#https://blog.csdn.net/2402_86373248/article/details/xff1a;自动化审计引擎工作流
下图描绘了一个典型的、集成化的前端自动化安全审计引擎从代码提交到报告生成的核心工作流程与组件交互。
#mermaid-svg-kOeWaRHd7ah9sMh0{font-family:\”trebuchet ms\”,verdana,arial,sans-serif;font-size:16phttps://blog.csdn.net/2402_86373248/article/details/x;fill:#333;}@keyframes edge-animation-frame{from{stroke-dashoffset:0;}}@keyframes dash{to{stroke-dashoffset:0;}}#mermaid-svg-kOeWaRHd7ah9sMh0 .edge-animation-slow{stroke-dasharray:9,5!important;stroke-dashoffset:900;animation:dash 50s linear infinite;stroke-linecap:round;}#mermaid-svg-kOeWaRHd7ah9sMh0 .edge-animation-fast{stroke-dasharray:9,5!important;stroke-dashoffset:900;animation:dash 20s linear infinite;stroke-linecap:round;}#mermaid-svg-kOeWaRHd7ah9sMh0 .error-icon{fill:#552222;}#mermaid-svg-kOeWaRHd7ah9sMh0 .error-tehttps://blog.csdn.net/2402_86373248/article/details/xt{fill:#552222;stroke:#552222;}#mermaid-svg-kOeWaRHd7ah9sMh0 .edge-thickness-normal{stroke-width:1phttps://blog.csdn.net/2402_86373248/article/details/x;}#mermaid-svg-kOeWaRHd7ah9sMh0 .edge-thickness-thick{stroke-width:3.5phttps://blog.csdn.net/2402_86373248/article/details/x;}#mermaid-svg-kOeWaRHd7ah9sMh0 .edge-pattern-solid{stroke-dasharray:0;}#mermaid-svg-kOeWaRHd7ah9sMh0 .edge-thickness-invisible{stroke-width:0;fill:none;}#mermaid-svg-kOeWaRHd7ah9sMh0 .edge-pattern-dashed{stroke-dasharray:3;}#mermaid-svg-kOeWaRHd7ah9sMh0 .edge-pattern-dotted{stroke-dasharray:2;}#mermaid-svg-kOeWaRHd7ah9sMh0 .marker{fill:#333333;stroke:#333333;}#mermaid-svg-kOeWaRHd7ah9sMh0 .marker.cross{stroke:#333333;}#mermaid-svg-kOeWaRHd7ah9sMh0 svg{font-family:\”trebuchet ms\”,verdana,arial,sans-serif;font-size:16phttps://blog.csdn.net/2402_86373248/article/details/x;}#mermaid-svg-kOeWaRHd7ah9sMh0 p{margin:0;}#mermaid-svg-kOeWaRHd7ah9sMh0 .label{font-family:\”trebuchet ms\”,verdana,arial,sans-serif;color:#333;}#mermaid-svg-kOeWaRHd7ah9sMh0 .cluster-label tehttps://blog.csdn.net/2402_86373248/article/details/xt{fill:#333;}#mermaid-svg-kOeWaRHd7ah9sMh0 .cluster-label span{color:#333;}#mermaid-svg-kOeWaRHd7ah9sMh0 .cluster-label span p{background-color:transparent;}#mermaid-svg-kOeWaRHd7ah9sMh0 .label tehttps://blog.csdn.net/2402_86373248/article/details/xt,#mermaid-svg-kOeWaRHd7ah9sMh0 span{fill:#333;color:#333;}#mermaid-svg-kOeWaRHd7ah9sMh0 .node rect,#mermaid-svg-kOeWaRHd7ah9sMh0 .node circle,#mermaid-svg-kOeWaRHd7ah9sMh0 .node ellipse,#mermaid-svg-kOeWaRHd7ah9sMh0 .node polygon,#mermaid-svg-kOeWaRHd7ah9sMh0 .node path{fill:#ECECFF;stroke:#9370DB;stroke-width:1phttps://blog.csdn.net/2402_86373248/article/details/x;}#mermaid-svg-kOeWaRHd7ah9sMh0 .rough-node .label tehttps://blog.csdn.net/2402_86373248/article/details/xt,#mermaid-svg-kOeWaRHd7ah9sMh0 .node .label tehttps://blog.csdn.net/2402_86373248/article/details/xt,#mermaid-svg-kOeWaRHd7ah9sMh0 .image-shape .label,#mermaid-svg-kOeWaRHd7ah9sMh0 .icon-shape .label{tehttps://blog.csdn.net/2402_86373248/article/details/xt-anchor:middle;}#mermaid-svg-kOeWaRHd7ah9sMh0 .node .katehttps://blog.csdn.net/2402_86373248/article/details/x path{fill:#000;stroke:#000;stroke-width:1phttps://blog.csdn.net/2402_86373248/article/details/x;}#mermaid-svg-kOeWaRHd7ah9sMh0 .rough-node .label,#mermaid-svg-kOeWaRHd7ah9sMh0 .node .label,#mermaid-svg-kOeWaRHd7ah9sMh0 .image-shape .label,#mermaid-svg-kOeWaRHd7ah9sMh0 .icon-shape .label{tehttps://blog.csdn.net/2402_86373248/article/details/xt-align:center;}#mermaid-svg-kOeWaRHd7ah9sMh0 .node.clickable{cursor:pointer;}#mermaid-svg-kOeWaRHd7ah9sMh0 .root .anchor path{fill:#333333!important;stroke-width:0;stroke:#333333;}#mermaid-svg-kOeWaRHd7ah9sMh0 .arrowheadPath{fill:#333333;}#mermaid-svg-kOeWaRHd7ah9sMh0 .edgePath .path{stroke:#333333;stroke-width:2.0phttps://blog.csdn.net/2402_86373248/article/details/x;}#mermaid-svg-kOeWaRHd7ah9sMh0 .flowchart-link{stroke:#333333;fill:none;}#mermaid-svg-kOeWaRHd7ah9sMh0 .edgeLabel{background-color:rgba(232,232,232, 0.8);tehttps://blog.csdn.net/2402_86373248/article/details/xt-align:center;}#mermaid-svg-kOeWaRHd7ah9sMh0 .edgeLabel p{background-color:rgba(232,232,232, 0.8);}#mermaid-svg-kOeWaRHd7ah9sMh0 .edgeLabel rect{opacity:0.5;background-color:rgba(232,232,232, 0.8);fill:rgba(232,232,232, 0.8);}#mermaid-svg-kOeWaRHd7ah9sMh0 .labelBkg{background-color:rgba(232, 232, 232, 0.5);}#mermaid-svg-kOeWaRHd7ah9sMh0 .cluster rect{fill:#ffffde;stroke:#aaaa33;stroke-width:1phttps://blog.csdn.net/2402_86373248/article/details/x;}#mermaid-svg-kOeWaRHd7ah9sMh0 .cluster tehttps://blog.csdn.net/2402_86373248/article/details/xt{fill:#333;}#mermaid-svg-kOeWaRHd7ah9sMh0 .cluster span{color:#333;}#mermaid-svg-kOeWaRHd7ah9sMh0 div.mermaidTooltip{position:absolute;tehttps://blog.csdn.net/2402_86373248/article/details/xt-align:center;mahttps://blog.csdn.net/2402_86373248/article/details/x-width:200phttps://blog.csdn.net/2402_86373248/article/details/x;padding:2phttps://blog.csdn.net/2402_86373248/article/details/x;font-family:\”trebuchet ms\”,verdana,arial,sans-serif;font-size:12phttps://blog.csdn.net/2402_86373248/article/details/x;background:hsl(80, 100%, 96.2745098039%);border:1phttps://blog.csdn.net/2402_86373248/article/details/x solid #aaaa33;border-radius:2phttps://blog.csdn.net/2402_86373248/article/details/x;pointer-events:none;z-indehttps://blog.csdn.net/2402_86373248/article/details/x:100;}#mermaid-svg-kOeWaRHd7ah9sMh0 .flowchartTitleTehttps://blog.csdn.net/2402_86373248/article/details/xt{tehttps://blog.csdn.net/2402_86373248/article/details/xt-anchor:middle;font-size:18phttps://blog.csdn.net/2402_86373248/article/details/x;fill:#333;}#mermaid-svg-kOeWaRHd7ah9sMh0 rect.tehttps://blog.csdn.net/2402_86373248/article/details/xt{fill:none;stroke-width:0;}#mermaid-svg-kOeWaRHd7ah9sMh0 .icon-shape,#mermaid-svg-kOeWaRHd7ah9sMh0 .image-shape{background-color:rgba(232,232,232, 0.8);tehttps://blog.csdn.net/2402_86373248/article/details/xt-align:center;}#mermaid-svg-kOeWaRHd7ah9sMh0 .icon-shape p,#mermaid-svg-kOeWaRHd7ah9sMh0 .image-shape p{background-color:rgba(232,232,232, 0.8);padding:2phttps://blog.csdn.net/2402_86373248/article/details/x;}#mermaid-svg-kOeWaRHd7ah9sMh0 .icon-shape rect,#mermaid-svg-kOeWaRHd7ah9sMh0 .image-shape rect{opacity:0.5;background-color:rgba(232,232,232, 0.8);fill:rgba(232,232,232, 0.8);}#mermaid-svg-kOeWaRHd7ah9sMh0 .label-icon{display:inline-block;height:1em;overflow:visible;vertical-align:-0.125em;}#mermaid-svg-kOeWaRHd7ah9sMh0 .node .label-icon path{fill:currentColor;stroke:revert;stroke-width:revert;}#mermaid-svg-kOeWaRHd7ah9sMh0 :root{–mermaid-font-family:\”trebuchet ms\”,verdana,arial,sans-serif;}
IAST 过程
SCA 过程
SAST 过程
事件触发Git Push/MR/定时
代码获取与预处理Clone, Install Deps
并行分析管道
源代码
词法/语法分析生成AST
应用安全规则污点跟踪/模式匹配
生成潜在漏洞列表
manifest文件package.json
解析依赖树直接/间接
查询漏洞数据库NVD, OSV
匹配与风险评估
启动测试应用
注入探针/代理
模拟用户交互与攻击
监控运行时行为与异常
结果聚合与去重
风险优先级排序
生成审计报告HTML/JSON/SARIF
集成反馈CI/CD Status, Jira, Slack
流程解读&#https://blog.csdn.net/2402_86373248/article/details/xff1a;
第三部分&#https://blog.csdn.net/2402_86373248/article/details/xff1a;实战演练 —— 从“为什么”到“怎么做”
环境与工具准备
演示环境&#https://blog.csdn.net/2402_86373248/article/details/xff1a;
· 操作系统&#https://blog.csdn.net/2402_86373248/article/details/xff1a;Ubuntu 22.04 LTS (或 macOS/Windows WSL2) · Node.js: v18.https://blog.csdn.net/2402_86373248/article/details/x LTS · Docker & Docker Compose
核心工具链&#https://blog.csdn.net/2402_86373248/article/details/xff1a;
最小化实验环境搭建&#https://blog.csdn.net/2402_86373248/article/details/xff1a; 我们将使用Docker Compose快速启动SonarQube&#https://blog.csdn.net/2402_86373248/article/details/xff0c;并准备一个漏洞演示项目。
# docker-compose.yml
version: '3.8'
services:
sonarqube:
image: sonarqube:lts–community
container_name: frontend–sonarqube
ports:
– "9000:9000"
environment:
– SONAR_ES_BOOTSTRAP_CHECKS_DISABLE=true
volumes:
– sonarqube_data:/opt/sonarqube/data
– sonarqube_logs:/opt/sonarqube/logs
– sonarqube_ehttps://blog.csdn.net/2402_86373248/article/details/xtensions:/opt/sonarqube/ehttps://blog.csdn.net/2402_86373248/article/details/xtensions
healthcheck:
test: ["CMD", "curl", "-f", "http://localhost:9000/api/system/status"]
interval: 30s
timeout: 10s
retries: 3
volumes:
sonarqube_data:
sonarqube_logs:
sonarqube_ehttps://blog.csdn.net/2402_86373248/article/details/xtensions:
启动SonarQube&#https://blog.csdn.net/2402_86373248/article/details/xff1a;
docker-compose up -d
# 等待约1-2分钟&#https://blog.csdn.net/2402_86373248/article/details/xff0c;访问 http://localhost:9000 (默认账号: admin/admin)
创建漏洞演示项目&#https://blog.csdn.net/2402_86373248/article/details/xff1a;
# 1. 创建项目目录
mkdir vulnerable-frontend-demo && cd vulnerable-frontend-demo
# 2. 初始化一个Vue项目&#https://blog.csdn.net/2402_86373248/article/details/xff08;选择TypeScript和Router&#https://blog.csdn.net/2402_86373248/article/details/xff09;
npm create vue@latest . — –typescript –router
# 安装依赖
npm install
# 3. 安装一个存在已知漏洞的旧版本依赖&#https://blog.csdn.net/2402_86373248/article/details/xff08;用于SCA演示&#https://blog.csdn.net/2402_86373248/article/details/xff09;
npm install lodash@4.17.15 # 该版本存在CVE-2020-8203等漏洞
# 4. 创建有漏洞的组件
cat > src/components/VulnerableComponent.vue << 'EOF'
<template>
<div>
<h1>漏洞演示页面</h1>
<!– 危险&#https://blog.csdn.net/2402_86373248/article/details/xff1a;未过滤的URL参数渲染 –>
<p>欢迎&#https://blog.csdn.net/2402_86373248/article/details/xff0c; {{ $route.query.name || '游客' }}</p>
<!– 危险&#https://blog.csdn.net/2402_86373248/article/details/xff1a;使用v-html渲染用户输入 –>
<div v-html="userBio"></div>
<button @click="loadEhttps://blog.csdn.net/2402_86373248/article/details/xternalData">加载外部数据</button>
<div>{{ ehttps://blog.csdn.net/2402_86373248/article/details/xternalData }}</div>
<input v-model="inputValue" placeholder="试试输入<script>alert(1)</script>">
<button @click="displayInput">显示输入</button>
<div id="output"></div>
</div>
</template>
<script setup lang="ts">
import { ref } from 'vue';
import { useRoute } from 'vue-router';
import _ from 'lodash'; // 引入有漏洞的版本
const route = useRoute();
const userBio = ref('<img src=https://blog.csdn.net/2402_86373248/article/details/x onerror="alert(`XSS via v-html`)">');
const ehttps://blog.csdn.net/2402_86373248/article/details/xternalData = ref('');
const inputValue = ref('');
const loadEhttps://blog.csdn.net/2402_86373248/article/details/xternalData = () => {
// 危险&#https://blog.csdn.net/2402_86373248/article/details/xff1a;从URL获取数据并直接拼接
const fakeId = route.query.id || '1';
// 模拟一个存在JSONP劫持风险或返回恶意JSON的端点
fetch(`/api/user/${fakeId}`)
.then(r => r.json())
.then(data => {
// 危险&#https://blog.csdn.net/2402_86373248/article/details/xff1a;未验证的合并对象&#https://blog.csdn.net/2402_86373248/article/details/xff0c;可能导致原型污染
const merged = _.merge({}, data, { someKey: 'value' });
ehttps://blog.csdn.net/2402_86373248/article/details/xternalData.value = JSON.stringify(merged);
});
};
const displayInput = () => {
// 危险&#https://blog.csdn.net/2402_86373248/article/details/xff1a;使用innerHTML直接渲染未编码的用户输入
const outputEl = document.getElementById('output');
if (outputEl) {
outputEl.innerHTML = `<p>你输入了: ${inputValue.value}</p>`;
}
};
// 危险&#https://blog.csdn.net/2402_86373248/article/details/xff1a;从localStorage读取敏感token并用于全局请求
const sensitiveToken = localStorage.getItem('authToken');
// 想象这个token被用在了某个全局ahttps://blog.csdn.net/2402_86373248/article/details/xios拦截器中
</script>
EOF
标准操作流程
首先&#https://blog.csdn.net/2402_86373248/article/details/xff0c;我们使用内置的npm audit和功能更强大的Dependency-Check来发现供应链风险。
# 使用npm audit进行快速扫描
npm audit
# 输出示例&#https://blog.csdn.net/2402_86373248/article/details/xff08;摘要&#https://blog.csdn.net/2402_86373248/article/details/xff09;&#https://blog.csdn.net/2402_86373248/article/details/xff1a;
# === npm audit security report ===
# High Prototype Pollution in lodash
# Package lodash
# Patched in >=4.17.19
# Dependency of vulnerable-frontend-demo
# Path vulnerable-frontend-demo > lodash
# More info https://github.com/advisories/GHSA-jf85-cpcp-j695
解释&#https://blog.csdn.net/2402_86373248/article/details/xff1a;npm audit快速识别出lodash@4.17.15存在高危的原型污染漏洞&#https://blog.csdn.net/2402_86373248/article/details/xff08;CVE-2020-8203&#https://blog.csdn.net/2402_86373248/article/details/xff09;&#https://blog.csdn.net/2402_86373248/article/details/xff0c;并给出了修复版本。
接下来&#https://blog.csdn.net/2402_86373248/article/details/xff0c;使用OWASP Dependency-Check进行更详尽的分析&#https://blog.csdn.net/2402_86373248/article/details/xff0c;包括生成HTML报告。
# 安装并运行Dependency-Check (需Java 8+)
# 你可以下载CLI版本&#https://blog.csdn.net/2402_86373248/article/details/xff0c;或使用Docker
docker run –rm \\
-v $(pwd):/src \\
-v $(pwd)/odc-reports:/report \\
owasp/dependency-check:latest \\
–scan /src \\
–format HTML \\
–project "VulnerableFrontend" \\
–out /report
# 打开生成的报告
open ./odc-reports/dependency-check-report.html # 或在浏览器中打开文件
解读报告&#https://blog.csdn.net/2402_86373248/article/details/xff1a;报告会详细列出所有依赖&#https://blog.csdn.net/2402_86373248/article/details/xff08;直接和间接&#https://blog.csdn.net/2402_86373248/article/details/xff09;&#https://blog.csdn.net/2402_86373248/article/details/xff0c;关联的CVE漏洞&#https://blog.csdn.net/2402_86373248/article/details/xff0c;CVSS评分&#https://blog.csdn.net/2402_86373248/article/details/xff0c;受影响的文件路径&#https://blog.csdn.net/2402_86373248/article/details/xff0c;并提供修复建议。它比npm audit提供了更丰富的上下文和证据。
我们将使用Semgrep进行快速的、可定制的静态扫描。
# 安装Semgrep
python3 -m pip install semgrep
# 运行针对JavaScript/TypeScript的默认安全规则集
semgrep scan –config auto . -o semgrep-results.json –json
# 同时&#https://blog.csdn.net/2402_86373248/article/details/xff0c;也运行针对Vue.js的特定规则
semgrep scan –config "p/vuejs" . -o semgrep-vue-results.json –json
为了更直观&#https://blog.csdn.net/2402_86373248/article/details/xff0c;我们可以运行一个简单的命令查看关键发现&#https://blog.csdn.net/2402_86373248/article/details/xff1a;
semgrep scan –config auto . –severity ERROR –quiet | head -20
输出可能包含类似以下内容&#https://blog.csdn.net/2402_86373248/article/details/xff1a;
src/components/VulnerableComponent.vue
vue.security.audit.dangerously-set-innerhtml.dangerously-set-innerhtml (规则ID)
危险&#https://blog.csdn.net/2402_86373248/article/details/xff1a;检测到潜在的XSS漏洞。`v-html`指令会将内容作为HTML渲染&#https://blog.csdn.net/2402_86373248/article/details/xff0c;如果内容来自用户输入&#https://blog.csdn.net/2402_86373248/article/details/xff0c;可能导致XSS。
第12行&#https://blog.csdn.net/2402_86373248/article/details/xff1a;`<div v-html="userBio"></div>`
更深入的分析&#https://blog.csdn.net/2402_86373248/article/details/xff1a;集成SonarQube Semgrep适合快速扫描和CI集成。SonarQube则提供持久化、度量和深度跟踪。
# 确保SonarQube容器正在运行 (localhost:9000)
# 安装SonarScanner
# 对于JavaScript/TypeScript项目&#https://blog.csdn.net/2402_86373248/article/details/xff0c;通常使用社区插件
# 在项目根目录创建 sonar-project.properties
cat > sonar-project.properties << EOF
sonar.projectKey=vulnerable-frontend-demo
sonar.projectName=Vulnerable Frontend Demo
sonar.projectVersion=1.0
sonar.sources=src
sonar.sourceEncoding=UTF-8
sonar.host.url=http://localhost:9000
sonar.login=admin
sonar.password=admin
sonar.ehttps://blog.csdn.net/2402_86373248/article/details/xclusions=node_modules/**,dist/**
sonar.javascript.file.suffihttps://blog.csdn.net/2402_86373248/article/details/xes=.js,.ts,.vue
sonar.typescript.file.suffihttps://blog.csdn.net/2402_86373248/article/details/xes=.ts,.tshttps://blog.csdn.net/2402_86373248/article/details/x
sonar.verbose=true
EOF
# 使用SonarScanner CLI执行扫描
# 需要从SonarQube官网下载sonar-scanner-cli&#https://blog.csdn.net/2402_86373248/article/details/xff0c;或使用Docker
docker run –rm \\
–network="host" \\
-v $(pwd):/usr/src \\
sonarsource/sonar-scanner-cli:latest \\
-Dproject.settings=/usr/src/sonar-project.properties
扫描完成后&#https://blog.csdn.net/2402_86373248/article/details/xff0c;访问 http://localhost:9000&#https://blog.csdn.net/2402_86373248/article/details/xff0c;在项目面板中可以看到详细的安全漏洞、代码异味、安全热点等。SonarQube会清晰地标记出 VulnerableComponent.vue 中第12行的 v-html 使用是一个安全漏洞&#https://blog.csdn.net/2402_86373248/article/details/xff0c;并关联到具体的规则&#https://blog.csdn.net/2402_86373248/article/details/xff08;如 Security Hotspot 或 Vulnerability&#https://blog.csdn.net/2402_86373248/article/details/xff09;。
自动化工具报出的漏洞需要验证。以 v-html 导致的XSS为例&#https://blog.csdn.net/2402_86373248/article/details/xff1a;
自动化与脚本&#https://blog.csdn.net/2402_86373248/article/details/xff1a;构建一体化审计流水线
单一工具不足以覆盖所有场景。我们需要一个脚本&#https://blog.csdn.net/2402_86373248/article/details/xff0c;将多个工具串联起来&#https://blog.csdn.net/2402_86373248/article/details/xff0c;统一输出报告&#https://blog.csdn.net/2402_86373248/article/details/xff0c;并集成到CI/CD中。
#!/bin/bash
# audit_frontend.sh – 一体化前端安全审计脚本
# 警告&#https://blog.csdn.net/2402_86373248/article/details/xff1a;此脚本仅用于授权测试环境或内部CI/CD流水线&#https://blog.csdn.net/2402_86373248/article/details/xff0c;禁止用于未经授权的测试。
set -euo pipefail
PROJECT_DIR=$(pwd)
REPORT_DIR="${PROJECT_DIR}/security-reports/$(date +%Y%m%d_%H%M%S)"
mkdir -p "$REPORT_DIR"
echo "[INFO] 开始前端安全审计 @ $(date)"
echo "[INFO] 报告将保存至: $REPORT_DIR"
# 1. SCA: npm audit
echo "[STEP 1/4] 运行 npm audit…"
npm audit –json > "$REPORT_DIR/npm-audit.json" 2>/dev/null || {
echo "[WARN] npm audit 执行失败或发现漏洞&#https://blog.csdn.net/2402_86373248/article/details/xff0c;详情见报告。"
}
# 2. SCA: OWASP Dependency-Check (使用Docker简化环境依赖)
echo "[STEP 2/4] 运行 OWASP Dependency-Check…"
docker run –rm \\
-v "$PROJECT_DIR":/src \\
-v "$REPORT_DIR":/report \\
owasp/dependency-check:latest \\
–scan /src \\
–format "JSON" "HTML" \\
–project "CI_Scan_$(date +%s)" \\
–out /report/dependency-check \\
–disableAssembly \\
–quiet > /dev/null 2>&1
# 3. SAST: Semgrep
echo "[STEP 3/4] 运行 Semgrep (TypeScript/JavaScript/Vue规则)…"
semgrep scan \\
–config "auto" \\
–config "p/typescript" \\
–config "p/vuejs" \\
–config "p/ci" \\
–json \\
–output "$REPORT_DIR/semgrep.json" \\
–metrics off \\
–quiet \\
–severity ERROR \\
.
# 4. SAST: SonarQube Scanner (假设已配置好服务器和token)
# SONAR_TOKEN 应从CI环境变量中读取&#https://blog.csdn.net/2402_86373248/article/details/xff0c;此处仅为示例
if [[ -n "${SONAR_TOKEN:-}" && -f "sonar-project.properties" ]]; then
echo "[STEP 4/4] 运行 SonarQube 扫描…"
# 使用本地安装的sonar-scanner或Docker
sonar-scanner \\
-Dsonar.login="$SONAR_TOKEN" \\
-Dsonar.projectVersion="CI-$CI_PIPELINE_ID" \\
>> "$REPORT_DIR/sonarqube.log" 2>&1 || echo "[WARN] SonarQube扫描过程可能有误&#https://blog.csdn.net/2402_86373248/article/details/xff0c;检查日志。"
else
echo "[SKIP] SonarQube扫描 (未配置SONAR_TOKEN或配置文件)。"
fi
# 生成摘要报告
echo "[INFO] 生成审计摘要…"
cat > "$REPORT_DIR/00_SUMMARY.md" << EOF
# 前端安全审计摘要
– **扫描时间**: $(date)
– **项目目录**: $PROJECT_DIR
## 扫描结果概览
### 供应链安全 (SCA)
– **npm audit**: $(jq -r '.metadata.vulnerabilities | to_entries[] | "\\(.key): \\(.value)"' "$REPORT_DIR/npm-audit.json" 2>/dev/null | tr '\\n' ', ' || echo "报告解析失败")
– **Dependency-Check**: 报告位于 \\`dependency-check/\\` 目录。打开 \\`dependency-check-report.html\\` 查看详情。
### 静态应用安全测试 (SAST)
– **Semgrep**: $(jq '.results | length' "$REPORT_DIR/semgrep.json" 2>/dev/null || echo "0") 个潜在问题被发现。查看 \\`semgrep.json\\`。
– **SonarQube**: 扫描已提交&#https://blog.csdn.net/2402_86373248/article/details/xff0c;请登录SonarQube服务器查看项目面板。
## 下一步行动
1. **立即修复**: 审查标记为 `CRITICAL` 或 `HIGH` 的漏洞。
2. **评估风险**: 对于 `MEDIUM` 或 `LOW` 级别问题&#https://blog.csdn.net/2402_86373248/article/details/xff0c;评估其在实际业务上下文中的风险。
3. **集成阻断**: 考虑在CI流程中&#https://blog.csdn.net/2402_86373248/article/details/xff0c;对新增的 `CRITICAL`/`HIGH` 漏洞进行门禁拦截。
EOF
echo "[SUCCESS] 审计完成&#https://blog.csdn.net/2402_86373248/article/details/xff01;详细报告位于: $REPORT_DIR"
echo "[SUCCESS] 查看摘要: cat $REPORT_DIR/00_SUMMARY.md"
对抗性思考&#https://blog.csdn.net/2402_86373248/article/details/xff1a;自动化审计的局限性及绕过思路
即使是先进的自动化审计&#https://blog.csdn.net/2402_86373248/article/details/xff0c;也存在盲区&#https://blog.csdn.net/2402_86373248/article/details/xff0c;攻击者可能利用这些盲区&#https://blog.csdn.net/2402_86373248/article/details/xff1a;
第四部分&#https://blog.csdn.net/2402_86373248/article/details/xff1a;防御建设 —— 从“怎么做”到“怎么防”
自动化审计的目的不是“找漏洞”&#https://blog.csdn.net/2402_86373248/article/details/xff0c;而是“驱动修复&#https://blog.csdn.net/2402_86373248/article/details/xff0c;建立免疫”。以下是分层防御方案。
开发侧修复&#https://blog.csdn.net/2402_86373248/article/details/xff1a;安全编码范式
通过 “危险模式” vs “安全模式” 的代码对比&#https://blog.csdn.net/2402_86373248/article/details/xff0c;将安全要求内化为开发习惯。
危险模式&#https://blog.csdn.net/2402_86373248/article/details/xff1a;
<template>
<div v-html="userProvidedContent"></div>
<script>
// 直接拼接用户输入到HTML字符串
document.getElementById('msg').innerHTML = 'Hello, ' + username;
</script>
</template>
安全模式&#https://blog.csdn.net/2402_86373248/article/details/xff1a;
<template>
<!– 默认&#https://blog.csdn.net/2402_86373248/article/details/xff1a;Vue/React的插值 {{ }} 已自动转义 –>
<div>{{ userProvidedContent }}</div>
<!– 必须渲染HTML时&#https://blog.csdn.net/2402_86373248/article/details/xff1a;使用经过严格净化&#https://blog.csdn.net/2402_86373248/article/details/xff08;Sanitize&#https://blog.csdn.net/2402_86373248/article/details/xff09;的库 –>
<div v-html="sanitizedHtml"></div>
</template>
<script setup lang="ts">
import { ref, watch } from 'vue';
import DOMPurify from 'dompurify'; // 推荐净化库
const userProvidedContent = ref('<img src=https://blog.csdn.net/2402_86373248/article/details/x onerror=alert(1)>');
const sanitizedHtml = ref('');
// 对用户输入进行净化
watch(userProvidedContent, (newVal) => {
sanitizedHtml.value = DOMPurify.sanitize(newVal, {
ALLOWED_TAGS: ['b', 'i', 'em', 'strong', 'a'], // 白名单标签
ALLOWED_ATTR: ['href', 'target'] // 白名单属性
});
});
// 如果必须操作DOM&#https://blog.csdn.net/2402_86373248/article/details/xff0c;使用tehttps://blog.csdn.net/2402_86373248/article/details/xtContent而非innerHTML
document.getElementById('msg').tehttps://blog.csdn.net/2402_86373248/article/details/xtContent = 'Hello, ' + encodeForHTML(username);
</script>
危险模式&#https://blog.csdn.net/2402_86373248/article/details/xff1a;
const userInput = '{"__proto__": {"admin": true}}';
const config = JSON.parse(userInput);
// 错误&#https://blog.csdn.net/2402_86373248/article/details/xff1a;递归合并可能污染原型
Object.assign({}, config);
// 或
_.merge({}, config);
安全模式&#https://blog.csdn.net/2402_86373248/article/details/xff1a;
import merge from 'lodash.merge'; // 使用独立包&#https://blog.csdn.net/2402_86373248/article/details/xff0c;并确保版本>=4.17.19
const userInput = '{"__proto__": {"admin": true}}';
// 方法1&#https://blog.csdn.net/2402_86373248/article/details/xff1a;使用安全的JSON解析&#https://blog.csdn.net/2402_86373248/article/details/xff08;忽略__proto__等特殊属性&#https://blog.csdn.net/2402_86373248/article/details/xff09;
function safeJsonParse(str) {
return JSON.parse(str, (key, value) => {
if (key === '__proto__' || key === 'constructor' || key === 'prototype') {
return undefined; // 丢弃危险属性
}
return value;
});
}
const config = safeJsonParse(userInput);
// 方法2&#https://blog.csdn.net/2402_86373248/article/details/xff1a;使用Object.create(null)创建无原型的对象作为目标
const safeObject = Object.create(null);
Object.assign(safeObject, config);
// 方法3&#https://blog.csdn.net/2402_86373248/article/details/xff1a;使用已知安全的库函数&#https://blog.csdn.net/2402_86373248/article/details/xff08;并保持更新&#https://blog.csdn.net/2402_86373248/article/details/xff09;
const merged = merge({}, config); // lodash.merge >= 4.17.19 已修复
危险模式&#https://blog.csdn.net/2402_86373248/article/details/xff1a;
{
"dependencies": {
"some-package": "*", // 使用通配符&#https://blog.csdn.net/2402_86373248/article/details/xff0c;版本不可控
"lodash": "^4.17.15" // 允许自动升级到非兼容版本&#https://blog.csdn.net/2402_86373248/article/details/xff0c;可能包含新漏洞
}
}
# 随意安装包
npm install random-unknown-package –save
安全模式&#https://blog.csdn.net/2402_86373248/article/details/xff1a;
{
"dependencies": {
"some-package": "1.2.3", // 锁定精确版本
"lodash": "~4.17.19" // 使用波浪符&#https://blog.csdn.net/2402_86373248/article/details/xff0c;允许补丁版本更新&#https://blog.csdn.net/2402_86373248/article/details/xff08;修复安全漏洞&#https://blog.csdn.net/2402_86373248/article/details/xff09;
}
}
配套实践&#https://blog.csdn.net/2402_86373248/article/details/xff1a;
运维侧加固&#https://blog.csdn.net/2402_86373248/article/details/xff1a;配置与架构
在GitLab CI或GitHub Actions中集成安全扫描&#https://blog.csdn.net/2402_86373248/article/details/xff0c;并设置质量门禁。
# .gitlab-ci.yml 示例
stages:
– test
– security
– deploy
audit_dependencies:
stage: security
image: node:18–alpine
script:
– npm ci
– npm audit ––audit–level=high # 如果发现高危漏洞&#https://blog.csdn.net/2402_86373248/article/details/xff0c;任务失败
# 或者使用更严格的门禁&#https://blog.csdn.net/2402_86373248/article/details/xff1a;禁止任何漏洞
# – npm audit || ehttps://blog.csdn.net/2402_86373248/article/details/xit 0 # 仅报告&#https://blog.csdn.net/2402_86373248/article/details/xff0c;不阻塞。或者使用自定义脚本判断。
artifacts:
reports:
cyclonedhttps://blog.csdn.net/2402_86373248/article/details/x: gl–dependency–scanning–report.json
semgrep_scan:
stage: security
image: semgrep/semgrep:latest
script:
– semgrep scan ––config auto ––error ––json > semgrep–report.json
artifacts:
reports:
semgrep: semgrep–report.json
# 定义“安全”阶段必须通过才能进入“部署”阶段
deploy_production:
stage: deploy
script: echo "Deploying…"
rules:
– if: $CI_COMMIT_BRANCH == $CI_DEFAULT_BRANCH
when: on_success # 仅在之前所有阶段&#https://blog.csdn.net/2402_86373248/article/details/xff08;包括security&#https://blog.csdn.net/2402_86373248/article/details/xff09;成功后执行
即使前端代码存在漏洞&#https://blog.csdn.net/2402_86373248/article/details/xff0c;适当的安全响应头也能提供最后一层防护。
# Nginhttps://blog.csdn.net/2402_86373248/article/details/x 配置示例
server {
listen 80;
server_name your-app.com;
# 强制HTTPS (如果已配置SSL)
# return 301 https://$server_name$request_uri;
location / {
root /path/to/your/dist;
indehttps://blog.csdn.net/2402_86373248/article/details/x indehttps://blog.csdn.net/2402_86373248/article/details/x.html;
# 关键安全头
add_header Content-Security-Policy "default-src 'self'; script-src 'self' 'unsafe-inline' https://trusted.cdn.com; style-src 'self' 'unsafe-inline'; img-src 'self' data: https:; connect-src 'self' https://api.your-app.com; frame-ancestors 'none';";
add_header X-Frame-Options "DENY";
add_header X-Content-Type-Options "nosniff";
add_header Referrer-Policy "strict-origin-when-cross-origin";
add_header Permissions-Policy "geolocation=(), microphone=(), camera=()"; # 根据应用需求调整
# 移除可能泄露信息的头
prohttps://blog.csdn.net/2402_86373248/article/details/xy_hide_header X-Powered-By;
server_tokens off;
}
}
Content-Security-Policy (CSP) 是最强大的防XSS利器。它通过白名单控制资源加载。上述策略表示&#https://blog.csdn.net/2402_86373248/article/details/xff1a;
· default-src ‘self’: 默认只允许同源资源。 · script-src … ‘unsafe-inline’: 允许内联脚本&#https://blog.csdn.net/2402_86373248/article/details/xff08;对某些旧框架或SSR是必要的&#https://blog.csdn.net/2402_86373248/article/details/xff0c;理想情况应避免&#https://blog.csdn.net/2402_86373248/article/details/xff09;。 · frame-ancestors ‘none’: 禁止页面被嵌套&#https://blog.csdn.net/2402_86373248/article/details/xff08;防点击劫持&#https://blog.csdn.net/2402_86373248/article/details/xff09;。
检测与响应线索
自动化审计也应产出便于运营团队监控的指标和日志模式。
# 示例&#https://blog.csdn.net/2402_86373248/article/details/xff1a;一个简化的日志监控脚本思路&#https://blog.csdn.net/2402_86373248/article/details/xff08;使用grep&#https://blog.csdn.net/2402_86373248/article/details/xff09;
tail -f /var/log/nginhttps://blog.csdn.net/2402_86373248/article/details/x/access.log | grep –color -E "(<script|onerror=|onload=|eval\\(|document\\.cookie|%3Cscript)"
# 注意&#https://blog.csdn.net/2402_86373248/article/details/xff1a;这只是一个简单示例&#https://blog.csdn.net/2402_86373248/article/details/xff0c;实际中应用更复杂的正则和日志分析系统&#https://blog.csdn.net/2402_86373248/article/details/xff08;如ELK, Splunk&#https://blog.csdn.net/2402_86373248/article/details/xff09;。
第五部分&#https://blog.csdn.net/2402_86373248/article/details/xff1a;总结与脉络 —— 连接与展望
核心要点复盘
知识体系连接
本文是 “现代Web应用安全开发生命周期” 系列中的关键一环。
· 前序基础&#https://blog.csdn.net/2402_86373248/article/details/xff1a; · [《Web安全漏洞原理全解析&#https://blog.csdn.net/2402_86373248/article/details/xff1a;从OWASP Top 10开始》]&#https://blog.csdn.net/2402_86373248/article/details/xff1a;理解XSS、CSRF等漏洞的本质。 · [《安全编码规范&#https://blog.csdn.net/2402_86373248/article/details/xff1a;JavaScript/TypeScript篇》]&#https://blog.csdn.net/2402_86373248/article/details/xff1a;掌握编写安全代码的基础准则。 · 后继进阶&#https://blog.csdn.net/2402_86373248/article/details/xff1a; · [《深入软件供应链安全&#https://blog.csdn.net/2402_86373248/article/details/xff1a;从依赖审计到SBOM生成》]&#https://blog.csdn.net/2402_86373248/article/details/xff1a;更深入地探讨SCA、SBOM&#https://blog.csdn.net/2402_86373248/article/details/xff08;软件物料清单&#https://blog.csdn.net/2402_86373248/article/details/xff09;和代码签名。 · [《DevSecOps实战&#https://blog.csdn.net/2402_86373248/article/details/xff1a;构建自愈合的安全流水线》]&#https://blog.csdn.net/2402_86373248/article/details/xff1a;如何将安全工具链深度集成&#https://blog.csdn.net/2402_86373248/article/details/xff0c;实现自动化修复、漏洞管理、安全度量和文化构建。
进阶方向指引
自检清单
· 是否明确定义了本主题的价值与学习目标&#https://blog.csdn.net/2402_86373248/article/details/xff1f; · 开篇即阐述了前端自动化安全审计在“安全左移”、“全量覆盖”、“数据驱动”三方面的战略价值&#https://blog.csdn.net/2402_86373248/article/details/xff0c;并设定了5个具体、分层的学习目标。 · 原理部分是否包含一张自解释的Mermaid核心机制图&#https://blog.csdn.net/2402_86373248/article/details/xff1f; · 第二部分包含一张详细的“自动化审计引擎工作流”Mermaid流程图&#https://blog.csdn.net/2402_86373248/article/details/xff0c;清晰展示了从触发到反馈的完整流程及SAST、SCA、IAST三大引擎的并行工作与结果整合。 · 实战部分是否包含一个可运行的、注释详尽的代码片段&#https://blog.csdn.net/2402_86373248/article/details/xff1f; · 第三部分提供了完整的Docker Compose配置、漏洞演示项目创建脚本、多个工具&#https://blog.csdn.net/2402_86373248/article/details/xff08;npm audit, OWASP DC, Semgrep, SonarQube&#https://blog.csdn.net/2402_86373248/article/details/xff09;的扫描命令&#https://blog.csdn.net/2402_86373248/article/details/xff0c;以及一个一体化审计脚本audit_frontend.sh&#https://blog.csdn.net/2402_86373248/article/details/xff0c;所有代码均附有详细注释和解释。 · 防御部分是否提供了至少一个具体的安全代码示例或配置方案&#https://blog.csdn.net/2402_86373248/article/details/xff1f; · 第四部分通过 “危险模式 vs 安全模式” 对比&#https://blog.csdn.net/2402_86373248/article/details/xff0c;提供了防御XSS、原型污染的具体代码示例&#https://blog.csdn.net/2402_86373248/article/details/xff1b;同时给出了CI/CD门禁配置片段和Nginhttps://blog.csdn.net/2402_86373248/article/details/x安全响应头配置方案。 · 是否建立了与知识大纲中其他文章的联系&#https://blog.csdn.net/2402_86373248/article/details/xff1f; · 第五部分明确指出了本文在“现代Web应用安全开发生命周期”系列中的位置&#https://blog.csdn.net/2402_86373248/article/details/xff0c;列出了前序文章&#https://blog.csdn.net/2402_86373248/article/details/xff08;漏洞原理、安全编码&#https://blog.csdn.net/2402_86373248/article/details/xff09;和后继文章&#https://blog.csdn.net/2402_86373248/article/details/xff08;供应链安全、DevSecOps&#https://blog.csdn.net/2402_86373248/article/details/xff09;&#https://blog.csdn.net/2402_86373248/article/details/xff0c;构建了知识体系连接。 · 全文是否避免了未定义的术语和模糊表述&#https://blog.csdn.net/2402_86373248/article/details/xff1f; · 所有关键术语&#https://blog.csdn.net/2402_86373248/article/details/xff08;如SAST、SCA、AST、CSP等&#https://blog.csdn.net/2402_86373248/article/details/xff09;在首次出现时均用加粗强调&#https://blog.csdn.net/2402_86373248/article/details/xff0c;并在上下文中给予清晰定义或解释。全文力求论述严谨&#https://blog.csdn.net/2402_86373248/article/details/xff0c;技术描述准确。


评论前必须登录!
注册