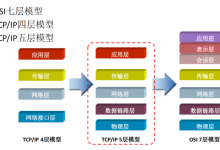
 网硕互联帮助中心
目录
一、架构与脚本
1.1 概况
1.2 建立一个UDP连接
二、内置应用:Application
2.1内置应用
2.2 应用层协议助手类使用的基本步骤:
1. 创建助手类对象:指定两个形参
2. 配置专属属性(可选)
3. 在指定结点上安装应用层协议
4. 设置应用层协议的启动和停止时间
5. 配置trace变量(可选)
2.3 分组产生器
2.3.1. 分组接收器:PacketSink
~examples/tcp/tcp-bulk-send.cc
程序功能和执行逻辑
~examples/routing/simple-global-routing.cc
程序功能与执行逻辑
~src/csma/examples/csma-packet-socket.cc
程序功能与执行逻辑
在脚本中创建应用层协议实际上完成的是制定分组收发规则和调用套接字(API)这两部分操作。
一、架构与脚本
1.1 概况
ns-3应用层协议主要负责数据分组的发送、处理和接收,可以把其看成物理网络中应用程序的网络传输部分
在应用层协议中,分组生成部分负责按照一定的统计规则发送分组;分组处理部分负责接收来自下层协议的分组并对分组相关信息进行记录。
在ns-3中,网络套接字(network socket)【可看作一种应用程序接口】可被分为两大类:
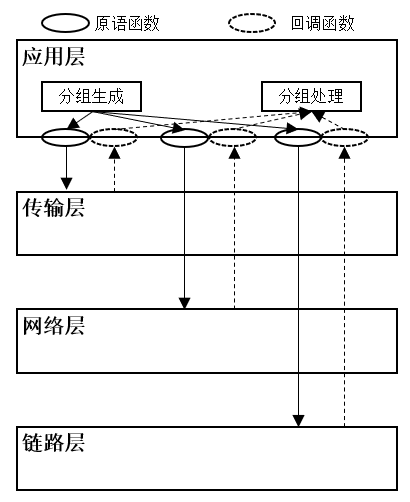
图1-1 ns-3应用层软件架构
ns-3支持的4种套接字类型:与传输层协议交互的流套接字(stream packet)、数据报文套接字(datagram socket)、与网络层协议交互的原始套接字(raw socket)、与链路层交互的Packet套接字(packet socket)。
1.2 建立一个UDP连接
利用UdpClient和UdpServer应用协议的助手类来建立
//创建客户端
UdpClientHelper client(
serverIpv4Address,serverPort);
client.Install(clientNode);
//创建服务器端
UdpServerHelper server(serverPort);
server.Install(serverNode);
2.不使用助手类的情况下实现与UdpClient和UdpServer相类似的功能
//创建客户端
client=Socket::CreateSocket(
clientNode,
"ns3::UdpSocketFactory");
client->Bind();
client->Connect(serverSocketAddress);
client->Send(pakcet);
//创建服务器端
server=Socket::CreateSocket(
serverNode,
"ns3::UdpSocketFactory");
server->Bind(serverSocketAddress);
server->SetRecvCallback(MakeCallback(&ReceivePacket));
二、内置应用:Application
2.1内置应用
内置应用可以分为两类:
- 分组产生器(packet generator):根据不同的统计模型产生数据分组,并不具有信令交互等行为
- 具有信令交互行为的内置应用
表2-1 内置应用层协议
| 应用层协议 | 支持的下层协议种类 | C | S | 支持的对端协议 |
| application模块 | ||||
| PacketSink | 所有 | √ |
OnOffApplication BulkSendAppliction |
|
| OnOffApplication | 所有 | √ | PacketSlink | |
| BUlkSendApplication | TCP | √ | ||
| UdpServer | UDP | √ | UdpClient | |
| UdpClient | √ | UdpServer | ||
| UdpTraceClient | √ | |||
| UdpEchoServer | √ | UdpEchoClient | ||
| UdpEchoClient | √ | UdpEchoServer | ||
| network模块 | ||||
| PacketSocketServer | NetDevice | √ | PacketSocketClient | |
| PacketSocketClient | √ | PacketSocketServer | ||
| internet-app模块 | ||||
| DhcpServer | IPv4 | √ | DhcpClient | |
| DhcpClient | √ | DhcpServer | ||
| V4Ping | √ | √ | V4Ping | |
| Ping6 | IPv6 | √ | √ | Ping6 |
| Radvd | √ | √ |
Radvd |
|
2.2 应用层协议助手类使用的基本步骤:
以PacketSink和BulkSendApplication为例:在结点1(nodes.Get(1),nodes是一个结点容器)中创建了一个BulkSendApplication应用(客户端)。这个应用向位于结点0的PacketSink应用(服务器端)发送TCP分组
//服务器端
//创建助手类对象并配置必备属性
PacketSinkHelper sin(
//下层协议种类(TCP协议)
"ns3::TcpSocketFactory",
//本地监听IP地址(全零地址)及端口属性
InetSocketAddress(Ipv4Address::GetAny(),9));
//在结点中安装服务器端应用层协议
ApplicationContainer sinkApps=
sink.Install(nodes.Get(0));
//设置启动和停止时间属性(批量设置)
sinkApps.Start(Seconds(0.0));
sinkApps.Stop(Seconds(10.0));
//客户端
//创建助手类对象并配置必备属性
BulkSendHelper source(
//下层协议种类
"ns3::TcpSocketFactory",
//服务器IP地址及端口属性
InetSocketAddress("10.0.0.1",9));
//设置其他属性(分组大小SendSize属性)
source.SetAttribute(
"SendSize",
UintegerValue(1024);
//在结点中安装客户端应用层协议
ApplicationContainer sourceApps=
sorce.Install(nodes.Get(1));
//设置启动和停止时间(批量设置)
sourceApps.Start(Seconds(1.0));
sourceApps.Stop(Seconds(10.0));
1. 创建助手类对象:指定两个形参
- 下层协议(套接字)种类:ns3::TcpSocketFactory(TCP)、ns3::UdpSocketFactory(UDP)、ns3::Ipv4RawSocketFactory(IPv4)、ns3::Ipv6RawSocketFactory(IPv6)、ns3::PacketSocketFactory(链路层协议);
- 套接字地址:对于客户端应用,套接字地址为发送分组的目标地址,即服务器端地址;对于服务器端应用,该地址为本地的监听地址。严格地说,这两个套接字地址必须是相同的,但在实际中,服务器端监听套接字中的IP地址常常采用全零IP地址,这样服务器端可以接收所有发往指定端口的分组,而无论其目的的地址是什么。全零地址可以通过Ipv4Address::GetAny()和Ipv6Address::GetAny()函数获取。
2. 配置专属属性(可选)
- 配置Application子类中的属性
3. 在指定结点上安装应用层协议
- ns-3中,协议的安装操作通过助手类中的 Install()函数 完成;
- Install()函数的形参可以是一个结点指针(Ptr<Node> node),也可以是包含多个结点指针的结点容器(NodeContainer);
- 创建好的应用层协议对象被放在应用层容器 ApplicationContainer 中返回
4. 设置应用层协议的启动和停止时间
- 在设置启动和停止时间时,一般秉承“服务器端先启动,后停止”的规则
- ns-3脚本既可以使用应用容器批量设置启动和停止时间,也可以为每一个应用层协议分别设置时间
//批量设置
sinkApps.Start(Seconds(0.0));
sinkApps.Stop(Seconds(10.0));
//单独设置
sinkApp[0].Start(Seconds(0.0));
sinkApp[0].Stop(Seconds(10.0));
5. 配置trace变量(可选)
- BulkSendApplication和PacketSink分别提供了发送(Tx)和接收(Rx)的trace变量
/************配置trace回调函数示例***************/
//分组接收回调函数
void recvPackets(
std::string path,
Ptr<const Packet>packet,
const Address&from);
//分组发送回调函数
void sendPackets(
std::string path,
Ptr<const Packet>packet);
//配置trace变量
Config::Connect(
"/NodeList/0/ApplicationList/*/\\
$ns3::BulkSendApplication/Tx",
MakeCallback(&sendPackets));
Config::Connect("NodeList/*/\\
ApplicationList/*/$ns3::PacketSink/Rx",
MakeCallback(&recvPackets));
所有内置协议助手类的使用方法和顺序都是相同的
2.3 分组产生器
2.3.1. 分组接收器:PacketSink
专门部署在服务器端的应用层协议,可以接收来自TCP、UDP、IPv4、IPv6和NetDevice协议的分组。助手类是PacketSinkHelper。
工作原理:对于接收到的每一个分组,打印其基本信息并记录(通过Rx trace变量),常常与OnOffApplication、BulkSendApplication一起使用
-
~examples/tcp/tcp-bulk-send.cc
/* -*- Mode:C++; c-file-style:"gnu"; indent-tabs-mode:nil; -*- */
/*
* 使用 ns-3 网络模拟器创建的简单点对点网络拓扑,演示了 TCP 大文件传输(BulkSend)场景
*
* This program is distributed in the hope that it will be useful,
* but WITHOUT ANY WARRANTY; without even the implied warranty of
* MERCHANTABILITY or FITNESS FOR A PARTICULAR PURPOSE. See the
* GNU General Public License for more details.
*
* You should have received a copy of the GNU General Public License
* along with this program; if not, write to the Free Software
* Foundation, Inc., 59 Temple Place, Suite 330, Boston, MA 02111-1307 USA
*/
// 拓扑结构:两个节点通过点对点链路连接,带宽 500 Kbps,延迟 5ms
//
// n0 ———– n1
// 500 Kbps
// 5 ms
//
// – Flow from n0 to n1 using BulkSendApplication.
// – Tracing of queues and packet receptions to file "tcp-bulk-send.tr"
// and pcap tracing available when tracing is turned on.
#include <string>
#include <fstream>
#include "ns3/core-module.h"
#include "ns3/point-to-point-module.h"
#include "ns3/internet-module.h"
#include "ns3/applications-module.h"
#include "ns3/network-module.h"
#include "ns3/packet-sink.h"// 数据包接收器类
using namespace ns3;
NS_LOG_COMPONENT_DEFINE ("TcpBulkSendExample");
int
main (int argc, char *argv[])
{
bool tracing = false;
uint32_t maxBytes = 0;
//
// Allow the user to override any of the defaults at
// run-time, via command-line arguments
//
CommandLine cmd (__FILE__);
cmd.AddValue ("tracing", "Flag to enable/disable tracing", tracing);//tracing: 控制是否启用跟踪
cmd.AddValue ("maxBytes",
"Total number of bytes for application to send", maxBytes);//maxBytes: 应用程序要发送的总字节数(0表示无限制)
cmd.Parse (argc, argv);
//
// Explicitly create the nodes required by the topology (shown above).
//
NS_LOG_INFO ("Create nodes.");
NodeContainer nodes;
nodes.Create (2);// 创建 2 个节点
NS_LOG_INFO ("Create channels.");
//
// Explicitly create the point-to-point link required by the topology (shown above).
//创建带宽为 500 Kbps,延迟为 5ms 的点对点链路
PointToPointHelper pointToPoint;
pointToPoint.SetDeviceAttribute ("DataRate", StringValue ("500Kbps"));
pointToPoint.SetChannelAttribute ("Delay", StringValue ("5ms"));
NetDeviceContainer devices;
devices = pointToPoint.Install (nodes);
//
// Install the internet stack on the nodes
//
InternetStackHelper internet;
internet.Install (nodes);// 在两个节点上安装 TCP/IP 协议栈
//
// We've got the "hardware" in place. Now we need to add IP addresses.
//
NS_LOG_INFO ("Assign IP Addresses.");
Ipv4AddressHelper ipv4;
ipv4.SetBase ("10.1.1.0", "255.255.255.0");//分配 IP 地址:n0 得到 10.1.1.1,n1 得到 10.1.1.2
Ipv4InterfaceContainer i = ipv4.Assign (devices);
NS_LOG_INFO ("Create Applications.");
//
// 创建 BulkSend 发送应用(在 n0 上)
//
uint16_t port = 9; // well-known echo port number
BulkSendHelper source ("ns3::TcpSocketFactory",
InetSocketAddress (i.GetAddress (1), port));
// 创建一个持续发送数据的 TCP 应用,maxBytes=0 表示无限制发送,直到模拟结束
source.SetAttribute ("MaxBytes", UintegerValue (maxBytes));
ApplicationContainer sourceApps = source.Install (nodes.Get (0));
sourceApps.Start (Seconds (0.0));
sourceApps.Stop (Seconds (10.0));
//
// 创建 PacketSink 接收应用(在 n1 上)
//
PacketSinkHelper sink ("ns3::TcpSocketFactory",
InetSocketAddress (Ipv4Address::GetAny (), port));
ApplicationContainer sinkApps = sink.Install (nodes.Get (1));
sinkApps.Start (Seconds (0.0));
sinkApps.Stop (Seconds (10.0));
//
// 配置跟踪(可选)
//
if (tracing)
{
AsciiTraceHelper ascii;
pointToPoint.EnableAsciiAll (ascii.CreateFileStream ("tcp-bulk-send.tr"));
pointToPoint.EnablePcapAll ("tcp-bulk-send", false);
}
//生成 ASCII 格式跟踪文件 "tcp-bulk-send.tr"
//生成 PCAP 格式跟踪文件,可用于 Wireshark 分析
//
// Now, do the actual simulation.
//
NS_LOG_INFO ("Run Simulation.");
Simulator::Stop (Seconds (10.0));// 设置模拟停止时间
Simulator::Run ();
Simulator::Destroy ();
NS_LOG_INFO ("Done.");
// 获取并输出统计信息
Ptr<PacketSink> sink1 = DynamicCast<PacketSink> (sinkApps.Get (0));
std::cout << "Total Bytes Received: " << sink1->GetTotalRx () << std::endl;
}
程序功能和执行逻辑
1、网络拓扑:n0(10.1.1.1)—–[500kbps,5ms]—–n1(10.1.1.2)
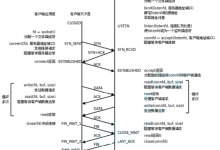
2、TCP连接建立过程(三次握手):
0.0s:n0启动BulkSend 应用,n1 启动 PacketSink 应用
n0 向 n1 发起 TCP 连接(SYN)
n1 回复 SYN-ACK
n0 发送 ACK,连接建立
3、数据传输过程:
-
TCP 流控制:ns-3 中的 TCP 实现会自动进行拥塞控制
-
数据传输:n0 持续发送数据,直到:达到 maxBytes 限制或到达停止时间
-
接收确认:n1 接收数据并发送 ACK
4、执行时间线:
| 时间(秒) | 事件 |
| 0.0 | TCP连接建立开始,数据传输开始 |
| … | 数据传输进行中 |
| 9.999+ | n0发送最后一个数据包 |
| 10.0 |
应用程序停止,TCP可ianjie正常关闭 |
| 10.0+ | 模拟结束 |
5、关键特点:
BulkSendApplication 特性
-
持续生成数据并尽可能快地发送
-
使用 TCP 协议,确保可靠传输
-
自动处理 TCP 的流控制和拥塞控制
TCP 协议栈配置
程序使用了 ns-3 的默认 TCP 实现(通常是 TcpNewReno),包括:
慢启动:连接开始时指数增长拥塞窗口
拥塞避免:拥塞窗口线性增长
快速重传/快速恢复:处理丢包情况
链路容量与理论最大传输量
-
链路带宽:500 Kbps = 62.5 KB/s
-
模拟时间:10 秒
-
理论最大传输量:62.5 KB/s × 10s = 625 KB
-
考虑 TCP 建立/关闭开销和拥塞控制,实际传输量会略低于此值
6、输出结果分析
程序最后输出的 "Total Bytes Received" 可以用于:
- 计算吞吐量:总字节数/传输时间
- 评估TCP性能:比较世纪吞吐量与理论最大值
- 分析效率:考虑TCP开销后的实际效率
-
~examples/routing/simple-global-routing.cc
/* -*- Mode:C++; c-file-style:"gnu"; indent-tabs-mode:nil; -*- */
/*
* 使用 ns-3 网络模拟器创建的星型网络拓扑示例,演示了全局路由和多个数据流(UDP)的场景
*
*
*/
//拓扑结构:节点 n2 作为中心节点,连接 n0、n1 和 n3
// Network topology
//
// n0
// \\ 5 Mb/s, 2ms
// \\ 1.5Mb/s, 10ms
// n2 ————————-n3
// /
// / 5 Mb/s, 2ms
// n1
//
// – all links are point-to-point links with indicated one-way BW/delay
// – CBR/UDP flows from n0 to n3, and from n3 to n1
// – FTP/TCP flow from n0 to n3, starting at time 1.2 to time 1.35 sec.
// – UDP packet size of 210 bytes, with per-packet interval 0.00375 sec.
// (i.e., DataRate of 448,000 bps)
// – DropTail queues
// – Tracing of queues and packet receptions to file "simple-global-routing.tr"
#include <iostream>
#include <fstream>
#include <string>
#include <cassert>
#include "ns3/core-module.h"
#include "ns3/network-module.h"
#include "ns3/internet-module.h"
#include "ns3/point-to-point-module.h"
#include "ns3/applications-module.h"
#include "ns3/flow-monitor-helper.h"//流量监控助手
#include "ns3/ipv4-global-routing-helper.h"//全局路由助手
using namespace ns3;
NS_LOG_COMPONENT_DEFINE ("SimpleGlobalRoutingExample");
int
main (int argc, char *argv[])
{
// Users may find it convenient to turn on explicit debugging
// for selected modules; the below lines suggest how to do this
#if 0
LogComponentEnable ("SimpleGlobalRoutingExample", LOG_LEVEL_INFO);
#endif
//配置默认参数: 设置 OnOff 应用的默认数据包大小(210字节)和数据速率(448 kbps)
Config::SetDefault ("ns3::OnOffApplication::PacketSize", UintegerValue (210));
Config::SetDefault ("ns3::OnOffApplication::DataRate", StringValue ("448kb/s"));
//DefaultValue::Bind ("DropTailQueue::m_maxPackets", 30);//队列长度设置为30
// 命令行参数处理: –EnableMonitor 来控制是否启用流量监控
// DefaultValue::Bind ()s at run-time, via command-line arguments
CommandLine cmd (__FILE__);
bool enableFlowMonitor = false;
cmd.AddValue ("EnableMonitor", "Enable Flow Monitor", enableFlowMonitor);
cmd.Parse (argc, argv);
// Here, we will explicitly create four nodes. In more sophisticated
// topologies, we could configure a node factory.
NS_LOG_INFO ("Create nodes.");
NodeContainer c;
c.Create (4);//创建4个节点,定义三个点对点连接
NodeContainer n0n2 = NodeContainer (c.Get (0), c.Get (2));
NodeContainer n1n2 = NodeContainer (c.Get (1), c.Get (2));
NodeContainer n3n2 = NodeContainer (c.Get (3), c.Get (2));
InternetStackHelper internet;
internet.Install (c);//在所有节点上安装TCP/IP协议栈
// 创建点对点链路和设备
NS_LOG_INFO ("Create channels.");
PointToPointHelper p2p;
p2p.SetDeviceAttribute ("DataRate", StringValue ("5Mbps"));
p2p.SetChannelAttribute ("Delay", StringValue ("2ms"));
NetDeviceContainer d0d2 = p2p.Install (n0n2);//n0-n2链路:5Mbps,2ms
NetDeviceContainer d1d2 = p2p.Install (n1n2);//n1-n2链路:5Mbps,2ms
p2p.SetDeviceAttribute ("DataRate", StringValue ("1500kbps"));
p2p.SetChannelAttribute ("Delay", StringValue ("10ms"));
NetDeviceContainer d3d2 = p2p.Install (n3n2);//n3-n2链路:1.5Mbps,10ms
// 分配IP地址
NS_LOG_INFO ("Assign IP Addresses.");
Ipv4AddressHelper ipv4;
ipv4.SetBase ("10.1.1.0", "255.255.255.0");
Ipv4InterfaceContainer i0i2 = ipv4.Assign (d0d2);//n0-n2:10.1.1.0/24
ipv4.SetBase ("10.1.2.0", "255.255.255.0");
Ipv4InterfaceContainer i1i2 = ipv4.Assign (d1d2);//n1-n2:10.1.2.0/24
ipv4.SetBase ("10.1.3.0", "255.255.255.0");
Ipv4InterfaceContainer i3i2 = ipv4.Assign (d3d2);//n3-n2:10.1.3.0/24
// 配置全局路由:计算并安装全局路由表,让所有节点知道如何到达网络中的所有其他节点
Ipv4GlobalRoutingHelper::PopulateRoutingTables ();
// 创建应用程序
// 210 bytes at a rate of 448 Kb/s
NS_LOG_INFO ("Create Applications.");
//第一个 UDP 流(n0 → n3)
uint16_t port = 9; // Discard port (RFC 863)
OnOffHelper onoff ("ns3::UdpSocketFactory",
Address (InetSocketAddress (i3i2.GetAddress (0), port)));
onoff.SetConstantRate (DataRate ("448kb/s"));
ApplicationContainer apps = onoff.Install (c.Get (0));//安装在n0
apps.Start (Seconds (1.0));
apps.Stop (Seconds (10.0));
//创建第一个数据包接收器(在 n3)
PacketSinkHelper sink ("ns3::UdpSocketFactory",
Address (InetSocketAddress (Ipv4Address::GetAny (), port)));
apps = sink.Install (c.Get (3));// 在 n3 上安装接收器
apps.Start (Seconds (1.0));
apps.Stop (Seconds (10.0));
// 创建第二个 UDP 流(n3 → n1)
onoff.SetAttribute ("Remote",
AddressValue (InetSocketAddress (i1i2.GetAddress (0), port)));
apps = onoff.Install (c.Get (3));// 安装在 n3
apps.Start (Seconds (1.1)); // 比第一个流晚 0.1 秒开始
apps.Stop (Seconds (10.0));
// 创建第二个数据包接收器(在 n1
apps = sink.Install (c.Get (1));// 在 n1 上安装接收器
apps.Start (Seconds (1.1));
apps.Stop (Seconds (10.0));
//配置跟踪:启用 ASCII 跟踪和 PCAP 跟踪,用于后续分析
AsciiTraceHelper ascii;
p2p.EnableAsciiAll (ascii.CreateFileStream ("simple-global-routing.tr"));
p2p.EnablePcapAll ("simple-global-routing");
// 流量监控(可选):如果命令行参数启用了流量监控,则安装流量监控器
FlowMonitorHelper flowmonHelper;
if (enableFlowMonitor)
{
flowmonHelper.InstallAll ();
}
//运行模拟
NS_LOG_INFO ("Run Simulation.");
Simulator::Stop (Seconds (11)); // 停止时间比应用停止时间晚1秒
Simulator::Run ();
NS_LOG_INFO ("Done.");
if (enableFlowMonitor)
{
flowmonHelper.SerializeToXmlFile ("simple-global-routing.flowmon", false, false);
}
Simulator::Destroy ();
return 0;
}
程序功能与执行逻辑
1、网络拓扑详情:
| 节点连接: | |
| n0-n2 | 5Mbps,2ms延迟 |
| n1-n2 | 5Mbps,2ms延迟 |
| n3-n2 | 1.5Mbps,10ms延迟 |
| IP地址分配: |
| -n0:10.1.1.1(接口连接到n2) |
| -n1:10.1.2.1(接口连接到n2) |
| -n2:10.1.1.2,10.1.2.2,10.1.3.1(三个接口) |
| -n3:10.1.3.2(接口连接到n2) |
2、数据流详情:
- 流1:n0-n3(UDP)
开始时间:1.0s
结束时间:10.0s
数据速率:448kbps
数据包大小:210字节
路径:n0-n2-n3
- 流2:n3-n1(UDP)
开始时间:1.1s
结束时间:10.0s
数据速率:448kbps
数据包大小:210字节
路径:n3-n2-n1
3、执行时间:
| 时间(秒) | 事件 |
| 0.0 | 模拟开始,路由表建立 |
| 1.0 | n0开始向n3发送UDP数据,n3开始接收 |
| 1.1 | n3开始向n1发送UDP数据,n1开始接收 |
| 10.0 | 所有发送应用停止 |
| 10.0 | 所有接收应用停止(实际上接受器会继续接收已经在途的数据包) |
| 11.0 | 模拟结束 |
4、路由机制:
-
使用 Ipv4GlobalRoutingHelper::PopulateRoutingTables() 自动计算最佳路由
-
n2 作为路由器,负责转发 n0-n3 和 n3-n1 之间的数据包
-
路由表基于链路成本(带宽和延迟)自动计算
5、关键特点:
-
不对称链路带宽:n2-n3 链路(1.5 Mbps)比其他链路(5 Mbps)慢,可能成为瓶颈
-
多跳通信:n0 和 n3 之间的通信需要经过 n2 转发
-
全局路由:自动计算和配置所有节点的路由表
-
并发 UDP 流:两个方向相反的 UDP 数据流同时运行
-
完整的协议栈:使用 TCP/IP 协议栈,而不仅仅是原始数据包
6、输出文件:
-
simple-global-routing.tr:ASCII 格式的网络事件跟踪
-
simple-global-routing-0-1.pcap 等:每个节点的 PCAP 文件,可用 Wireshark 分析
-
simple-global-routing.flowmon(可选):如果启用流量监控,生成 XML 格式的流量统计
-
~src/csma/examples/csma-packet-socket.cc
/* -*- Mode:C++; c-file-style:"gnu"; indent-tabs-mode:nil; -*- */
/*
使用 ns-3 网络模拟器创建的 CSMA(载波侦听多路访问)网络示例
演示了原始数据包套接字(Packet Socket)通信
*/
//网络拓扑说明:4个节点通过一个共享的 CSMA 总线连接
//
//
// n0 n1 n2 n3
// | | | |
// =====================
//
// – Two packet socket flows: from n0 to n1 and from n3 to n0
// – Default 512 byte packets generated by traffic generator
// – Output from the PacketSink trace source will be sent to the
// csma-packet-socket-sink.tr file
// ASCII trace output will be sent to the csma-packet-socket.tr file
#include <iostream>
#include <fstream>
#include <string>
#include <cassert>
#include "ns3/core-module.h"//ns3核心模块
#include "ns3/network-module.h"//网络模块
#include "ns3/csma-module.h"//CSMA模块
#include "ns3/applications-module.h"//应用层模块
using namespace ns3;
NS_LOG_COMPONENT_DEFINE ("CsmaPacketSocketExample");
std::ofstream g_os;//全局变量:全局输出文件流
//回调函数:该回调函数在PacketSink接收到数据包时被调用,将数据包大小写入文件
static void
SinkRx (std::string path, Ptr<const Packet> p, const Address &address)
{
g_os << p->GetSize () << std::endl;//记录接收到的数据包大小
}
//主函数
int
main (int argc, char *argv[])
{
#if 0
LogComponentEnable ("CsmaPacketSocketExample", LOG_LEVEL_INFO);
#endif
//打开输出文件,用于记录接收到的数据包信息
CommandLine cmd (__FILE__);
cmd.Parse (argc, argv);
g_os.open ("csma-packet-socket-sink.tr",std::ios_base::binary | std::ios_base::out);
// 创建网络结点
NS_LOG_INFO ("Create nodes.");
NodeContainer nodes;
nodes.Create (4);
//安装PacketSocket
PacketSocketHelper packetSocket;
packetSocket.Install (nodes);//在所有结点上安装原始数据包套接字
// 创建CSMA信道和设备
NS_LOG_INFO ("Create channels.");
Ptr<CsmaChannel> channel = CreateObjectWithAttributes<CsmaChannel> (
"DataRate", DataRateValue (DataRate (5000000)),//5Mbps
"Delay", TimeValue (MilliSeconds (2)));//2ms 迟延
// use a helper function to connect our nodes to the shared channel.
NS_LOG_INFO ("Build Topology.");
CsmaHelper csma;
csma.SetDeviceAttribute ("EncapsulationMode", StringValue ("Llc"));//LLC封装
NetDeviceContainer devs = csma.Install (nodes, channel);//安装CSMA设备
NS_LOG_INFO ("Create Applications.");
//创建应用程序-两个数据流
//第一个数据流:从节点0到节点1
PacketSocketAddress socket;
socket.SetSingleDevice (devs.Get (0)->GetIfIndex ());//使用节点0的设备
socket.SetPhysicalAddress (devs.Get (1)->GetAddress ());//目标:节点1的MAC地址
socket.SetProtocol (2);//协议号2
OnOffHelper onoff ("ns3::PacketSocketFactory", Address (socket));
onoff.SetConstantRate (DataRate ("500kb/s"));//500 Kbps恒定速率
ApplicationContainer apps = onoff.Install (nodes.Get (0));//安装在节点0
apps.Start (Seconds (1.0));
apps.Stop (Seconds (10.0));
//第二个数据流:从节点3到节点0
socket.SetSingleDevice (devs.Get (3)->GetIfIndex ());//使用节点3的设备
socket.SetPhysicalAddress (devs.Get (0)->GetAddress ());//目标:节点0的MAC地址
socket.SetProtocol (3);//协议号3
onoff.SetAttribute ("Remote", AddressValue (socket));
apps = onoff.Install (nodes.Get (3));//安装在节点3
apps.Start (Seconds (1.0));
apps.Stop (Seconds (10.0));
// 创建数据包接收器(Packet Sink)
PacketSinkHelper sink = PacketSinkHelper ("ns3::PacketSocketFactory",
socket);
apps = sink.Install (nodes.Get (0));//在节点0上安装接受其
apps.Start (Seconds (0.0));
apps.Stop (Seconds (20.0));
// While the below trace sink is hooked to all nodes (the wildcard "*")
// only one packet sink (on node 0) is actually added above, so
// only the receive events on node 0 will be traced
//连接跟踪回调:将所有的 PacketSink 接收事件连接到 SinkRx 回调函数
Config::Connect ("/NodeList/*/ApplicationList/*/$ns3::PacketSink/Rx",
MakeCallback (&SinkRx));
// Configure tracing of all enqueue, dequeue, and NetDevice receive events
// Trace output will be sent to the csma-packet-socket.tr file
NS_LOG_INFO ("Configure Tracing.");
//启用ASCII跟踪:记录所有节点的网络事件到 ASCII 文件
AsciiTraceHelper ascii;
csma.EnableAsciiAll (ascii.CreateFileStream ("csma-packet-socket.tr"));
//运行模拟和清理
NS_LOG_INFO ("Run Simulation.");
Simulator::Run ();//运行模拟
Simulator::Destroy ();//清理模拟器
NS_LOG_INFO ("Done.");//关闭输出文件
g_os.close ();
return 0;
}
程序功能与执行逻辑
1、主要功能:
- 创建网络拓扑:4个节点通过共享CSMA总线连接
- 创建两个原始数据包流:
流1:节点0–>节点1.使用协议号2,500kbps
流2:节点3 → 节点0,使用协议号3,500 kbps
- 数据包接收:在节点0上安装 PacketSink,接收来自节点3的数据包
- 数据包收集:
将接收到的数据包大小记录到 csma-packet-socket-sink.tr
将网络事件记录到 csma-packet-socket.tr
2、执行时间线:
| 时间(秒) | 事件 |
| 0.0 | 节点0的PacketSink开始监听 |
| 1.0 | 节点0和节点3开始发送数据 |
| 10.0 | 节点0和节点3停止发送数据 |
| 20.0 | 节点0的PacketSink停止监听,模拟结束 |
3、关键特点:
- 使用原始数据包套接字:不依赖IP协议栈,直接在数据链路层通信
- CSMA/CD协议:模拟以太网的多路访问特性
- 两个独立的数据流:使用不同的协议号进行区分
- 非对称通信:节点0既发送又接收、节点1只接收、节点3只发送、节点2是空闲节点
4、输出文件:
-
csma-packet-socket-sink.tr:包含所有接收到的数据包大小
-
csma-packet-socket.tr:包含详细的网络事件(排队、发送、接收等)


评论前必须登录!
注册