 网硕互联帮助中心
前言
这段时间经常听到说用服务器安装哪吒探针检测自己的服务器,今天我也来试试搭建一个适用一下。今天还是用海外云服务器 VMRack 的机器。三网精品线路不管是平时还是晚上高峰期时网速都很稳定,最主要的是价格便宜。
安装 docker
不知道安装命令的可以到官网上去查找,一定要根据自己服务器的系统执行相应的命令。
默认使用 root 用户
export DOWNLOAD_URL="https://mirrors.tuna.tsinghua.edu.cn/docker-ce"
# 如您使用 curl
curl -fsSL https://raw.githubusercontent.com/docker/docker-install/master/install.sh | sh
# 如您使用 wget
wget -O- https://raw.githubusercontent.com/docker/docker-install/master/install.sh | sh
curl https://c.ysicing.net/oss/scripts/docker.sh | bash
初始化 docker
curl https://c.ysicing.net/oss/scripts/dockerconfig.sh | bash
哪吒配置文件
创建目录
mkdir nezha
touch nezha/config.yaml
哪吒的配置文件 config.yaml, 示例如下
AvgPingCount: 2
Cover: 0
DDNS:
AccessID: ""
AccessSecret: ""
Enable: false
MaxRetries: 3
Provider: webhook
WebhookHeaders: ""
WebhookMethod: POST
WebhookRequestBody: ""
WebhookURL: ""
Debug: false
EnableIPChangeNotification: false
EnablePlainIPInNotification: false
GRPCHost: agent.nzops.ysicing.net
GRPCPort: 5555
HTTPPort: 80
IPChangeNotificationTag: default
IgnoredIPNotification: ""
IgnoredIPNotificationServerIDs: {}
Language: zh-CN
Location: Asia/Shanghai
MaxTCPPingValue: 500
Oauth2:
Admin: admin
ClientID: 19507d56-xxxx
ClientSecret: gto_xxxx
Endpoint: https://gitea.local
Type: gitea
ProxyGRPCPort: 0
Site:
Brand: Monitor
CookieName: ops-dashboard
CustomCode: <script async src="https://umami.external.ysicing.net/script.js" data-website-id="c"></script>
DashboardTheme: default
Theme: default
ViewPassword: ""
TLS: false
这里说下几个比较重要的地方
-
GRPCHost: agent 连接地址
-
Oauth2 配置的地方,我示例的是用 Gitea,由于某些因素,哪吒监控只支持 Oauth2 方式,常见使用 Github 方式
哪吒监控接入 Github、Gitlab、Gitee、Gitea 作为后台管理员账号,这里主要已常见的 Github 和我自用的 Gitea 为例。
Github 方式
登录 Github 后,打开 Oauth App
-
Application name – 随意填写。
-
Homepage URL – 填写面板的访问域名,如:"http://dashboard.example.com"(你的域名)。
-
Authorization callback URL – 填写回调地址,如:"http://dashboard.example.com/oauth2/callback"(不要忘记 /oauth2/callback)。
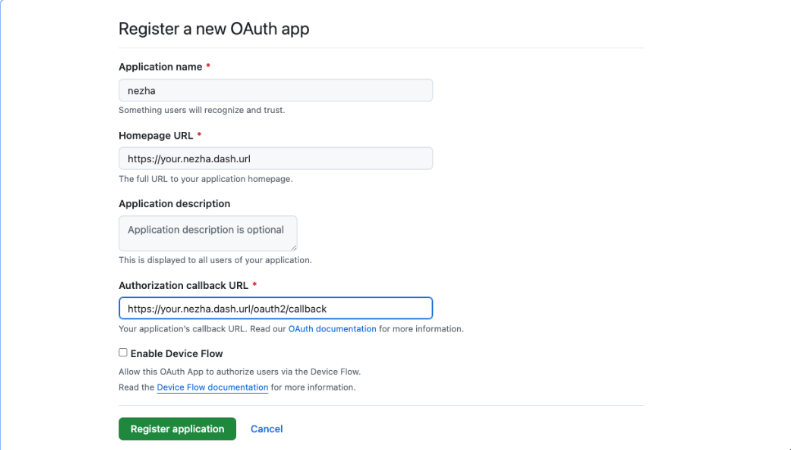
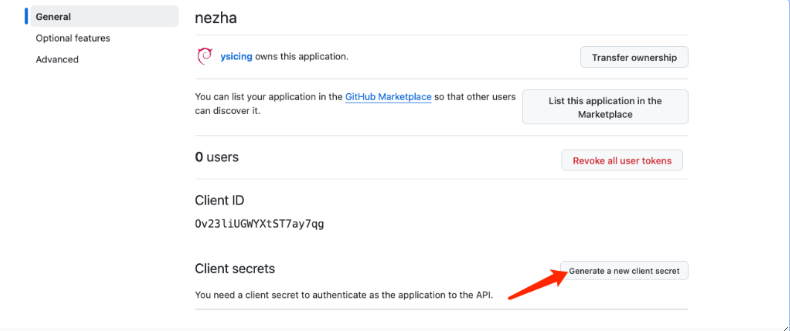
保存页面中的 Client ID,然后点击 “Generate a new client secret“,创建一个新的 Client Secret,新建的密钥仅会显示一次,请妥善保存。
配置文件
Oauth2:
Admin: ysicing #你的github账号
ClientID: 19507d56-xxxx # github clientid
ClientSecret: gto_xxxx # github client secret
Type: github
部署仪表面板
services:
nezha-dash:
container_name: nezha-dash
image: ccr.ccs.tencentyun.com/k7scn/nezha-dash
restart: always
environment:
– NezhaBaseUrl="哪吒面包URL"
– NezhaAuth=your-nezha-api-token
ports:
– "3000:3000"
利用Cloudflare Tunnel部署哪吒探针
有一种更简单、更安全的方法可以保护您的应用程序和web服务器免受直接攻击:Cloudflare Tunnel。可以借助Cloudflare完全免费的Tunnel服务,快速安全地加密应用程序到任何类型基础设施的流量,让您能够隐藏你的web服务器IP地址,阻止直接攻击。Tunnel后台程序在源web服务器和Cloudflare最近的数据中心之间创建一条加密隧道,同时无需打开任何公共入站端口。使用防火墙锁定所有源服务器端口和协议后,HTTP/S端口上的任何请求都会被丢弃,包括容量耗尽DDoS攻击。数据泄露尝试被完全阻止,例如传输中数据窥探或暴力登录攻击。同时Tunnel支持gRPC的流量转发,用来配置哪吒探针也没有问题。
配置Cloudflare Tunnel
Cloudflare Tunnel支持多种部署方式,并且平台的适配也很完善,具体项目信息可以从Github上查看。下面以Debian为例,简单介绍一下安装方法。
在Cloudflare Dashboard中新建一个隧道,之后你可以获得一串密钥,之后下载合适的deb安装包
curl -L –output cloudflared.deb https://github.com/cloudflare/cloudflared/releases/latest/download/cloudflared-linux-arm64.deb
然后可以直接使用一键安装
sudo dpkg -i cloudflared.deb && sudo cloudflared service install eyJhI…
注意:这样通过官网service install一键安装的方式需要在/etc/systemd/system/cloudflared.service中增加–protocol http2参数
ExecStart=/usr/bin/cloudflared –no-autoupdate tunnel run –protocol http2 –token eyJhI…
更推荐使用Docker安装,部署方式如下:
docker run -d \\
–name cloudflared \\
–restart always \\
–network host \\
cloudflare/cloudflared:latest \\
tunnel –no-autoupdate –edge-ip-version auto run –protocol http2 –token eyJhI…
官方只提供amd64及arm64的docker镜像,其他架构可考虑采用第三方镜像:
docker run -d \\
–name cloudflared \\
–restart always \\
–network host \\
laveao/cloudflared:latest \\
tunnel –no-autoupdate –edge-ip-version auto run –protocol http2 –token eyJhI…
配置隧道时如果你直接穿透web服务,你可以设置到目标端口,如http://0.0.0.0:12345。反代哪吒面板需要采用Tunnel+Nginx这样的组合,你的服务必须使用https协议,设置Service为https://0.0.0.0:443,同时需要打开No TLS Verify和HTTP2 connection Origin,并配置好Server Name和HTTP Host Header。
部署哪吒探针
哪吒探针的部署官网很详细,你可以轻松的使用Docker部署
docker run -d \\
–name nezha \\
–restart always \\
–network host \\
-v /opt/nezha/dashboard/data:/dashboard/data \\
ghcr.io/nezhahq/nezha
新版哪吒拉取镜像启动后在设置页面即可配置config.yaml,无需提前写好配置文件。
进阶:如果想要自定义前端主题可以添加前端文件目录的映射,具体如下:
docker run -d \\
–name nezha \\
–restart always \\
–network host \\
-v /opt/nezha/dashboard/data:/dashboard/data \\
-v /opt/nezha/dashboard/user-dist:/dashboard/user-dist \\
ghcr.io/nezhahq/nezha
映射后需要在GitHub下载主题并解压到/opt/nezha/dashboard/user-dist内并docker restart nezha重启容器,即可应用主题。附上新版哪吒的默认前端Nazhe Dash。
部署Nginx转发
这块比较简单,可以通过监控/proto.NezhaService,区分不同流量,直接贴出我的配置供参考,证书位置,端口等视情况修改。
server {
listen 443 ssl;
listen [::]:443 ssl;
http2 on;
server_tokens off;
ssl_certificate /opt/cert/web.crt;
ssl_certificate_key /opt/cert/web.key;
ssl_session_timeout 1d;
ssl_session_tickets off;
ssl_protocols TLSv1.2 TLSv1.3;
ssl_ciphers HIGH:!aNULL:!MD5;
ssl_prefer_server_ciphers on;
server_name status.canghai.org;
underscores_in_headers on;
set_real_ip_from 0.0.0.0/0;
real_ip_header CF-Connecting-IP;
location ^~ /proto.NezhaService/ {
grpc_set_header Host $host;
grpc_set_header nz-realip $http_cf_connecting_ip;
grpc_read_timeout 600s;
grpc_send_timeout 600s;
grpc_socket_keepalive on;
client_max_body_size 10m;
grpc_buffer_size 4m;
grpc_pass grpc://dashboard;
}
location ~* ^/api/v1/ws/(server|terminal|file)(.*)$ {
proxy_set_header Host $host;
proxy_set_header nz-realip $http_cf_connecting_ip;
proxy_set_header Origin https://$host;
proxy_set_header Upgrade $http_upgrade;
proxy_set_header Connection "upgrade";
proxy_read_timeout 3600s;
proxy_send_timeout 3600s;
proxy_pass http://127.0.0.1:5015;
}
location / {
proxy_set_header Host $host;
proxy_set_header nz-realip $http_cf_connecting_ip;
proxy_read_timeout 3600s;
proxy_send_timeout 3600s;
proxy_buffer_size 128k;
proxy_buffers 4 256k;
proxy_busy_buffers_size 256k;
proxy_max_temp_file_size 0;
proxy_pass http://127.0.0.1:5015;
}
}
upstream dashboard {
server 127.0.0.1:5015;
keepalive 512;
}
探针自定义代码
前端自定义
<link rel="stylesheet" href="https://registry.npmmirror.com/lxgw-wenkai-screen-web/latest/files/style.css" />
<style>
* {
font-family: LXGW WenKai Screen !important;
}
#root > div > main > div.mx-auto.w-full.max-w-5xl.px-0 > div > section > button:nth-child(1) {
display: none !important;
}
#root > div > main > div.mx-auto.w-full.max-w-5xl.px-0 > div > section > button:nth-child(2) {
display: none !important;
}
#root > div > main > div:nth-child(1) > section.mt-10.flex.flex-col.md\\:mt-16.header-timer {
display: none !important;
}
#root > div > main > div:nth-child(1) > section.flex.items-center.justify-between.header-top > section.flex.items-center.gap-2.header-handles > div {
display: none !important;
}
#root > div > main > div:nth-child(1) > div > div {
display: none !important;
}
#root > div > main > div.mx-auto.w-full.max-w-5xl.px-0 > section.grid.grid-cols-2.gap-4.lg\\:grid-cols-4.server-overview {
display: none !important;
}
#root > div > main > footer > section {
display: none !important;
}
</style>
<script>
window.CustomLogo = "https://status.canghai.org/dashboard/logo.svg";
window.ForceUseSvgFlag = true;
window.ForcePeakCutEnabled = true;
const isMobile = window.matchMedia("(max-width: 768px)").matches;
window.ForceCardInline = !isMobile;
</script>
后端自定义
<link rel="stylesheet" href="https://registry.npmmirror.com/lxgw-wenkai-screen-web/latest/files/style.css" />
<style>
html {
font-family: LXGW WenKai Screen !important;
}
</style>
<script>
window.DisableAnimatedMan = true;
</script>
总结
以上就是博主分享的两种安装哪吒探针的方式,各有各的优点。第一种对服务器的性能要求较高,第二种借助了大厂Cloudflare 的优势安装更加的简单。
本文首发于我的博客:landonVPS


评论前必须登录!
注册