 网硕互联帮助中心
点此查看 所有教程、项目、源码导航
文章目录
- 1. 需求说明
- 2. 实现思路
- 3. 分步讲解
-
- 3.1 HTML 结构、CSS样式
- 3.2 获取页面元素
- 3.3 读取本地存储里面的待办数据
- 3.4 封装渲染函数
- 3.5 新增待办逻辑
- 4. 完整可运行代码
- 5. 重点复盘
1. 需求说明
我们来实现一个极简的待办事项,是前端入门很经典的案例。 功能清单:
知识点回顾:
- localStorage 只能保存字符串
- 数组需要先用 JSON.stringify 序列化为 JSON 字符串再存入
- 读取的时候用 JSON.parse 把字符串转回 JS 数组
2. 实现思路
3. 分步讲解
3.1 HTML 结构、CSS样式
输入框、新增按钮,列表容器
<input type="text" id="todoInput" placeholder="请输入待办事项">
<button id="addBtn">新增待办</button>
<ul id="todoList"></ul>
效果: 
CSS部分如下,当然如果只是为了学习本地存储的话,CSS这一部分代码可以不看:
<style>
/* 全局重置,清除默认内外边距,统一盒模型 */
* {
margin: 0;
padding: 0;
box-sizing: border-box;
}
/* 页面主体样式:居中、设置背景色、字体 */
body {
width: 600px;
margin: 50px auto;
font-family: "Microsoft Yahei", sans-serif;
background-color: #f5f7fa;
}
/* 标题样式 */
h2 {
text-align: center;
color: #333;
margin-bottom: 20px;
}
/* 输入区域容器,弹性布局,控制输入框和按钮间距 */
.input-wrap {
display: flex;
gap: 10px;
margin-bottom: 20px;
}
/* 输入框样式,弹性占满剩余宽度 */
#todoInput {
flex: 1;
padding: 10px 14px;
border: 1px solid #ccc;
border-radius: 6px;
font-size: 16px;
}
/* 新增按钮基础样式 */
#addBtn {
padding: 10px 20px;
background-color: #409eff;
color: #fff;
border: none;
border-radius: 6px;
cursor: pointer;
font-size: 16px;
}
/* 鼠标悬浮在新增按钮上,颜色加深 */
#addBtn:hover {
background-color: #337ecc;
}
/* 待办列表容器,去掉默认圆点,白色背景,圆角 */
#todoList {
list-style: none;
background: #fff;
border-radius: 8px;
overflow: hidden;
}
/* 每一条待办项,弹性布局,文字和删除按钮左右分开 */
#todoList li {
display: flex;
justify-content: space-between;
align-items: center;
padding: 12px 16px;
border-bottom: 1px solid #eee;
font-size: 16px;
}
/* 最后一条待办,去掉底部边框 */
#todoList li:last-child {
border-bottom: none;
}
/* 删除按钮样式,红色风格 */
#todoList li button {
padding: 6px 12px;
background-color: #f56c6c;
color: #fff;
border: none;
border-radius: 4px;
cursor: pointer;
}
/* 删除按钮悬浮效果 */
#todoList li button:hover {
background-color: #dd6161;
}
</style>
3.2 获取页面元素
var todoInput = document.getElementById("todoInput");
var addBtn = document.getElementById("addBtn");
var todoList = document.getElementById("todoList");
3.3 读取本地存储里面的待办数据
var str = localStorage.getItem("todoData");
// 有数据就转数组,没有就初始化为空数组
var todoArr = str ? JSON.parse(str) : [];
3.4 封装渲染函数
function render() {
// 清空旧列表
todoList.innerHTML = "";
for (var i = 0; i < todoArr.length; i++) {
var li = document.createElement("li");
li.innerText = todoArr[i];
// 删除按钮
var delBtn = document.createElement("button");
delBtn.innerText = "删除";
delBtn.style.marginLeft = "10px";
delBtn.onclick = function () {
// 找到删除的元素在数组中的序号
var index = Array.from(this.parentElement.parentElement.children).indexOf(this.parentElement);
todoArr.splice(index, 1);
localStorage.setItem("todoData", JSON.stringify(todoArr));
render();
}
li.appendChild(delBtn);
todoList.appendChild(li);
}
}
// 页面打开先渲染一次
render();
3.5 新增待办逻辑
addBtn.onclick = function () {
var content = todoInput.value.trim();
if (content === "") {
alert("待办内容不能为空!");
return;
}
todoArr.push(content);
localStorage.setItem("todoData", JSON.stringify(todoArr));
render();
// 清空输入框
todoInput.value = "";
}
4. 完整可运行代码
<!DOCTYPE html>
<html lang="zh-CN">
<head>
<meta charset="UTF-8">
<title>简易持久化待办事项</title>
<style>
/* 全局重置,清除默认内外边距,统一盒模型 */
* {
margin: 0;
padding: 0;
box-sizing: border-box;
}
/* 页面主体样式:居中、设置背景色、字体 */
body {
width: 600px;
margin: 50px auto;
font-family: "Microsoft Yahei", sans-serif;
background-color: #f5f7fa;
}
/* 标题样式 */
h2 {
text-align: center;
color: #333;
margin-bottom: 20px;
}
/* 输入区域容器,弹性布局,控制输入框和按钮间距 */
.input-wrap {
display: flex;
gap: 10px;
margin-bottom: 20px;
}
/* 输入框样式,弹性占满剩余宽度 */
#todoInput {
flex: 1;
padding: 10px 14px;
border: 1px solid #ccc;
border-radius: 6px;
font-size: 16px;
}
/* 新增按钮基础样式 */
#addBtn {
padding: 10px 20px;
background-color: #409eff;
color: #fff;
border: none;
border-radius: 6px;
cursor: pointer;
font-size: 16px;
}
/* 鼠标悬浮在新增按钮上,颜色加深 */
#addBtn:hover {
background-color: #337ecc;
}
/* 待办列表容器,去掉默认圆点,白色背景,圆角 */
#todoList {
list-style: none;
background: #fff;
border-radius: 8px;
overflow: hidden;
}
/* 每一条待办项,弹性布局,文字和删除按钮左右分开 */
#todoList li {
display: flex;
justify-content: space-between;
align-items: center;
padding: 12px 16px;
border-bottom: 1px solid #eee;
font-size: 16px;
}
/* 最后一条待办,去掉底部边框 */
#todoList li:last-child {
border-bottom: none;
}
/* 删除按钮样式,红色风格 */
#todoList li button {
padding: 6px 12px;
background-color: #f56c6c;
color: #fff;
border: none;
border-radius: 4px;
cursor: pointer;
}
/* 删除按钮悬浮效果 */
#todoList li button:hover {
background-color: #dd6161;
}
</style>
</head>
<body>
<input type="text" id="todoInput" placeholder="请输入待办事项">
<button id="addBtn">新增待办</button>
<ul id="todoList"></ul>
<script>
var todoInput = document.getElementById("todoInput");
var addBtn = document.getElementById("addBtn");
var todoList = document.getElementById("todoList");
var str = localStorage.getItem("todoData");
var todoArr = str ? JSON.parse(str) : [];
function render() {
todoList.innerHTML = "";
for (var i = 0; i < todoArr.length; i++) {
var li = document.createElement("li");
li.innerText = todoArr[i];
var delBtn = document.createElement("button");
delBtn.innerText = "删除";
delBtn.style.marginLeft = "10px";
delBtn.onclick = function () {
var index = Array.from(this.parentElement.parentElement.children).indexOf(this.parentElement);
todoArr.splice(index, 1);
localStorage.setItem("todoData", JSON.stringify(todoArr));
render();
}
li.appendChild(delBtn);
todoList.appendChild(li);
}
}
render();
addBtn.onclick = function () {
var content = todoInput.value.trim();
if (content === "") {
alert("待办内容不能为空!");
return;
}
todoArr.push(content);
localStorage.setItem("todoData", JSON.stringify(todoArr));
render();
todoInput.value = "";
}
</script>
</body>
</html>
效果: 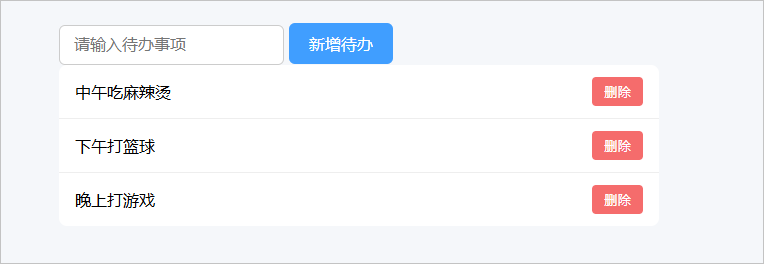
注意,刷新后待办事项仍能保留。

评论前必须登录!
注册