 网硕互联帮助中心
QML Canvas绘制汽车仪表盘源码分享
- 一、效果展示
- 二、源码分享
- 三、QML Context2D 方法介绍
-
- 1、路径绘制
- 2、 填充与描边
- 3、文本绘制
- 4、图像操作
- 5、变换
- 6、状态管理**
- 7、合成与裁剪
- 8、样式属性
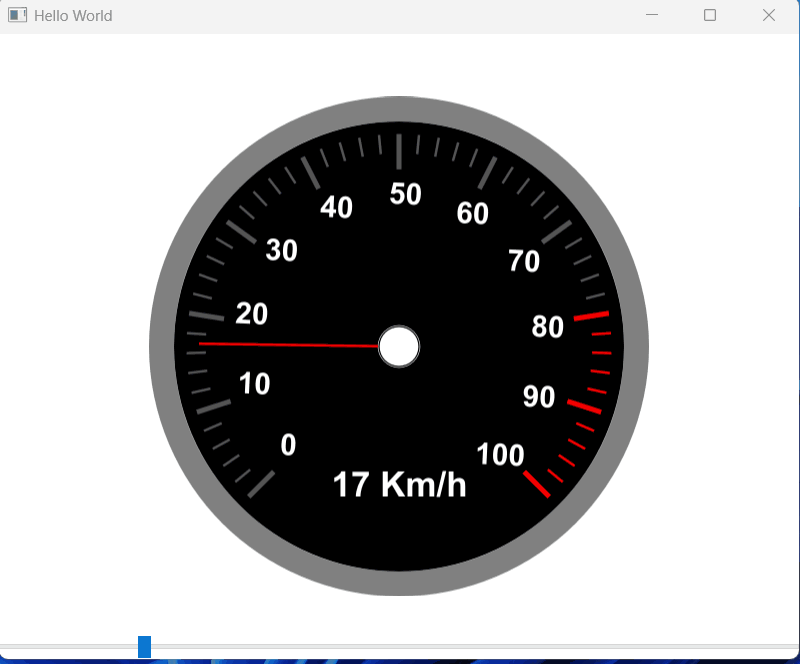
一、效果展示
二、源码分享
import QtQuick
import QtQuick.Controls
Window {
id:self
width: 640
height: 500
visible: true
title: qsTr("Hello World")
property int maxValue: 100 // 仪表盘最大值(如100%)
property int minValue: 0 // 仪表盘最小值(如0%)
property int value: 0 // 当前显示数值(需动态绑定)
property int redScale: 80
property string unit: "Km/h"
//color: "gray"
Canvas {
id: canvas
width: 400; height: 400 // 仪表盘尺寸(正方形)
anchors.centerIn: parent // 居中显示
onPaint: {
var realWidth = Math.min(width,height)
var ctx = getContext("2d")
ctx.reset()
ctx.save()
// 1. 绘制外框(灰色圆环)
ctx.strokeStyle = "gray"
ctx.lineWidth = 20
ctx.beginPath()
ctx.arc(realWidth/2, realWidth/2, realWidth/2–10, 0, 2 * Math.PI)
ctx.stroke()
//内部填充
ctx.fillStyle = "black"
ctx.beginPath()
ctx.arc(realWidth/2, realWidth/2, realWidth/2–20, 0, 2 * Math.PI)
ctx.fill()
// 2. 绘制刻度线(主刻度+副刻度)
var startAngle = 45
var r = realWidth/2*0.85
var lineWidth = 2
var rotate = (360 – (startAngle * 2)) / 100
var valTotal = Math.abs(minValue)+Math.abs(maxValue)
var valToAngle = valTotal/100
ctx.translate(realWidth/2,realWidth/2)
ctx.rotate(startAngle*Math.PI/180);
for (var i = 0; i <= 100; i++) {
var color = "#545454"
var redScaleStartVal = minValue+i*valToAngle;
if(redScaleStartVal>=redScale)
color = "#FF0000"
if((i % 10) == 0)
{
ctx.beginPath()
ctx.strokeStyle = color
ctx.lineWidth = 2*lineWidth
ctx.moveTo(0, r)
ctx.lineTo(0, r / 1.2)
ctx.stroke()
}
else if((i % 2) == 0)
{
ctx.beginPath()
ctx.strokeStyle = color
ctx.lineWidth = 1*lineWidth
ctx.moveTo(0, r)
ctx.lineTo(0, r / 1.1)
ctx.stroke()
}
ctx.rotate(rotate*Math.PI/180);
}
//绘制刻度值
var gap = (360–startAngle*2) / 10;
r = realWidth/2*0.6;
var valGap = Math.abs(minValue)+Math.abs(maxValue);
valGap/=10;
var refreshVal = minValue;
ctx.fillStyle = "white"
ctx.rotate(startAngle*Math.PI/180)
ctx.translate(0,0)
ctx.font = `bold ${realWidth*0.06}px Arial`
//ctx.textAlign = "left"
for(var i=0; i<=10; i+=1)
{
var angle = 90+startAngle+gap*i; //角度,10格子画一个刻度值
var angleArc =( angle % 360) * 3.14 / 180 //转换为弧度
var x = (r)*Math.cos(angleArc)
var y = (r)*Math.sin(angleArc)
var tempValue = ""+refreshVal
refreshVal += valGap;
var w = ctx.measureText(tempValue).width
var h = realWidth*0.06
x = x – w/2
y = y + h/4
ctx.fillText(tempValue, x, y)
}
//绘制指针
ctx.restore()
ctx.save()
var degRotate = (270.0 / (maxValue – minValue)) * (value – minValue) +135
console.log(degRotate)
ctx.translate(realWidth/2, realWidth/2)
ctx.rotate(degRotate* 3.14 / 180)
ctx.beginPath()
ctx.strokeStyle = color
ctx.lineWidth = 1*lineWidth
ctx.moveTo(0, 0)
ctx.lineTo(realWidth/2–40, 0)
ctx.stroke()
//绘制中间圆心
ctx.fillStyle = "white"
ctx.strokeStyle = "white"
ctx.beginPath()
ctx.lineWidth = 0
ctx.arc(0, 0, realWidth*0.04, 0, 2 * Math.PI)
ctx.fill()
ctx.stroke()
//绘制显示值
ctx.restore()
ctx.fillStyle = "white"
ctx.font = `bold ${realWidth*0.07}px Arial`
ctx.textAlign = "center"
ctx.fillText(value+" "+unit, realWidth/2, realWidth*0.8)
ctx.stroke()
}
}
Slider{
width: parent.width
anchors.bottom: parent.bottom
anchors.leftMargin: 20
anchors.rightMargin: 20
onValueChanged: {
self.value = value*100
canvas.requestPaint()
}
}
}
三、QML Context2D 方法介绍
Context2D 是 QML Canvas 组件的 2D 绘图上下文对象,提供类似 HTML5 Canvas 的 API。所有方法分类如下:
1、路径绘制
- beginPath(): 开始新路径
- closePath(): 闭合当前路径(终点连接起点)
- moveTo(x, y): 移动画笔到坐标
(
x
,
y
)
(x, y)
(x,y) - lineTo(x, y): 从当前位置画直线到
(
x
,
y
)
(x, y)
(x,y) - arc(x, y, radius, startAngle, endAngle, anticlockwise): 画圆弧
-
(
x
,
y
)
(x, y)
(x,y) 为圆心,r
a
d
i
u
s
radius
radius 为半径
-
- arcTo(x1, y1, x2, y2, radius): 通过控制点画圆弧
- quadraticCurveTo(cpx, cpy, x, y): 二次贝塞尔曲线
- bezierCurveTo(cp1x, cp1y, cp2x, cp2y, x, y): 三次贝塞尔曲线
- rect(x, y, width, height): 添加矩形路径
2、 填充与描边
- fill(): 填充当前路径
- stroke(): 描边当前路径
- fillRect(x, y, width, height): 直接填充矩形
- strokeRect(x, y, width, height): 直接描边矩形
- clearRect(x, y, width, height): 清除矩形区域
3、文本绘制
- fillText(text, x, y): 在
(
x
,
y
)
(x, y)
(x,y) 填充文本 - strokeText(text, x, y): 在
(
x
,
y
)
(x, y)
(x,y) 描边文本 - measureText(text): 返回文本宽度信息(对象)
4、图像操作
- drawImage(image, dx, dy): 绘制图像到
(
d
x
,
d
y
)
(dx, dy)
(dx,dy) - drawImage(image, dx, dy, dWidth, dHeight): 缩放绘制
- drawImage(image, sx, sy, sWidth, sHeight, dx, dy, dWidth, dHeight): 裁剪后绘制
5、变换
- scale(sx, sy): 缩放
(
s
x
,
s
y
)
(sx, sy)
(sx,sy) 倍 - rotate(angle): 旋转角度
a
n
g
l
e
angle
angle(弧度制) - translate(tx, ty): 平移
(
t
x
,
t
y
)
(tx, ty)
(tx,ty) - transform(a, b, c, d, e, f): 矩阵变换
- 矩阵形式:
[
a
c
e
b
d
f
0
0
1
]
\\begin{bmatrix} a & c & e \\\\ b & d & f \\\\ 0 & 0 & 1 \\end{bmatrix}
ab0cd0ef1
- 矩阵形式:
- setTransform(a, b, c, d, e, f): 重置并应用新矩阵
6、状态管理**
- save(): 保存当前状态(样式/变换)
- restore(): 恢复最近保存的状态
7、合成与裁剪
- globalAlpha: 全局透明度(属性,值域
[
0
,
1
]
[0, 1]
[0,1]) - globalCompositeOperation: 合成模式(如 "source-over")
- clip(): 将当前路径设为裁剪区域
8、样式属性
- fillStyle: 填充样式(颜色/渐变/图案)
- strokeStyle: 描边样式
- lineWidth: 描边宽度
- lineCap: 线端点样式("butt", "round", "square")
- lineJoin: 线连接样式("miter", "round", "bevel")
- miterLimit: 斜接长度限制
- font: 文本字体(如 "bold 12px Arial")
- textAlign: 文本对齐("start", "center", "end")
- textBaseline: 文本基线("top", "middle", "alphabetic")


评论前必须登录!
注册