 网硕互联帮助中心
前言
图片拼接(image stitching)就是将统一场景的不同拍摄出的图片拼接到一起,如图所示
 就是拼接全景图,是图片拼接的应用之一,手机拍照都有全景拍摄功能
仔细观察全景图,寻找它们相似性,图8-2的全景图可以通过缩放,旋转,射影等操作进行拼接而成,我们首先介绍几个常用的图像变换
图像变换
平移变换
平移变换通过向量 ( \\mathbf{t} = (t_x, t_y) ) 实现,图像上点 ( \\mathbf{p} = (i, j) ) 平移后得到新点 ( \\mathbf{p}' = (i', j') ),满足: [ \\mathbf{p}' = \\mathbf{p} + \\mathbf{t} ] 其中 ( t_x ) 和 ( t_y ) 分别表示水平和垂直方向的平移距离。
旋转变换
旋转变换绕原点逆时针旋转角度 ( \\theta ),点 ( \\mathbf{p} = (i, j) ) 旋转后得到 ( \\mathbf{p}' = R\\mathbf{p} ),旋转矩阵 ( R ) 为: [ R = \\begin{bmatrix} \\cos \\theta & -\\sin \\theta \\ \\sin \\theta & \\cos \\theta \\end{bmatrix} ]
缩放变换
以原点为中心,沿 ( x ) 轴缩放 ( s_x ) 倍,沿 ( y ) 轴缩放 ( s_y ) 倍,点 ( \\mathbf{p} = (i, j) ) 缩放后得到 ( \\mathbf{p}' = S\\mathbf{p} ),缩放矩阵 ( S ) 为: [ S = \\begin{bmatrix} s_x & 0 \\ 0 & s_y \\end{bmatrix} ]
对称变换
- 关于 ( y ) 轴对称:点 ( \\mathbf{p} = (i, j) ) 变换后为 ( \\mathbf{p}' = (-i, j) ),对应矩阵: [ P_y = \\begin{bmatrix} -1 & 0 \\ 0 & 1 \\end{bmatrix} ]
- 关于直线 ( y = x ) 对称:点 ( \\mathbf{p} = (i, j) ) 变换后为 ( \\mathbf{p}' = (j, i) ),对应矩阵: [ P_{y=x} = \\begin{bmatrix} 0 & 1 \\ 1 & 0 \\end{bmatrix} ]
射影变换(透视变换)
射影变换是更一般的线性变换,可用齐次坐标表示。对于点 ( \\mathbf{p} = (i, j, 1) )(齐次坐标),变换后 ( \\mathbf{p}' = H\\mathbf{p} ),其中 ( H ) 为 ( 3 \\times 3 ) 变换矩阵: [ H = \\begin{bmatrix} h_{11} & h_{12} & h_{13} \\ h_{21} & h_{22} & h_{23} \\ h_{31} & h_{32} & h_{33} \\end{bmatrix} ] 射影变换能实现倾斜、透视等复杂几何变换。
几何相似性分析
图8-1的子图与图8-2全景图的相似性体现在:
数学表达统一性
所有变换均可表示为矩阵乘法(齐次坐标下): [ \\mathbf{p}' = M\\mathbf{p} ] 其中 ( M ) 为对应变换矩阵。平移需扩展为仿射变换: [ M_{\\text{平移}} = \\begin{bmatrix} 1 & 0 & t_x \\ 0 & 1 & t_y \\ 0 & 0 & 1 \\end{bmatrix} ]
计算变化矩阵
1.通过SIFT计算出两幅图片的特征点
2.将两幅图片的特征点进行匹配
3.更具匹配的特征点计算图片变换矩阵
利用RANSAC算法去除误匹配
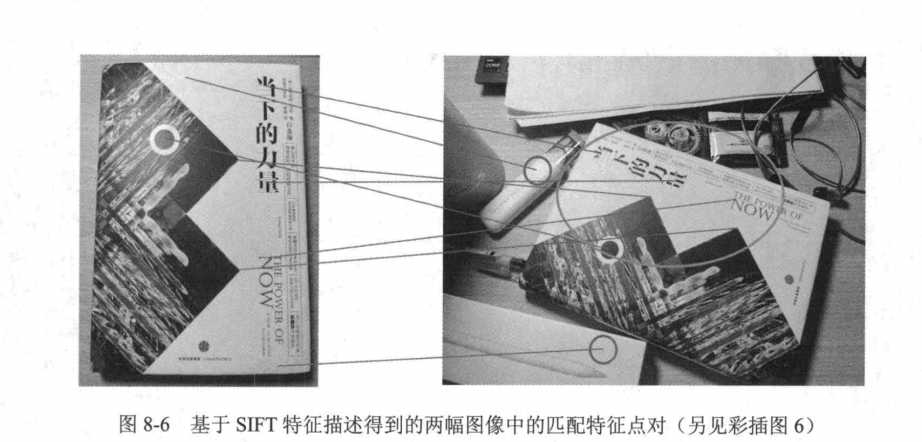
当利用SIFT进行特征匹配时,有些时候可能会出现图8-6的情况。图8-6中右图绿色圆圈
内的特征点是与左图匹配的特征点,但利用SIFT匹配特征点时,会将左图中部分特征点匹配到
右图绿色圆圈之外的特征点(如红色圆圈内的特征点)。这些特征点匹配是错误的匹配,应该被
移除,从而保证变换矩阵计算的鲁棒性。应该如何移除错误的匹配点对呢?
可以用到RANSAC算法
RANSAC算法简介
RANSAC(Random Sample Consensus)是一种鲁棒的模型拟合算法,常用于处理包含大量噪声或异常值的数据。在计算机视觉中,RANSAC常用于去除特征匹配中的误匹配(outliers),仅保留满足几何约束的正确匹配(inliers)。
算法原理
RANSAC通过随机采样最小数据集迭代估计模型参数,并统计支持该模型的样本数量。算法核心思想是:正确的匹配应满足某种几何变换(如单应性矩阵或基础矩阵),而误匹配则不符合该约束。
实现步骤
输入准备
- 两组匹配的特征点对:points1和points2(形状为N×2的数组)
- 模型类型:单应性矩阵(Homography)或基础矩阵(Fundamental Matrix)
- 最大迭代次数:max_iterations(默认1000)
- 内点阈值:threshold(像素距离,默认3.0)
核心流程
OpenCV代码实现
import cv2
import numpy as np
def ransac_filter_matches(points1, points2, model='homography', max_iter=1000, threshold=3.0):
"""
points1, points2: 匹配的点坐标 (N×2 numpy数组)
model: 拟合模型类型 ('homography' 或 'fundamental')
"""
if len(points1) < 4:
return np.arange(len(points1)) # 不足4对点时返回所有索引
if model == 'homography':
H, mask = cv2.findHomography(points1, points2, cv2.RANSAC, threshold, maxIters=max_iter)
elif model == 'fundamental':
F, mask = cv2.findFundamentalMat(points1, points2, cv2.FM_RANSAC, threshold, max_iter)
return mask.ravel().astype(bool) # 返回内点掩码
参数选择建议
-
阈值选择:通常设置为1-5像素,取决于特征点定位精度。对于SIFT/SURF等特征可设为3,ORB等二进制特征建议设为5
-
迭代次数:默认1000次可满足大多数场景。可通过公式估算:
$$ N = \\frac{\\log(1-p)}{\\log(1-(1-\\epsilon)^s)} $$
其中p为置信度(如0.99),ε为异常值比例估计值,s为最小样本数
应用示例
# 假设已有匹配结果
matches = flann.knnMatch(des1, des2, k=2)
good_matches = [m for m,n in matches if m.distance < 0.7*n.distance]
# 提取匹配点坐标
pts1 = np.float32([kp1[m.queryIdx].pt for m in good_matches]).reshape(-1,2)
pts2 = np.float32([kp2[m.trainIdx].pt for m in good_matches]).reshape(-1,2)
# RANSAC过滤
inlier_mask = ransac_filter_matches(pts1, pts2)
final_matches = [good_matches[i] for i in range(len(good_matches)) if inlier_mask[i]]
注意事项
- 匹配点对数量较少时(<10),RANSAC可能失效
- 场景中存在多个运动平面时,需改用多模型拟合方法(如PEARL)
- 对于纯旋转相机运动,建议使用单应性矩阵;一般运动建议用基础矩阵
图像变换与缝合
图像拼接的最后一步是将输入图像变换并缝合到一幅图像中。对于两幅图像A和B,在已
经检测出对应的特征点对,并利用RANSAC算法计算得到变换矩阵T之后,将图像B转换为
TB。然后,对转换后的图像,即TB,与图像A在重叠部分的像素值求平均值,以优化图像缝
合的边界。如此,便可得到最终缝合好的拼接图像。
综上所述,我们把图像拼接的全过程总结为以下4步:
(1)计算两幅图像的特征点;
(2)将两幅图像的特征点进行匹配;
(3)根据匹配的特征点对,利用RANSAC算法计算图像变换矩阵;
(4)将图像进行拼接。
代码实现
方法一:使用OpenCV内置的Stitcher类(最简单)
import cv2
# 读取图像
image1 = cv2.imread('image1.jpeg')
image2 = cv2.imread('image2.jpeg')
# 检查图像是否成功读取
if image1 is None or image2 is None:
print("无法读取图像文件")
exit()
# 创建拼接器 效果:拼接结果出现了边缘黑边和形变
stitcher = cv2.Stitcher_create() if hasattr(cv2, 'Stitcher_create') else cv2.createStitcher()
# 执行拼接
(status, stitched) = stitcher.stitch([image1, image2])
# 保存结果
if status == cv2.Stitcher_OK:
cv2.imwrite('stitched_output.jpg', stitched)
print("拼接成功,结果已保存为 'stitched_output.jpg'")
else:
print(f'拼接失败,错误代码: {status}')
方法二:完整实现
import cv2
import numpy as np
def stitch_images(images, ratio=0.75, reproj_thresh=4.0, show_matches=False):
"""
图像拼接函数
参数:
images: 要拼接的图像列表
ratio: Lowe's ratio test参数
reproj_thresh: RANSAC重投影阈值
show_matches: 是否显示特征匹配结果
返回:
拼接后的图像
"""
# 初始化OpenCV的SIFT特征检测器
sift = cv2.SIFT_create()
# 检测关键点和描述符
(kpsA, featuresA) = sift.detectAndCompute(images[0], None)
(kpsB, featuresB) = sift.detectAndCompute(images[1], None)
# 匹配特征点
matcher = cv2.DescriptorMatcher_create("BruteForce")
raw_matches = matcher.knnMatch(featuresA, featuresB, 2)
# 应用Lowe's ratio test筛选好的匹配点
good_matches = []
for m in raw_matches:
if len(m) == 2 and m[0].distance < m[1].distance * ratio:
good_matches.append((m[0].trainIdx, m[0].queryIdx))
# 至少需要4个匹配点才能计算单应性矩阵
if len(good_matches) > 4:
ptsA = np.float32([kpsA[i].pt for (_, i) in good_matches])
ptsB = np.float32([kpsB[i].pt for (i, _) in good_matches])
# 计算单应性矩阵
(H, status) = cv2.findHomography(ptsA, ptsB, cv2.RANSAC, reproj_thresh)
# 拼接图像
result = cv2.warpPerspective(images[0], H,
(images[0].shape[1] + images[1].shape[1],
images[0].shape[0]))
result[0:images[1].shape[0], 0:images[1].shape[1]] = images[1]
# 如果需要显示匹配结果
if show_matches:
vis = np.zeros((max(images[0].shape[0], images[1].shape[0]),
images[0].shape[1] + images[1].shape[1], 3), dtype=np.uint8)
vis[0:images[0].shape[0], 0:images[0].shape[1]] = images[0]
vis[0:images[1].shape[0], images[0].shape[1]:] = images[1]
for ((trainIdx, queryIdx), s) in zip(good_matches, status):
if s == 1:
ptA = (int(kpsA[queryIdx].pt[0]), int(kpsA[queryIdx].pt[1]))
ptB = (int(kpsB[trainIdx].pt[0]) + images[0].shape[1],
int(kpsB[trainIdx].pt[1]))
cv2.line(vis, ptA, ptB, (0, 255, 0), 1)
cv2.imshow("Feature Matches", vis)
cv2.waitKey(0)
cv2.destroyAllWindows()
return result
return None
# 示例用法
if __name__ == "__main__":
# 读取两张要拼接的图像
image1 = cv2.imread("image1.jpeg")
image2 = cv2.imread("image2.jpeg")
# 确保图像读取成功
if image1 is None or image2 is None:
print("无法读取图像文件")
exit()
# 调整图像大小(可选)
image1 = cv2.resize(image1, (0, 0), fx=0.5, fy=0.5)
image2 = cv2.resize(image2, (0, 0), fx=0.5, fy=0.5)
# 拼接图像
stitched_image = stitch_images([image1, image2], show_matches=True)
if stitched_image is not None:
# 显示并保存结果
cv2.imshow("Stitched Image", stitched_image)
cv2.waitKey(0)
cv2.destroyAllWindows()
cv2.imwrite("stitched_result.jpg", stitched_image)
else:
print("图像拼接失败,可能匹配点不足")
使用建议
- 如果只是需要快速拼接,推荐使用第一种方法(Stitcher类)
- 如果需要了解基本原理或进行简单定制,可以使用第二种方法
- 确保图像有足够重叠区域(建议30%以上重叠)
- 图像大小不宜过大,可以先缩小处理
两种方法都需要安装OpenCV:
pip install opencv-python opencv-contrib-python


评论前必须登录!
注册