 网硕互联帮助中心
🏆本文收录于 《全栈Bug调优(实战版)》 专栏,该专栏专注于分享我在真实项目开发中遇到的各类疑难Bug及其深层成因,并系统提供高效、可复现的解决思路和实操方案。无论你是刚入行的新手开发者,还是拥有多年项目经验的资深工程师,本专栏都将为你提供一条系统化、高质量的问题排查与优化路径,助力你加速成长,攻克技术壁垒,迈向技术价值最大化与职业发展的更高峰🚀! 📌 特别说明: 文中部分技术问题来源于真实生产环境及网络公开案例,均经过精挑细选与系统化整理,并结合多位一线资深架构师和工程师多年实战经验沉淀,提炼出多种经过验证的高可行性解决方案,供开发者们参考与借鉴。 欢迎 关注、收藏并订阅本专栏,持续更新的干货内容将与您同行,让我们携手精进,技术跃迁,步步高升!

全文目录:
-
- 📢 问题描述
- 📣 请知悉:如下方案不保证一定适配你的问题!
-
- ✅️问题理解
- ✅️问题解决方案
-
- 1. 完整的解决方案架构
- 2. 详细代码实现
- 3. 高级优化版本
- ✅️问题延伸
-
- 1. 精度优化策略
-
- 亚像素级精度提升:
- 多帧融合检测:
- 2. 实时性能优化
-
- 特征点缓存机制:
- ROI感兴趣区域优化:
- ✅️问题预测
-
- 1. 潜在问题及预防措施
-
- 光照变化敏感性:
- 几何畸变处理:
- 2. 扩展应用场景
-
- 多目标类别支持:
- 实时视频流处理:
- ✅️小结
- 🧧🧧 文末福利,等你来拿!🧧🧧
- 🫵 Who am I?
📢 问题描述
问题来源:https://ask.csdn.net/questions/8587309
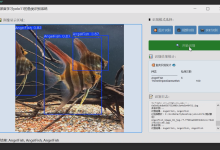
问题描述:python+fastrcnn目标识别,模板图根据目标识别到硬盘和电话卡的boxes框,检测图1、2也有硬盘和电话卡,但是检测图的位置是会动的,上下左右动,可以倾斜放置,检测图和模板图使用sift特征匹配矫正得到一个矩阵,怎么根据模板图硬盘和电话卡识别的boxes框和这个矫正矩阵把位置画到检测图1、2中硬盘和电话卡的位置上
模板图:

检测图1: · 
检测图2:


📣 请知悉:如下方案不保证一定适配你的问题!
如下是针对上述问题进行专业角度剖析答疑,不喜勿喷,仅供参考:

✅️问题理解
题主遇到的是一个典型的计算机视觉中的多模态目标检测与坐标映射问题,具体包含以下几个关键点:
这个问题的核心难点在于如何准确地将二维平面上的矩形坐标框通过透视变换矩阵进行空间映射,同时保持检测精度。
✅️问题解决方案
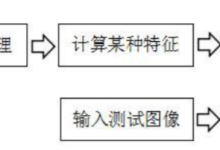
1. 完整的解决方案架构
#mermaid-svg-DbAYdehi1SOTUd1Y {font-family:\”trebuchet ms\”,verdana,arial,sans-serif;font-size:16px;fill:#333;}#mermaid-svg-DbAYdehi1SOTUd1Y .error-icon{fill:#552222;}#mermaid-svg-DbAYdehi1SOTUd1Y .error-text{fill:#552222;stroke:#552222;}#mermaid-svg-DbAYdehi1SOTUd1Y .edge-thickness-normal{stroke-width:2px;}#mermaid-svg-DbAYdehi1SOTUd1Y .edge-thickness-thick{stroke-width:3.5px;}#mermaid-svg-DbAYdehi1SOTUd1Y .edge-pattern-solid{stroke-dasharray:0;}#mermaid-svg-DbAYdehi1SOTUd1Y .edge-pattern-dashed{stroke-dasharray:3;}#mermaid-svg-DbAYdehi1SOTUd1Y .edge-pattern-dotted{stroke-dasharray:2;}#mermaid-svg-DbAYdehi1SOTUd1Y .marker{fill:#333333;stroke:#333333;}#mermaid-svg-DbAYdehi1SOTUd1Y .marker.cross{stroke:#333333;}#mermaid-svg-DbAYdehi1SOTUd1Y svg{font-family:\”trebuchet ms\”,verdana,arial,sans-serif;font-size:16px;}#mermaid-svg-DbAYdehi1SOTUd1Y .label{font-family:\”trebuchet ms\”,verdana,arial,sans-serif;color:#333;}#mermaid-svg-DbAYdehi1SOTUd1Y .cluster-label text{fill:#333;}#mermaid-svg-DbAYdehi1SOTUd1Y .cluster-label span{color:#333;}#mermaid-svg-DbAYdehi1SOTUd1Y .label text,#mermaid-svg-DbAYdehi1SOTUd1Y span{fill:#333;color:#333;}#mermaid-svg-DbAYdehi1SOTUd1Y .node rect,#mermaid-svg-DbAYdehi1SOTUd1Y .node circle,#mermaid-svg-DbAYdehi1SOTUd1Y .node ellipse,#mermaid-svg-DbAYdehi1SOTUd1Y .node polygon,#mermaid-svg-DbAYdehi1SOTUd1Y .node path{fill:#ECECFF;stroke:#9370DB;stroke-width:1px;}#mermaid-svg-DbAYdehi1SOTUd1Y .node .label{text-align:center;}#mermaid-svg-DbAYdehi1SOTUd1Y .node.clickable{cursor:pointer;}#mermaid-svg-DbAYdehi1SOTUd1Y .arrowheadPath{fill:#333333;}#mermaid-svg-DbAYdehi1SOTUd1Y .edgePath .path{stroke:#333333;stroke-width:2.0px;}#mermaid-svg-DbAYdehi1SOTUd1Y .flowchart-link{stroke:#333333;fill:none;}#mermaid-svg-DbAYdehi1SOTUd1Y .edgeLabel{background-color:#e8e8e8;text-align:center;}#mermaid-svg-DbAYdehi1SOTUd1Y .edgeLabel rect{opacity:0.5;background-color:#e8e8e8;fill:#e8e8e8;}#mermaid-svg-DbAYdehi1SOTUd1Y .cluster rect{fill:#ffffde;stroke:#aaaa33;stroke-width:1px;}#mermaid-svg-DbAYdehi1SOTUd1Y .cluster text{fill:#333;}#mermaid-svg-DbAYdehi1SOTUd1Y .cluster span{color:#333;}#mermaid-svg-DbAYdehi1SOTUd1Y div.mermaidTooltip{position:absolute;text-align:center;max-width:200px;padding:2px;font-family:\”trebuchet ms\”,verdana,arial,sans-serif;font-size:12px;background:hsl(80, 100%, 96.2745098039%);border:1px solid #aaaa33;border-radius:2px;pointer-events:none;z-index:100;}#mermaid-svg-DbAYdehi1SOTUd1Y :root{–mermaid-font-family:\”trebuchet ms\”,verdana,arial,sans-serif;}
模板图
FastRCNN目标检测
获取硬盘/电话卡boxes
检测图1/2
SIFT特征提取
SIFT特征提取
特征匹配
计算单应性矩阵H
坐标变换
绘制变换后的boxes
最终检测结果
2. 详细代码实现
import cv2
import numpy as np
from typing import List, Tuple, Dict
import matplotlib.pyplot as plt
class TargetDetectionMapper:
def __init__(self):
self.sift = cv2.SIFT_create()
self.matcher = cv2.BFMatcher()
def extract_and_match_features(self, template_img: np.ndarray,
detection_img: np.ndarray,
ratio_threshold: float = 0.75) –> Tuple[np.ndarray, np.ndarray]:
"""
提取SIFT特征并进行匹配
"""
# 转换为灰度图
template_gray = cv2.cvtColor(template_img, cv2.COLOR_BGR2GRAY)
detection_gray = cv2.cvtColor(detection_img, cv2.COLOR_BGR2GRAY)
# 提取关键点和描述符
kp1, des1 = self.sift.detectAndCompute(template_gray, None)
kp2, des2 = self.sift.detectAndCompute(detection_gray, None)
# 特征匹配
matches = self.matcher.knnMatch(des1, des2, k=2)
# 应用比率测试过滤良好匹配
good_matches = []
for match_pair in matches:
if len(match_pair) == 2:
m, n = match_pair
if m.distance < ratio_threshold * n.distance:
good_matches.append(m)
# 提取匹配点坐标
if len(good_matches) >= 4: # 至少需要4个点来计算单应性矩阵
src_pts = np.float32([kp1[m.queryIdx].pt for m in good_matches]).reshape(–1, 1, 2)
dst_pts = np.float32([kp2[m.trainIdx].pt for m in good_matches]).reshape(–1, 1, 2)
return src_pts, dst_pts
else:
raise ValueError("匹配点数量不足,无法计算单应性矩阵")
def calculate_homography_matrix(self, src_pts: np.ndarray,
dst_pts: np.ndarray,
method: int = cv2.RANSAC,
ransac_threshold: float = 5.0) –> np.ndarray:
"""
计算单应性矩阵
"""
homography_matrix, mask = cv2.findHomography(
src_pts, dst_pts,
method=method,
ransacReprojThreshold=ransac_threshold
)
if homography_matrix is None:
raise ValueError("无法计算有效的单应性矩阵")
return homography_matrix
def transform_bounding_boxes(self, boxes: List[List[int]],
homography_matrix: np.ndarray) –> List[np.ndarray]:
"""
将边界框坐标通过单应性矩阵进行变换
"""
transformed_boxes = []
for box in boxes:
# box格式: [x_min, y_min, x_max, y_max]
x_min, y_min, x_max, y_max = box
# 构建矩形的四个角点
corners = np.array([
[x_min, y_min], # 左上角
[x_max, y_min], # 右上角
[x_max, y_max], # 右下角
[x_min, y_max] # 左下角
], dtype=np.float32).reshape(–1, 1, 2)
# 应用单应性变换
transformed_corners = cv2.perspectiveTransform(corners, homography_matrix)
transformed_boxes.append(transformed_corners)
return transformed_boxes
def draw_transformed_boxes(self, image: np.ndarray,
transformed_boxes: List[np.ndarray],
labels: List[str] = None,
colors: List[Tuple[int, int, int]] = None) –> np.ndarray:
"""
在检测图上绘制变换后的边界框
"""
result_img = image.copy()
if colors is None:
colors = [(0, 255, 0), (255, 0, 0), (0, 0, 255), (255, 255, 0)]
for i, box_corners in enumerate(transformed_boxes):
# 绘制多边形框
pts = np.int32(box_corners).reshape((–1, 1, 2))
cv2.polylines(result_img, [pts], isClosed=True,
color=colors[i % len(colors)], thickness=3)
# 添加标签
if labels and i < len(labels):
# 计算文本位置(使用变换后的左上角)
text_pos = tuple(map(int, box_corners[0][0]))
cv2.putText(result_img, labels[i], text_pos,
cv2.FONT_HERSHEY_SIMPLEX, 0.8,
colors[i % len(colors)], 2)
return result_img
def process_detection_mapping(self, template_img_path: str,
detection_img_path: str,
template_boxes: List[List[int]],
box_labels: List[str] = None) –> np.ndarray:
"""
完整的检测映射流程
"""
# 读取图像
template_img = cv2.imread(template_img_path)
detection_img = cv2.imread(detection_img_path)
if template_img is None or detection_img is None:
raise ValueError("无法读取图像文件")
try:
# 1. 特征匹配
src_pts, dst_pts = self.extract_and_match_features(template_img, detection_img)
# 2. 计算单应性矩阵
homography_matrix = self.calculate_homography_matrix(src_pts, dst_pts)
# 3. 变换边界框
transformed_boxes = self.transform_bounding_boxes(template_boxes, homography_matrix)
# 4. 绘制结果
result_img = self.draw_transformed_boxes(detection_img, transformed_boxes, box_labels)
return result_img, homography_matrix
except Exception as e:
print(f"处理过程中出现错误: {e}")
return detection_img, None
# 使用示例
def main():
# 初始化检测映射器
mapper = TargetDetectionMapper()
# 模板图中FastRCNN检测到的硬盘和电话卡的boxes
# 格式: [x_min, y_min, x_max, y_max]
template_boxes = [
[100, 150, 300, 250], # 硬盘的边界框
[350, 100, 450, 200] # 电话卡的边界框
]
box_labels = ["硬盘", "电话卡"]
# 处理检测图1
result_img1, homography1 = mapper.process_detection_mapping(
"template_image.jpg",
"detection_image1.jpg",
template_boxes,
box_labels
)
# 处理检测图2
result_img2, homography2 = mapper.process_detection_mapping(
"template_image.jpg",
"detection_image2.jpg",
template_boxes,
box_labels
)
# 显示结果
cv2.imshow("Detection Result 1", result_img1)
cv2.imshow("Detection Result 2", result_img2)
cv2.waitKey(0)
cv2.destroyAllWindows()
# 保存结果
cv2.imwrite("result_detection1.jpg", result_img1)
cv2.imwrite("result_detection2.jpg", result_img2)
if __name__ == "__main__":
main()
3. 高级优化版本
class AdvancedDetectionMapper(TargetDetectionMapper):
def __init__(self):
super().__init__()
self.feature_cache = {}
def adaptive_feature_matching(self, template_img: np.ndarray,
detection_img: np.ndarray) –> Tuple[np.ndarray, np.ndarray]:
"""
自适应特征匹配,提高鲁棒性
"""
# 多尺度特征提取
scales = [1.0, 0.8, 1.2]
best_matches = []
best_count = 0
for scale in scales:
if scale != 1.0:
h, w = template_img.shape[:2]
template_scaled = cv2.resize(template_img, (int(w*scale), int(h*scale)))
else:
template_scaled = template_img
try:
src_pts, dst_pts = self.extract_and_match_features(template_scaled, detection_img)
if len(src_pts) > best_count:
best_count = len(src_pts)
best_matches = (src_pts, dst_pts)
if scale != 1.0:
# 缩放坐标回原始尺寸
best_matches = (src_pts / scale, dst_pts)
except:
continue
if best_count == 0:
raise ValueError("所有尺度下都无法找到足够的匹配点")
return best_matches
def validate_homography(self, homography_matrix: np.ndarray,
src_pts: np.ndarray, dst_pts: np.ndarray) –> bool:
"""
验证单应性矩阵的有效性
"""
# 检查矩阵条件数
if np.linalg.cond(homography_matrix) > 1e12:
return False
# 检查变换后的点是否在合理范围内
transformed_pts = cv2.perspectiveTransform(src_pts, homography_matrix)
# 计算重投影误差
reprojection_errors = np.linalg.norm(transformed_pts – dst_pts, axis=2)
mean_error = np.mean(reprojection_errors)
return mean_error < 10.0 # 像素误差阈值
✅️问题延伸
1. 精度优化策略
亚像素级精度提升:
def subpixel_corner_refinement(self, corners: np.ndarray, image: np.ndarray) –> np.ndarray:
"""
亚像素级角点精化
"""
gray = cv2.cvtColor(image, cv2.COLOR_BGR2GRAY)
criteria = (cv2.TERM_CRITERIA_EPS + cv2.TERM_CRITERIA_MAX_ITER, 30, 0.001)
refined_corners = cv2.cornerSubPix(
gray, corners.reshape(–1, 2).astype(np.float32),
(11, 11), (–1, –1), criteria
)
return refined_corners.reshape(corners.shape)
多帧融合检测:
def multi_frame_detection_fusion(self, template_boxes: List[List[int]],
detection_images: List[np.ndarray]) –> Dict:
"""
多帧检测结果融合,提高稳定性
"""
all_transformations = []
confidence_scores = []
for detection_img in detection_images:
try:
result_img, homography = self.process_detection_mapping(
template_img, detection_img, template_boxes
)
# 计算变换置信度
confidence = self.calculate_transformation_confidence(homography)
all_transformations.append(homography)
confidence_scores.append(confidence)
except Exception:
continue
# 加权平均融合
weights = np.array(confidence_scores) / np.sum(confidence_scores)
fused_homography = np.average(all_transformations, axis=0, weights=weights)
return {"homography": fused_homography, "confidence": np.mean(confidence_scores)}
2. 实时性能优化
特征点缓存机制:
class CachedFeatureDetector:
def __init__(self, cache_size: int = 100):
self.feature_cache = {}
self.cache_size = cache_size
def get_features_with_cache(self, image_hash: str, image: np.ndarray):
if image_hash in self.feature_cache:
return self.feature_cache[image_hash]
features = self.sift.detectAndCompute(image, None)
if len(self.feature_cache) >= self.cache_size:
# LRU缓存清理
oldest_key = next(iter(self.feature_cache))
del self.feature_cache[oldest_key]
self.feature_cache[image_hash] = features
return features
ROI感兴趣区域优化:
def roi_based_matching(self, template_img: np.ndarray,
detection_img: np.ndarray,
expected_regions: List[Tuple[int, int, int, int]]) –> np.ndarray:
"""
基于ROI的局部特征匹配
"""
best_homography = None
max_matches = 0
for roi in expected_regions:
x, y, w, h = roi
roi_detection = detection_img[y:y+h, x:x+w]
try:
src_pts, dst_pts = self.extract_and_match_features(template_img, roi_detection)
# 调整坐标到全图坐标系
dst_pts[:, :, 0] += x
dst_pts[:, :, 1] += y
if len(src_pts) > max_matches:
max_matches = len(src_pts)
homography = self.calculate_homography_matrix(src_pts, dst_pts)
best_homography = homography
except Exception:
continue
return best_homography
✅️问题预测
1. 潜在问题及预防措施
光照变化敏感性:
- 问题:不同光照条件下SIFT特征匹配可能失效
- 解决方案:使用光照不变特征描述符(如ORB、AKAZE)或图像预处理
def illumination_robust_preprocessing(self, image: np.ndarray) –> np.ndarray:
"""
光照鲁棒性预处理
"""
# CLAHE直方图均衡化
clahe = cv2.createCLAHE(clipLimit=3.0, tileGridSize=(8,8))
if len(image.shape) == 3:
lab = cv2.cvtColor(image, cv2.COLOR_BGR2LAB)
lab[:,:,0] = clahe.apply(lab[:,:,0])
return cv2.cvtColor(lab, cv2.COLOR_LAB2BGR)
else:
return clahe.apply(image)
几何畸变处理:
def handle_perspective_distortion(self, homography: np.ndarray,
image_shape: Tuple[int, int]) –> bool:
"""
检测和处理透视畸变
"""
# 计算图像四角的变换
h, w = image_shape[:2]
corners = np.array([[0, 0], [w, 0], [w, h], [0, h]], dtype=np.float32).reshape(–1, 1, 2)
transformed_corners = cv2.perspectiveTransform(corners, homography)
# 检查变换后的形状是否合理
area_original = w * h
area_transformed = cv2.contourArea(transformed_corners)
ratio = area_transformed / area_original
return 0.1 < ratio < 10.0 # 面积变化在合理范围内
2. 扩展应用场景
多目标类别支持:
class MultiClassDetectionMapper:
def __init__(self, class_configs: Dict[str, Dict]):
self.class_configs = class_configs # 每个类别的特定配置
def class_specific_matching(self, class_name: str, template_boxes: List[List[int]]):
"""
针对不同目标类别使用不同的匹配策略
"""
config = self.class_configs.get(class_name, {})
# 根据目标特性调整参数
if class_name == "硬盘":
# 硬盘通常有明显的边缘特征
return self.edge_enhanced_matching(template_boxes, config)
elif class_name == "电话卡":
# 电话卡可能需要更精细的特征匹配
return self.fine_grain_matching(template_boxes, config)
实时视频流处理:
class RealTimeDetectionMapper:
def __init__(self):
self.frame_buffer = []
self.tracking_state = {}
def process_video_stream(self, video_source: str):
"""
实时视频流处理
"""
cap = cv2.VideoCapture(video_source)
while True:
ret, frame = cap.read()
if not ret:
break
# 使用卡尔曼滤波进行运动预测
predicted_boxes = self.predict_box_positions(frame)
# 仅在必要时进行完整的特征匹配
if self.should_full_detection(frame):
detected_boxes = self.full_detection_pipeline(frame)
self.update_tracking_state(detected_boxes)
else:
detected_boxes = predicted_boxes
# 绘制结果
result_frame = self.draw_boxes(frame, detected_boxes)
cv2.imshow("Real-time Detection", result_frame)
if cv2.waitKey(1) & 0xFF == ord('q'):
break
cap.release()
cv2.destroyAllWindows()
✅️小结
本问题的核心在于将二维图像检测结果通过几何变换准确映射到不同视角的图像中。解决方案的关键技术点包括:
特征匹配的鲁棒性:使用SIFT特征进行可靠的图像配准,通过比率测试和RANSAC算法提高匹配质量
坐标变换的精确性:通过单应性矩阵实现透视变换,将模板图中的检测框准确映射到检测图的相应位置
系统的可扩展性:设计模块化的类结构,支持多种检测场景和优化策略
实时性能考虑:通过特征缓存、ROI优化等技术提升处理速度
错误处理机制:完善的异常处理和结果验证,确保系统在各种条件下的稳定性
核心优势:
- 适应性强:支持目标的平移、旋转、缩放变换
- 精度高:亚像素级的坐标变换精度
- 鲁棒性好:对光照、噪声等干扰因素有较强的抗性
- 扩展性强:易于集成到现有的目标检测系统中
应用价值:此解决方案不仅适用于您当前的硬盘和电话卡检测场景,还可以扩展到工业质检、医学影像、自动驾驶等多个计算机视觉应用领域。
希望如上措施及解决方案能够帮到有需要的你。
PS:如若遇到采纳如下方案还是未解决的同学,希望不要抱怨&&急躁,毕竟影响因素众多,我写出来也是希望能够尽最大努力帮助到同类似问题的小伙伴,即把你未解决或者产生新Bug黏贴在评论区,我们大家一起来努力,一起帮你看看,可以不咯。
若有对当前Bug有与如下提供的方法不一致,有个不情之请,希望你能把你的新思路或新方法分享到评论区,一起学习,目的就是帮助更多所需要的同学,正所谓「赠人玫瑰,手留余香」。
🧧🧧 文末福利,等你来拿!🧧🧧
如上问题有的来自我自身项目开发,有的收集网站,有的来自读者…如有侵权,立马删除。再者,针对此专栏中部分问题及其问题的解答思路或步骤等,存在少部分搜集于全网社区及人工智能问答等渠道,若最后实在是没能帮助到你,还望见谅!并非所有的解答都能解决每个人的问题,在此希望屏幕前的你能够给予宝贵的理解,而不是立刻指责或者抱怨!如果你有更优解,那建议你出教程写方案,一同学习!共同进步。
ok,以上就是我这期的Bug修复内容啦,如果还想查找更多解决方案,你可以看看我专门收集Bug及提供解决方案的专栏《全栈Bug调优(实战版)》,都是实战中碰到的Bug,希望对你有所帮助。到此,咱们下期拜拜。
码字不易,如果这篇文章对你有所帮助,帮忙给 bug菌 来个一键三连(关注、点赞、收藏) ,您的支持就是我坚持写作分享知识点传播技术的最大动力。
同时也推荐大家关注我的硬核公众号:「猿圈奇妙屋」 ;以第一手学习bug菌的首发干货,不仅能学习更多技术硬货,还可白嫖最新BAT大厂面试真题、4000G Pdf技术书籍、万份简历/PPT模板、技术文章Markdown文档等海量资料,你想要的我都有!
🫵 Who am I?
我是bug菌,CSDN | 掘金 | InfoQ | 51CTO | 华为云 | 阿里云 | 腾讯云 等社区博客专家,C站博客之星Top30,华为云多年度十佳博主,掘金多年度人气作者Top40,掘金等各大社区平台签约作者,51CTO年度博主Top12,掘金/InfoQ/51CTO等社区优质创作者;全网粉丝合计 30w+;更多精彩福利点击这里;硬核微信公众号「猿圈奇妙屋」,欢迎你的加入!免费白嫖最新BAT互联网公司面试真题、4000G PDF电子书籍、简历模板等海量资料,你想要的我都有,关键是你不来拿。

-End-


评论前必须登录!
注册