 网硕互联帮助中心
配置文件优化后的 Prometheus 自动发现 MySQL 实例的完整 YAML 文件。该配置包括:
1、mysql 配置文件 (mysql-deployment.yaml)
apiVersion: apps/v1
kind: Deployment
metadata:
name: mysql
labels:
app: mysql
spec:
replicas: 3
selector:
matchLabels:
app: mysql
template:
metadata:
labels:
app: mysql
annotations:
prometheus.io/scrape: "true" # 允许 Prometheus 抓取
prometheus.io/port: "9104" # MySQL Exporter 暴露的端口
spec:
containers:
– name: mysql
image: harbor.fq.com/public/mysql:9.1.0 # 使用官方 MySQL 镜像
env:
– name: MYSQL_ROOT_PASSWORD
value: "password" # 设置 MySQL root 密码
ports:
– containerPort: 3306 # MySQL 默认端口
—
apiVersion: v1
kind: Service
metadata:
name: mysql-service
labels:
app: mysql
annotations:
prometheus.io/scrape: "true" # 允许 Prometheus 抓取
prometheus.io/port: "9104" # MySQL Exporter 暴露的端口
spec:
selector:
app: mysql
ports:
– name: mysql
protocol: TCP
port: 3306
targetPort: 3306
cat mysql-statefulset.yaml
apiVersion: apps/v1
kind: StatefulSet
metadata:
name: mysql
labels:
app: mysql
spec:
serviceName: "mysql"
replicas: 1
selector:
matchLabels:
app: mysql
template:
metadata:
labels:
app: mysql
annotations:
prometheus.io/scrape: "true" # 允许 Prometheus 抓取
prometheus.io/port: "9104" # MySQL Exporter 暴露的端口
spec:
containers:
– name: mysql
image: harbor.fq.com/public/mysql:9.1.0 # MySQL 镜像
env:
– name: MYSQL_ROOT_PASSWORD
value: "password" # 设置 MySQL root 密码
ports:
– containerPort: 3306 # MySQL 默认端口
volumeMounts:
– name: mysql-data
mountPath: /var/lib/mysql # MySQL 数据存储路径
volumes:
– name: mysql-data
emptyDir: {} # 使用空目录,不持久化数据
—
apiVersion: v1
kind: Service
metadata:
name: mysql-service
labels:
app: mysql
annotations:
prometheus.io/scrape: "true" # 允许 Prometheus 抓取
prometheus.io/port: "9104" # MySQL Exporter 暴露的端口
spec:
selector:
app: mysql
ports:
– name: mysql
protocol: TCP
port: 3306
targetPort: 3306
type: ClusterIP # 内部服务
2、登录mysql,并创建‘mysql_exporter’用户
2.1、查看mysql容器名称,登录到容器内
[root@k8s-master01 example]# kubectl get pod
NAME READY STATUS RESTARTS AGE
kuard-d574f5b78-r2l77 1/1 Running 0 278d
mysql-0 1/1 Running 0 6s
[root@k8s-master01 example]# kubectl exec -it mysql-0 — bash
bash-5.1#
2.2、确保 mysql_exporter 用户存在**
使用 MySQL root 用户登录并检查 mysql_exporter 用户:
SELECT user, host FROM mysql.user WHERE user = 'mysql_exporter';
2.3、如果没有该用户,则创建:
CREATE USER 'mysql_exporter'@'%' IDENTIFIED BY 'your_password';
GRANT PROCESS, REPLICATION CLIENT, SELECT ON *.* TO 'mysql_exporter'@'%';
FLUSH PRIVILEGES;
实操:
CREATE USER 'mysql_exporter'@'%' IDENTIFIED BY 'mysql123!';
GRANT PROCESS, REPLICATION CLIENT, SELECT ON *.* TO 'mysql_exporter'@'%';
FLUSH PRIVILEGES;
![[IMG-5、k8s平台:mysql 监控案例-20250318102405307.png]]
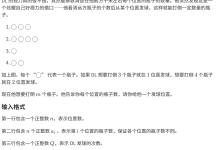
mysql> SELECT user, host FROM mysql.user WHERE user = 'mysql_exporter';
Empty set (0.00 sec)
mysql> CREATE USER 'mysql_exporter'@'%' IDENTIFIED BY 'mysql123!';
Query OK, 0 rows affected (0.01 sec)
mysql> GRANT PROCESS, REPLICATION CLIENT, SELECT ON *.* TO 'mysql_exporter'@'%';
Query OK, 0 rows affected (0.01 sec)
mysql> FLUSH PRIVILEGES;
Query OK, 0 rows affected (0.00 sec)
mysql> SELECT user, host FROM mysql.user WHERE user = 'mysql_exporter';
+—————-+——+
| user | host |
+—————-+——+
| mysql_exporter | % |
+—————-+——+
1 row in set (0.00 sec)
mysql>
⚠ 注意:确保 your_password 与 mysqld-exporter 配置的密码匹配。
4. MySQL Exporter 配置文件 (mysql-exporter-config.yaml)
apiVersion: v1
kind: ConfigMap
metadata:
name: mysql-exporter-config
data:
.my.cnf: |-
[client]
user = mysql_exporter
password = mysql123!
[client.servers]
user = mysql_exporter
password = mysql123!
5. MySQL Exporter 部署文件 (mysql-exporter-deployment.yaml)
apiVersion: apps/v1
kind: Deployment
metadata:
name: mysql-exporter
labels:
app: mysql-exporter
spec:
replicas: 1
selector:
matchLabels:
app: mysql-exporter
template:
metadata:
labels:
app: mysql-exporter
annotations:
prometheus.io/scrape: "true" # 允许 Prometheus 抓取
prometheus.io/port: "9104" # MySQL Exporter 暴露的端口
spec:
volumes:
– name: mysql-exporter-config
configMap:
name: mysql-exporter-config
items:
– key: .my.cnf
path: .my.cnf
containers:
– name: mysql-exporter
image: harbor.fq.com/prometheus/mysql-exporter:v0.16.0
command:
– mysqld_exporter
– –config.my-cnf=/etc/mysql-exporter/.my.cnf # 指定配置文件路径
securityContext:
runAsUser: 0 # 以 root 用户运行
ports:
– containerPort: 9104 # MySQL Exporter 默认端口
volumeMounts:
– name: mysql-exporter-config
mountPath: /etc/mysql-exporter/.my.cnf
subPath: .my.cnf
—
apiVersion: v1
kind: Service
metadata:
name: mysql-exporter-service
labels:
app: mysql-exporter
annotations:
prometheus.io/scrape: "true" # 允许 Prometheus 抓取
prometheus.io/port: "9104" # MySQL Exporter 暴露的端口
spec:
selector:
app: mysql-exporter
ports:
– protocol: TCP
port: 9104
targetPort: 9104
type: ClusterIP
6. Prometheus 自动发现配置 (prometheus.yml)
scrape_configs:
– job_name: 'mysql'
kubernetes_sd_configs:
– role: endpoints # 从 Kubernetes Endpoints 发现服务
relabel_configs:
# 只抓取带有 `prometheus.io/scrape: "true"` 注解的服务
– source_labels: [__meta_kubernetes_service_annotation_prometheus_io_scrape]
action: keep
regex: true
# 替换目标地址为服务的 IP 和指定端口(9104)
– source_labels: [__meta_kubernetes_endpoint_address_target_kind, __meta_kubernetes_endpoint_address_target_name]
action: keep
regex: Pod;(.*mysql-exporter.*) # 仅抓取名称包含 "mysql-exporter" 的 Pod
– source_labels: [__meta_kubernetes_pod_ip]
action: replace
target_label: __address__
replacement: $1:9104 # 指定 MySQL Exporter 的端口为 9104
# 添加 Kubernetes 服务的 app 标签
– source_labels: [__meta_kubernetes_service_label_app]
action: replace
target_label: app
# 添加 Kubernetes 命名空间标签
– source_labels: [__meta_kubernetes_namespace]
action: replace
target_label: namespace
# 添加 Kubernetes 服务名称标签
– source_labels: [__meta_kubernetes_service_name]
action: replace
target_label: service
# 添加 Kubernetes Pod 名称标签
– source_labels: [__meta_kubernetes_pod_name]
action: replace
target_label: pod
# 添加 Kubernetes 节点名称标签
– source_labels: [__meta_kubernetes_pod_node_name]
action: replace
target_label: node
# 添加实例标签(用于区分不同的 MySQL 实例)
– source_labels: [__meta_kubernetes_pod_ip]
action: replace
target_label: instance
7. 部署步骤
创建 ConfigMap:
kubectl apply -f mysql-exporter-config.yaml
部署 MySQL Exporter:
kubectl apply -f mysql-exporter-deployment.yaml
更新 Prometheus 配置文件(prometheus.yml),添加 MySQL 的自动发现配置。
重启 Prometheus 以加载新配置。
8. 验证
检查 mysql-exporter 容器日志:
kubectl logs <mysql-exporter-pod-name> -c mysql-exporter
- 确保没有错误日志。
检查 Pod 状态:
kubectl get pods
- 确保 mysql-exporter 容器处于 Running 状态。
访问 Prometheus Web UI(http://<prometheus-server>:9090),查看 Targets 页面,确认 MySQL 目标已被发现。 ![[IMG-5、k8s平台:mysql 监控案例-20250317170341907.png]]
9. 生产环境建议
- 高可用性:部署多个 MySQL Exporter 实例,并使用 Kubernetes 的 HorizontalPodAutoscaler 实现自动扩展。
- 监控告警:设置 MySQL 关键指标的告警规则(如连接数、慢查询等)。
- 资源限制:为 MySQL Exporter 设置资源限制(CPU 和内存)。
- 日志管理:收集 MySQL Exporter 的日志,便于排查问题。
10. 示例告警规则 (mysql-alerts.yml)
groups:
– name: mysql_alerts
rules:
– alert: MySQLDown
expr: mysql_up == 0
for: 1m
labels:
severity: critical
annotations:
summary: "MySQL is down"
description: "MySQL instance {{ $labels.instance }} is down."
– alert: HighMySQLConnections
expr: mysql_global_status_connections > 1000
for: 5m
labels:
severity: warning
annotations:
summary: "High number of MySQL connections"
description: "MySQL instance {{ $labels.instance }} has more than 1000 connections."
– alert: HighMySQLSlowQueries
expr: mysql_global_status_slow_queries > 10
for: 5m
labels:
severity: warning
annotations:
summary: "High number of slow queries on MySQL"
description: "MySQL instance {{ $labels.instance }} has more than 10 slow queries."


评论前必须登录!
注册