 网硕互联帮助中心
1. 项目核心功能 | Core Features of the Project
-
离线大模型推理 Supports running lightweight large models like DeepSeek R1 1.5B/7B, enabling text generation, code writing, and Q&A interactions.
-
支持运行DeepSeek R1 1.5B/7B等轻量化大模型,实现文本生成、代码编写与问答交互。
-
完全本地执行,无需网络连接,确保隐私保护。 Fully local execution with no internet requirement, ensuring privacy protection.
-
-
便携式硬件设计 Portable Hardware Design
-
树莓派5B + PiSugar 3 Plus电池,轻量化设计提供2-3小时续航。 Raspberry Pi 5B + PiSugar 3 Plus battery provides 2-3 hours of runtime with a lightweight design.
-
定制3D打印外壳,集成散热与电源管理。 Custom 3D-printed case integrates cooling and power management.
-
-
多模态交互接口 Multi-Modal Interaction Interface
-
Open WebUI:提供类ChatGPT的网页交互界面。 Open WebUI: Provides a ChatGPT-like web-based interface.
-
命令行接口:允许开发者直接调用API。 Command Line Interface: Allows developers to directly invoke APIs.
-
局域网共享:支持多用户通过浏览器访问。 Local Network Sharing: Enables multi-user access via a web browser.
-
2. 项目架构 | Project Architecture
[PiSugar 3 Plus Battery]
↓ Power Supply
[Raspberry Pi 5B]
├─ Ollama Service (DeepSeek R1 Model)
├─ Open WebUI (Frontend Interaction)
├─ Power Management Module (Battery Monitoring / Power Saving Strategy)
└─ Cooling Control (Temperature-Controlled Fan + Metal Case)
↓ Output
[User Device] → Browser/SSH/API Call
3. 硬件与软件配置 | Hardware and Software Configuration
树莓派5B性能配置 | Raspberry Pi 5B Performance
-
8GB内存:足以运行1.5B/7B参数模型(7B模型需约4-6GB内存)。 8GB RAM: Sufficient for running models with 1.5B/7B parameters (7B models require about 4-6GB of RAM).
-
CPU:Cortex-A76四核2.4GHz,较树莓派3B+/4B性能显著提升,推理速度更快。 CPU: Cortex-A76 quad-core 2.4GHz, significantly improved over Raspberry Pi 3B+/4B, enabling faster inference speeds.
-
32GB TF卡:确保合理分配存储空间。 32GB TF Card: Ensure proper storage space allocation.
PiSugar 3 Plus电池 | PiSugar 3 Plus Battery
-
5000mAh容量:在高负载LLM推理下可为树莓派5B供电2-3小时,低功耗模式下可达6-8小时。 5000mAh Capacity: Powers Raspberry Pi 5B for 2-3 hours under high-load LLM inference and 6-8 hours in low-power mode.
-
便携性:结合定制外壳,打造真正的“口袋AI服务器”。 Portability: Combined with a custom case, it creates a true "pocket-sized AI server."
系统镜像 | System Image
-
Raspberry Pi OS(64位) Raspberry Pi OS (64-bit)
4. 实现步骤 | Implementation Steps
步骤1:烧录系统镜像 | Step 1: Flash the System Image
准备工作 | Preparation
-
所需材料:读卡器、TF卡。 Required materials: Card reader, TF card.
-
下载烧录工具:访问树莓派Imager官网:https://www.raspberrypi.com/software/ 下载软件。 Download the flashing tool: Visit the Raspberry Pi Imager official site at https://www.raspberrypi.com/software/ to download the software.
烧录流程 | Flashing Process
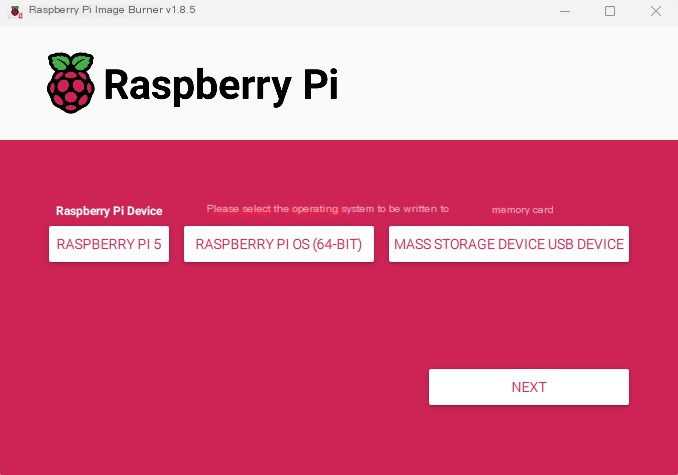
点击“CHOOSE DEVICE”并选择Raspberry Pi 5。 Click "CHOOSE DEVICE" and select Raspberry Pi 5.
点击“CHOOSE OS”并选择Raspberry Pi OS(64位)。 Click "CHOOSE OS" and select Raspberry Pi OS (64-bit).
将MicroSD卡插入读卡器并连接电脑,选择“CHOOSE STORAGE”。 Insert the microSD card into the card reader, connect it to your computer, and select "CHOOSE STORAGE".
5. 自定义系统设置 | Customize OS Settings
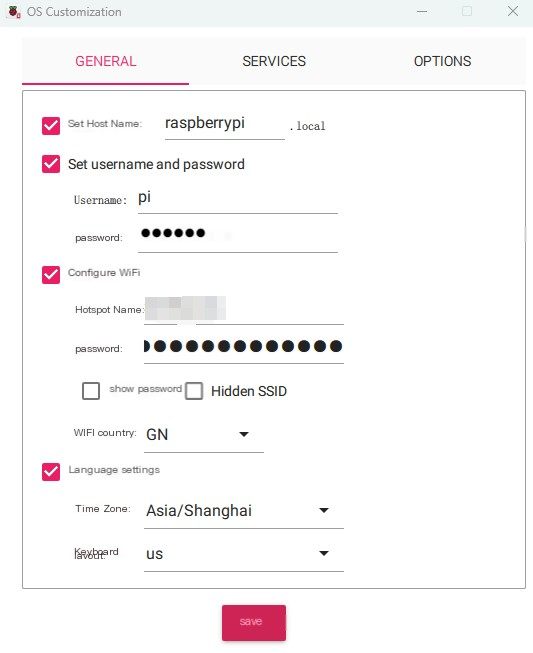
用户名与密码设置 | Username & Password
-
设置SSH登录的管理员凭据 Set administrator credentials for SSH login.
WiFi网络配置 | WiFi Credentials
-
确保树莓派接入正确网络 Ensure the Raspberry Pi connects to the correct network.
设备主机名定义 | Device Hostname
-
自定义设备在局域网的广播名称 Define the Pi's network broadcast name.
区域设置优化 | Region Settings
-
配置时区与键盘布局 Configure time zone and keyboard layout.
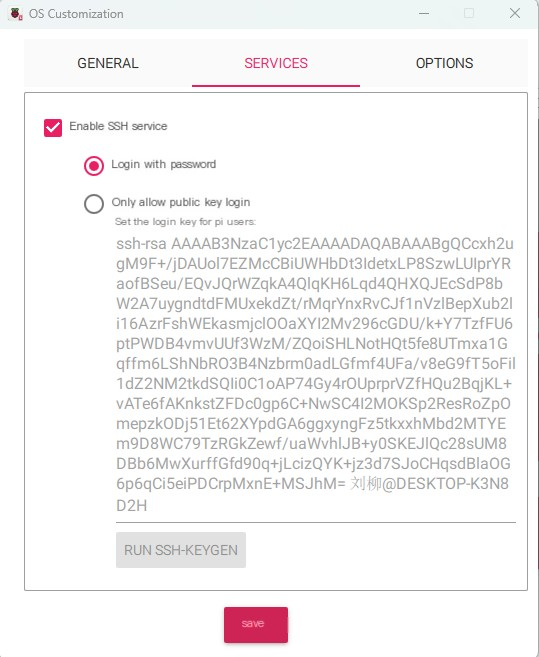
Enable Remote Access 启用远程访问:
Under "Services", enable SSH and select "Password Authentication".
在"Services"下方,启用SSH并选择"Password Authentication"。
保存设置并烧录 | Save Settings & Write Image
点击「保存」确认系统定制设置 Click "SAVE", then confirm OS customization settings.
点击「是」开始写入镜像至存储设备 Click "YES" to write the image to the storage device.
烧录完成后安全弹出SD卡,插入树莓派启动 Once flashing is complete, eject the SD card and insert it into the Raspberry Pi to boot.
Step 2: Connect Raspberry Pi via SSH
硬件组装与启动 | Hardware Assembly & Power On
-
组装组件:树莓派5B + PiSugar 3 Plus电池 + 散热风扇 + TF卡 After assembling the Raspberry Pi 5, PiSugar 3 Plus, cooling fan, and TF card, power on the device.
SSH连接操作 | SSH Connection Steps
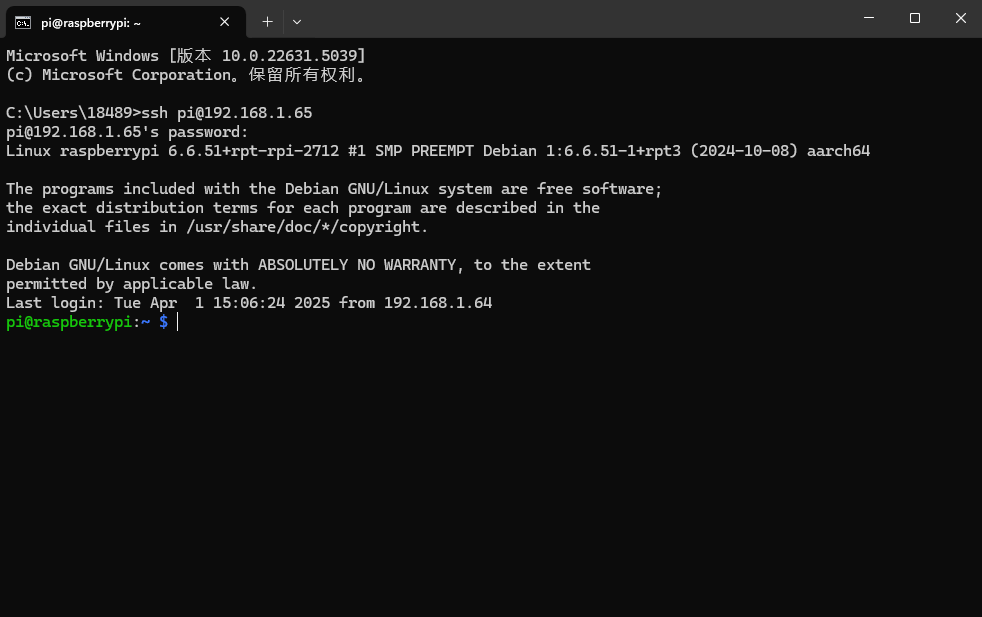
在主机打开命令提示符 On your host machine:
-
Windows:
-
按下 Win + R → 输入 cmd → 回车 Press Win + R, type cmd, and press Enter to open the command prompt.
-
-
macOS/Linux: 直接打开终端 Open Terminal directly
执行SSH连接命令 | Execute SSH connection command
ssh [用户名]@raspberrypi.local
# 示例(默认用户为pi):
# Example (default user is pi):
ssh pi@raspberrypi.local
步骤3:安装Ollama与模型下载 | Step 3: Install Ollama and Download the Model
Ollama简介 | About Ollama
-
核心功能:专为本地环境运行与定制大语言模型设计的工具,提供简洁高效的管理接口。 Ollama is a tool designed for running and customizing large language models in local environments. It provides a simple, efficient interface for managing models.
-
适用场景:开发者快速部署AI应用 / 终端用户本地隐私保护推理 Use Cases: Rapid AI deployment for developers / Privacy-preserving local inference for end users
安装流程 | Installation Process
1. 安装依赖项 | 1. Install dependencies
# 更新系统
sudo apt update && sudo apt upgrade -y
# 安装基础编译工具
sudo apt install -y build-essential curl
2. 一键安装Ollama(ARM64专用)| 2. One-click installation of Ollama (ARM64 only)
# 下载安装脚本
curl -fsSL https://ollama.com/install.sh | sudo sh
# 验证安装
ollama –version
# 预期输出:ollama version 0.1.xx
3. 配置系统服务 | 3. Configure system services |
# 启动Ollama服务
sudo systemctl enable ollama
sudo systemctl start ollama
# 检查服务状态
systemctl status ollama
# 正常应显示 active (running)
4.下载DeepSeek R1模型 | Launch the DeepSeek R1 Model
# 下载1.5B参数版本(适合8GB内存)
ollama pull deepseek-r1:1.5b
# 或下载7B参数版本(需确保swap空间充足)
ollama pull deepseek-r1:7b

步骤4:部署Open WebUI | Step 4: Deploy Open WebUI
项目目标 | Project Objectives
将树莓派变为小型AI聊天服务器,提供类ChatGPT的网页交互体验。 Turn your Raspberry Pi into a small AI chat server with a ChatGPT-like web interface.
1. 创建Python虚拟环境 | Set Up Python Virtual Environment
# 安装虚拟环境工具
sudo apt install python3.11-venv -y
# 创建项目目录并进入
mkdir ~/openwebui && cd ~/openwebui
# 创建虚拟环境
python3 -m venv venv
# 激活环境
source venv/bin/activate
# 提示符变为 (venv) 表示激活成功
2. 安装Open WebUI核心依赖 | Install Core Dependencies
# 确保在虚拟环境中操作
(venv) pip install –upgrade pip wheel setuptools
# 安装GPU加速支持(可选,需Vulkan兼容驱动)
(venv) sudo apt install libvulkan1 -y
(venv) pip install torch torchvision –extra-index-url https://download.pytorch.org/whl/arm64
# 安装Open WebUI
(venv) pip install open-webui –no-cache-dir
3. 配置服务参数 | Service Configuration
server:
host: 0.0.0.0 # 允许局域网访问
port: 8080 # 自定义端口
ollama:
base_url: http://localhost:11434 # 连接本地Ollama
auth:
enabled: true # 启用登录认证
4. 启动服务 | Start Service
(venv) nohup openwebui –config config.yml > webui.log 2>&1 &
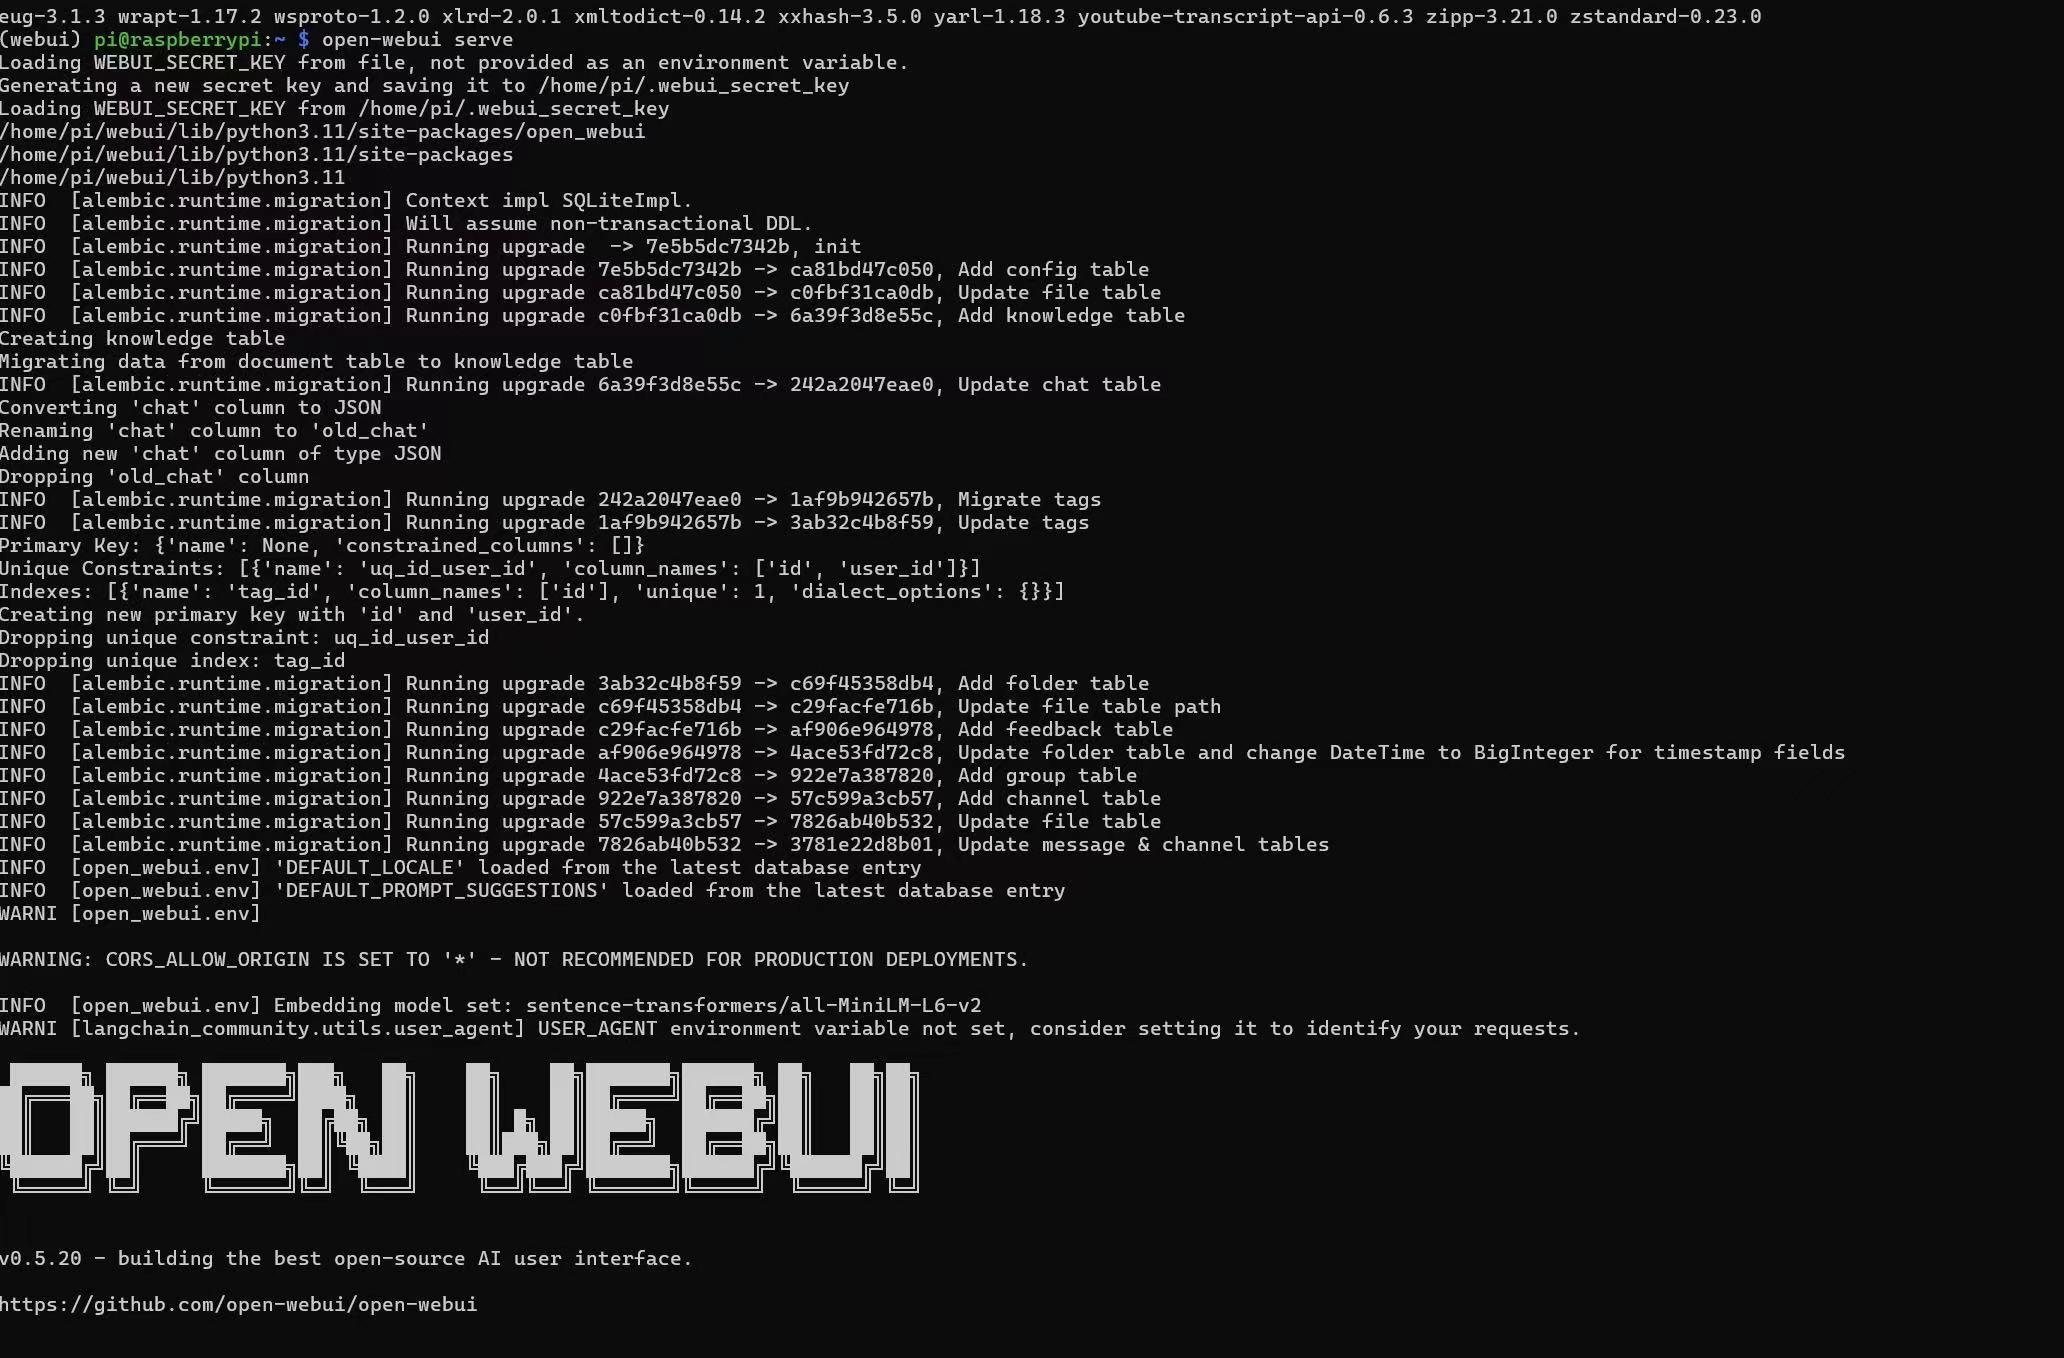
5. 访问验证 | Access Verification
本地访问: 浏览器打开 http://localhost:8080
局域网访问: 使用树莓派IP地址:http://[树莓派IP]:8080
Q&A | 常见问题解答
1. 无法通过主机名SSH连接 | Unable to SSH using Hostname
解决方案:
-
确认网络环境:确保树莓派与操作主机处于同一局域网。 Ensure the Raspberry Pi and host machine are on the same network.
-
检查SSH服务:烧录系统时需启用SSH(在boot分区创建空文件ssh)。 Make sure SSH is enabled during system flashing (create empty ssh file in boot partition).
-
使用PiSugar WiFi工具:
# 安装PiSugar网络配置工具
curl https://cdn.pisugar.com/PiSugar-wificonfig/script/install.sh | sudo bash
# 运行交互式配置
sudo pisugar-wificonfig
2. 加速Ollama模型下载(代理配置) | Speeding Up Ollama Model Downloads via Proxy
操作步骤:
获取主机IP(Windows示例):
ipconfig
# 查找"IPv4 Address"(如192.168.1.100)
开启代理软件(如Clash):
-
启用Allow LAN(允许局域网共享代理)| 1.Enable Allow LAN (allow LAN to share proxy)
-
确认代理端口(默认7890)| 2. Confirm the proxy port (default 7890)
树莓派代理配置: | Raspberry Pi proxy configuration:
# 临时生效(当前会话)
export http_proxy=http://主机IP:7890
export https_proxy=http://主机IP:7890
# 永久生效(写入环境变量)
echo "export http_proxy=http://主机IP:7890" >> ~/.bashrc
echo "export https_proxy=http://主机IP:7890" >> ~/.bashrc
source ~/.bashrc
3. 解决Open WebUI安装超时 | Resolving Open WebUI Installation Timeout
优化方案:
更换国内PyPI镜像源:| Change the domestic PyPI mirror source:
# 全局配置(推荐)
sudo nano /etc/pip.conf [global]
index-url = https://pypi.tuna.tsinghua.edu.cn/simple
timeout = 600 # 增加超时时间
清理缓存并重试:| Clear the cache and try again:
pip cache purge
pip install open-webui –no-cache-dir
分步安装依赖:| Install dependencies step by step:
# 先安装基础依赖
pip install fastapi uvicorn httpx
# 再安装完整包
pip install open-webui
最终成果 | Final Outcome
通过以上步骤,您已成功将树莓派5B改造为:
-
🚀 便携式AI服务器:PiSugar 3 Plus电池提供2-3小时离线推理能力
-
🔒 隐私安全:完全本地运行,无数据外传风险
-
🌐 多用户支持:通过Open WebUI实现局域网内多设备访问


评论前必须登录!
注册