 网硕互联帮助中心
文章目录
-
- 简介和安装
- 参数设置
- 运行
简介和安装
OptiCommPy作为一个专业库,和物理联系非常密切,从而模块众多,如果有一个GUI界面,可以加速对光纤通信的理解和认识。为此,捷克布尔诺理工大学的Martin Jurkovič硕士基于OptiCommPy写了个光纤通信仿真程序OpticalSimulation。
该项目的核心物理过程基于OptiCommPy,界面则基于customtikinter,如果没装,需要事先安装一下。考虑到这个软件编写于2024年5月,后续没再更新,而OptiCommPy又是个冷门库,更新比较任性,不怎么考虑兼容性,方便起见,这里新建一个conda环境,安装2023年的OptiCommPy0.7.0。
pip install OptiCommPy==0.7.0 -i https://pypi.tuna.tsinghua.edu.cn/simple
pip install customtkinter -i https://pypi.tuna.tsinghua.edu.cn/simple
然后克隆项目,运行就OK了。
git clone https://github.com/jurkovicmartin/OpticalSimulation
cd OpticalSimulation
python app.py
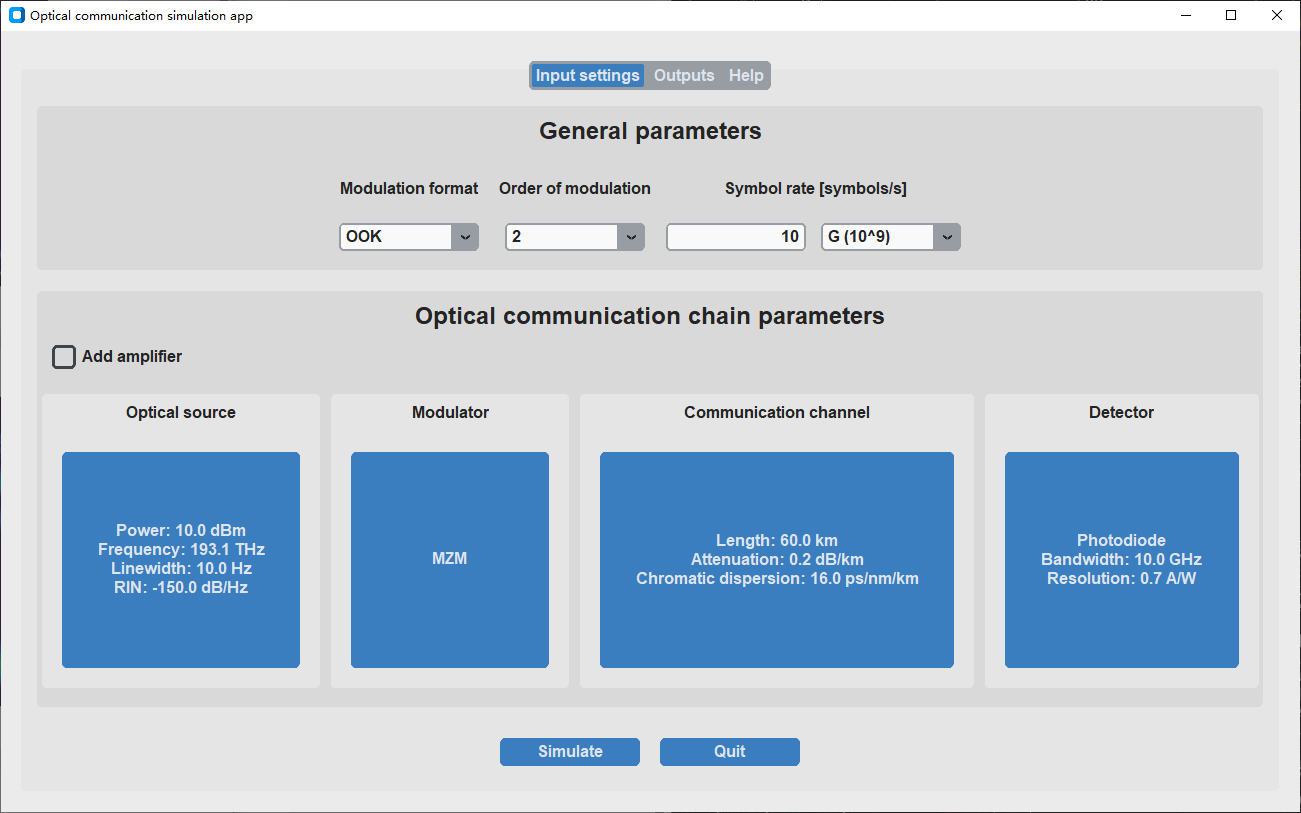
界面如下
参数设置
这个软件并没有提供默认设置,甚至代码中写了个参数检查功能,如果检测到参数和初始参数相同,会报错。下面按照截图中的参数逐个设置。
| General | Modulation format | – | OOK / PAM / PSK / QAM |
| General | Order of modulation | – | Depends on format |
| General | Symbol rate | symbols/s |
( 10 6 ) , G ( 10 9 ) \\text(10^6), G(10^9) (106),G(109) |
| Source | Power | dBm |
− 20 ⩽ x ⩽ 50 -20 \\leqslant x \\leqslant 50 −20⩽x⩽50 |
| Source | Central frequency | THz |
170 ⩽ x ⩽ 250 170 \\leqslant x \\leqslant 250 170⩽x⩽250 |
| Source | Linewidth | MHz / kHz / Hz |
1 Hz ⩽ x ⩽ 1 GHz 1 \\text{Hz} \\leqslant x \\leqslant 1 \\text{GHz} 1Hz⩽x⩽1GHz |
| Source | Relative intensity noise | dB/Hz |
− 250 ⩽ x ⩽ 0 -250 \\leqslant x \\leqslant 0 −250⩽x⩽0 |
| Modulator | Type | – | PM / MZM / IQM |
| Communication channel | Length | km |
0 < x ⩽ 1000 0 < x \\leqslant 1000 0<x⩽1000 |
| Communication channel | Attenuation | dB/km |
0 ⩽ x ⩽ 5 0 \\leqslant x \\leqslant 5 0⩽x⩽5 |
| Communication channel | Chromatic dispersion | ps/nm/km |
0 ⩽ x ⩽ 200 0 \\leqslant x \\leqslant 200 0⩽x⩽200 |
| Detector | Type | – | Photodiode / coherent |
| Detector | Bandwidth | GHz / MHz / kHz / Hz |
0 H z < x ⩽ 0 Hz < x \\leqslant 0Hz<x⩽ 取决于symbol rate |
| Detector | Responsivity | A/W |
0 < x ⩽ 10 0 < x \\leqslant 10 0<x⩽10 |
| Amplifier | Position in channel | – | start / middle / end |
| Amplifier | Gain | dB |
0 < x ⩽ 50 0 < x \\leqslant 50 0<x⩽50 |
| Amplifier | Noise figure | dB |
0 ⩽ x ⩽ 100 0 \\leqslant x \\leqslant 100 0⩽x⩽100 |
| Amplifier | Sensitivity | dBm |
− 50 ⩽ x ⩽ 100 -50 \\leqslant x \\leqslant 100 −50⩽x⩽100 |
运行
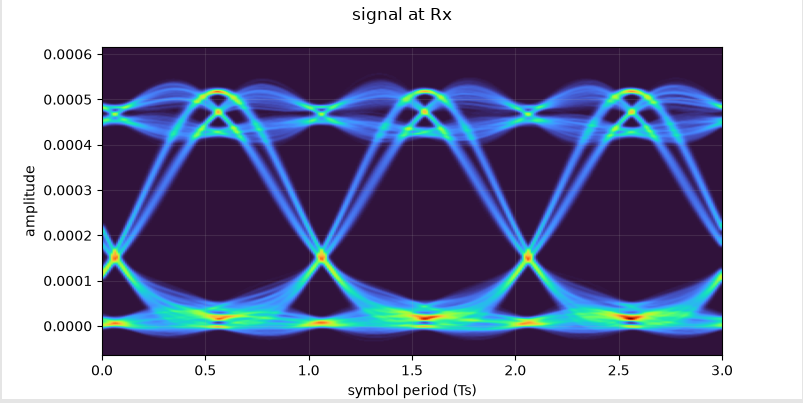
点击【Simulate】按钮,仿真就开始了。这个软件写的一般,没有使用多线程,界面会卡。卡完之后会弹出仿真完成,在Outputs中,可以查看仿真结果。其中比较好看的肯定是眼图,但



评论前必须登录!
注册